Categories
WORDPRESS

How to Create a Backup of Your WordPress Site Using cPanel

AceNewsDesk – If you have a WordPress website, you must back it up regularly in case of emergency. This way, you can restore a full copy of your site at a moment’s notice. One of the ways to back up a WordPress site is by using your host’s cPanel

@acenewsservices

Ace Press News From Cutting Room Floor: Published: Apr.03: 2024: Updated on March 29, 2024 – Jen Swisher TELEGRAM Ace Daily News Link https://t.me/+PuI36tlDsM7GpOJe

@acenewsservices
@acenewsservices

cPanel is a control panel that many hosting providers use as the central hub for managing your server and website. If you have a hosting plan, you probably have access to a cPanel account. You can use this interface to manage different aspects of your site and make complete copies of your content and database.

@acenewsservices

In this article, we’ll explain how cPanel backups work and how this method compares to other options. Then, we’ll guide you through the entire process of creating a WordPress cPanel backup and restoring it. Finally, we’ll discuss why you should consider an automated method instead, and answer some frequently asked questions. 

What is a cPanel Backup? Hi

You may be wondering: what exactly is a cPanel backup?  Well, a full WordPress backup includes two components. The first is a copy of the WordPress database and the second is a collection of all the files related to the website. The database contains post and page content, as well as user information and other critical elements. Meanwhile, the website files contain the rest of your site’s components, including WordPress core software, themes, plugins, and images.  Essentially, these elements don’t change. The difference is how you create your backup and what tools you use. cPanel tools enable you to access both of these essential elements and create copies of them separately. For database management within cPanel, you’ll most likely use phpMyAdmin. This enables you to export the entire database in your preferred format. With phpMyAdmin, you can also import files and overwrite the existing database. That’s precisely what you’ll need to do when restoring a backup. In terms of website files, you can use cPanel’s file manager to access the WordPress root directory. That’s the directory that contains all of your site’s files, including theme and plugin folders, the media gallery, and other components. The most important thing to know here is that a cPanel backup is created manually by copying the necessary elements (separately). On the other hand, automated backup alternatives tend to streamline this into one complete backup bundle (more on this later).

How do cPanel backups compare to other backup methods?

There are a lot of ways to create WordPress backups. Using cPanel is a popular approach, but before you commit to this method, it’s best to understand how it compares to the alternative options.

1. Ease of use

When it comes to creating WordPress backups, ease of use is crucial. This is especially true if you run a blog with comments enabled, an online store, or any other dynamic site that undergoes regular changes. In any of these scenarios, you’ll need to create frequent backups, so you don’t end up losing any valuable content. Unfortunately, creating a WordPress cPanel backup is a time-consuming process. That’s because it’s all done manually. You’ll have to download copies of the database and your site files, and restore them on your own as needed. If you’re familiar with how the process works, you may be able to create a WordPress cPanel backup relatively quickly. But, even if you’re a cPanel whiz, your server speeds and the size of your site might impact how long it takes to download the files you need. Other backup methods for WordPress tend to require a lot less human input. To give you an idea, there are WordPress backup plugins like Jetpack VaultPress Backup that can automate the entire process and upload copies of your site to the cloud.  Some web hosts (typically managed providers) also offer automatic daily backups. But you might not have control over what data these backups include. They’re also less secure than backups stored off-site. While creating a WordPress cPanel backup can take time, you’re also in full control over what files to include. For instance, if you want to exclude theme files from a backup, you’re free to do so. In any case, some premium backup tools give you equal, if not superior customization potential.

2. Frequency of backups

As mentioned earlier, you should aim to create regular backups of your site. If possible, you’ll want to do this every time there’s a change on your site. Since creating backups using cPanel is a manual process, that means you’d need to set time aside to do it. This is a lot less user-friendly than opting for a backup plugin, which can automate the process. You can access cPanel at any time and create backups as often as you need. But if you’re aiming for daily backups, you may need to consider an automated solution. With VaultPress, you get real-time backups, which means that every single change made to your site is saved instantly. There’s also storage to consider. If you’re manually backing up your site using cPanel, you’ll need to store multiple copies. You can do it on your local device or in the cloud, but you’ll need to figure out an organization system so you can easily find the backups you need.

3. Storage options

Expanding on the topic of storage — full-site backups can take up a lot of space. Moreover, if your storage solution fails, you can lose valuable backups and restore points for your website. cPanel backups need to be stored manually, which means you’re free to decide whether to use a local device, a cloud solution, or both. Typically, it’s recommended to store backups in multiple locations to create redundancy and avoid single points of failure.  All of that is possible using cPanel, but it means additional time spent figuring out storage options and what to do with each backup.  Other solutions, like VaultPress, automatically store backups in the cloud. This means you won’t lose access to backups, which are stored safely in a remote, off-site location. Storage space depends on your VaultPress plan, but you get more than enough for a large number of backups.

4. Restoration process

At the end of the day, you’re creating WordPress backups with the expectation that you’ll be able to use them to restore your site to its previous state if necessary. So, let’s consider the restoration process for a WordPress cPanel backup. To put it simply, cPanel enables you to restore your site by overwriting the database using phpMyAdmin and doing the same with site files using the file manager. This can be a tricky process and lead to potential errors. For example, you may have new files in the root directory that were created after a backup. If you upload a copy of your site, it’ll only override files with the same name, but not new ones. That means you can end up with a mix of old and new files. If you’re looking for a straightforward restoration process, consider using a plugin solution. Most of the best backup plugins on WordPress, including VaultPress, offer one-click restores. That means you can select a backup from a list and click on a button to restore it. The plugin takes care of the entire process, and you only need to wait until the restoration is complete before you continue using the site.

5. Convenience

Convenience is a mix of all the other factors we’ve analyzed so far. It measures how efficient a backup method is compared to other options. cPanel has several advantages going for it. If you have access to a cPanel account, that means you can create WordPress site backups for free. You can also decide whether to create full or partial backups, as you’re in control over what database elements to export and what files to include. Moreover, cPanel enables you to create backups on demand, and you’re only limited in terms of storage capacity. The main downside of using cPanel for creating backups is that you can’t automate the process, and it requires manual input. Plus, it’s relatively common to run into errors while restoring backups using cPanel. Other backup methods are typically a lot more convenient, especially for beginners. If your web host offers automatic backups, you can rely on them to some extent. Still, using a backup plugin tends to be the best option for most users. With VaultPress, you get automatic backups and off-site storage as part of the same solution. As we mentioned, the plugin creates backups in real time, saving every single change that you make to your site.

How to back up your WordPress files and database using cPanel

@acenewsservices

Now we’re going to show you how to back up your WordPress files and database using cPanel. 

1. Log in to cPanel

To get started, you’ll need to access your cPanel dashboard. You’ll do this from your web hosting account. So, you’ll need to log in there first.
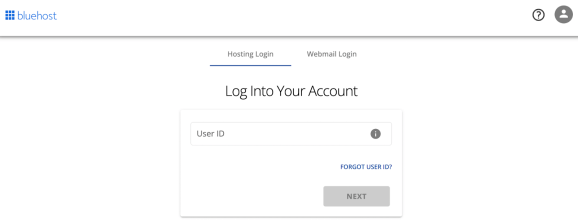
To get started, you’ll need to access your cPanel dashboard. You’ll do this from your web hosting account. So, you’ll need to log in there first.
@acenewsservices

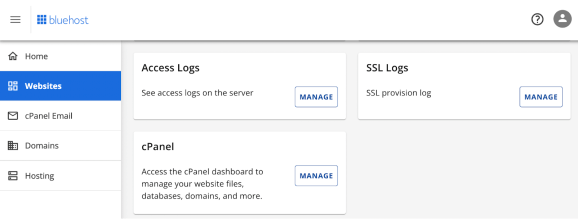
Once you’re logged in, look for the cPanel. This should be somewhere in your settings. If you’re using Bluehost, go to Advanced, then scroll down to the bottom of the page to the cPanel section and click on Manage.

If you’re using Bluehost, go to Advanced, then scroll down to the bottom of the page to the cPanel section and click on Manage.
@acenewsservices

This will open your cPanel dashboard.
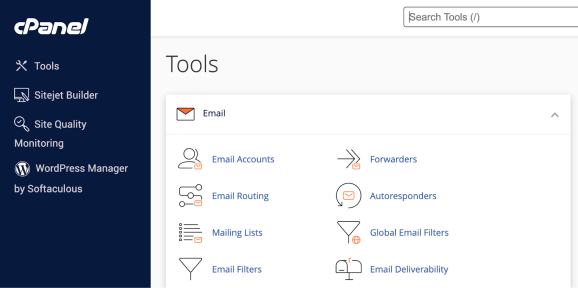
This will open your cPanel dashboard. Once you’re in, you can get to work.
@acenewsservices

Once you’re in, you can get to work.

2. Access phpMyAdmin and identify your site’s database

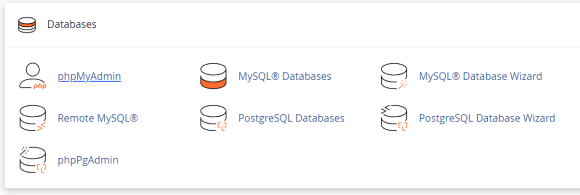
The next step is to access phpMyAdmin and identify your site’s database. Simply scroll down in your cPanel dashboard until you find the Databases section. When you locate it, click on phpMyAdmin.

Simply scroll down in your cPanel dashboard until you find the Databases section. When you locate it, click on phpMyAdmin.
@acenewsservices

When phpMyAdmin opens, you’ll see a list of existing databases on the left side of the screen. If you’re hosting multiple sites, there’ll be several options to choose from.
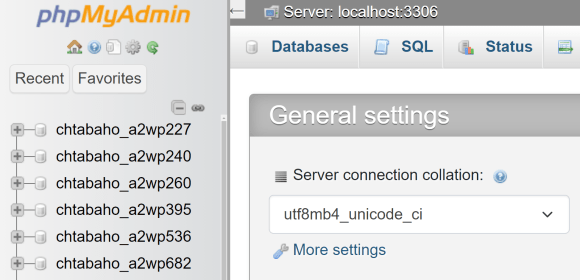
When phpMyAdmin opens, you’ll see a list of existing databases on the left side of the screen. If you’re hosting multiple sites, there’ll be several options to choose from.
@acenewsservices

You’ll need to identify the database based on its name and prefix. If there’s only one option, go ahead and click on it. This will prompt phpMyAdmin to display that database’s tables.
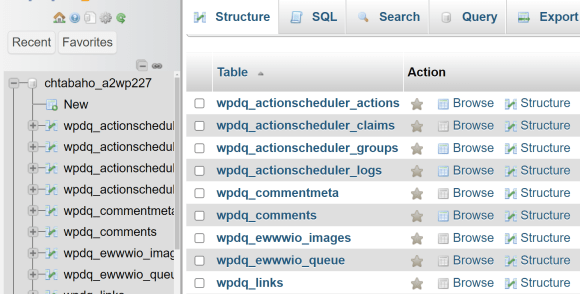
You’ll need to identify the database based on its name and prefix. If there’s only one option, go ahead and click on it.
@acenewsservices

If you’ve made it this far, you’re ready for the next step, where you’ll create the first part of your WordPress cPanel backup.

3. Export the WordPress database

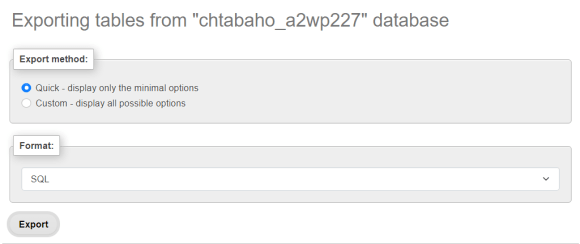
Once you’ve located the right database, click on the Export button in the menu at the top of the screen. This will load a new page where you can choose an export method. The Quick method will export every table in the database, which is what you need for a full site backup.

The Quick method will export every table in the database, which is what you need for a full site backup.
@acenewsservices

Alternatively, you can choose Custom if you want to exclude certain tables. Make sure to select SQL for your format. Then, click on Export at the bottom of the page. This will initiate the download of a .sql file. Note where it’s stored, since you’ll want to bundle it with the rest of your site’s files to have a full backup. 

4. Access the File Manager and locate the root director

Now, let’s move on to backing up your website files. 

For this next step, return to the cPanel dashboard. Go to Files → File Manager:
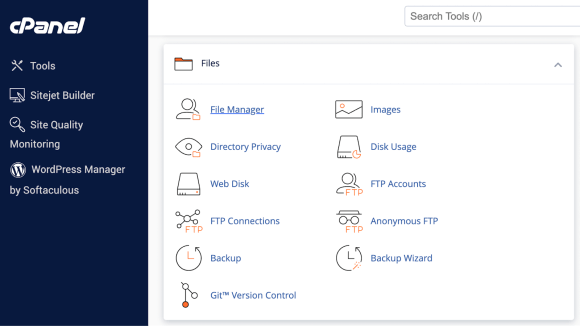
For this next step, return to the cPanel dashboard. Go to Files → File Manager
@acenewsservices

This will open a basic web-based file manager that includes all the features you need to download and upload site files.
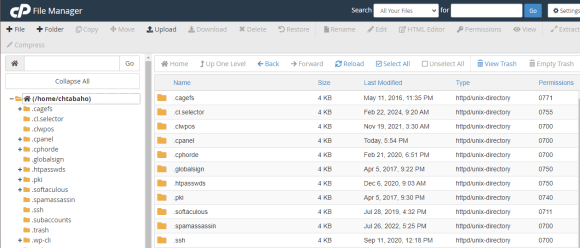
This will open a basic web-based file manager that includes all the features you need to download and upload site files.
@acenewsservices

You may see a lot of folders here, but we’re focused on the root directory. That’s the folder that contains all of your WordPress files. Typically, it’s named either wwwpublic_html, or after the website itself. Locate the root directory and open it. If you want to confirm you’re dealing with the root folder, you’ll see several recognizable WordPress files and folders inside, including wp-adminwp-content, and wp-includes.

Locate the root directory and open it. If you want to confirm you’re dealing with the root folder, you’ll see several recognizable WordPress files and folders inside.
@acenewsservices

Now, select the entire root directory, right-click on it, and choose the Compress option. The file manager will confirm what type of compressed file you want to create and where to store it on the server.

Now, select the entire root directory, right-click on it, and choose the Compress option.
@acenewsservices

Wait for the compression process to complete. When it’s ready, you’ll see a zipped file that contains the entire root directory. Right-click on it and select the Download option. Once the file finishes downloading, you have the two components you need for a WordPress cPanel backup. It’s advisable to store both the database .sql file and the root directory zipped file in the same folder, so you don’t mix them up with other backups.

How to restore a WordPress cPanel backup

@acenewsservices

Now that you know how to back up a WordPress site from cPanel, it’s time to learn how to restore backups

1. Import the database files using phpMyAdmin

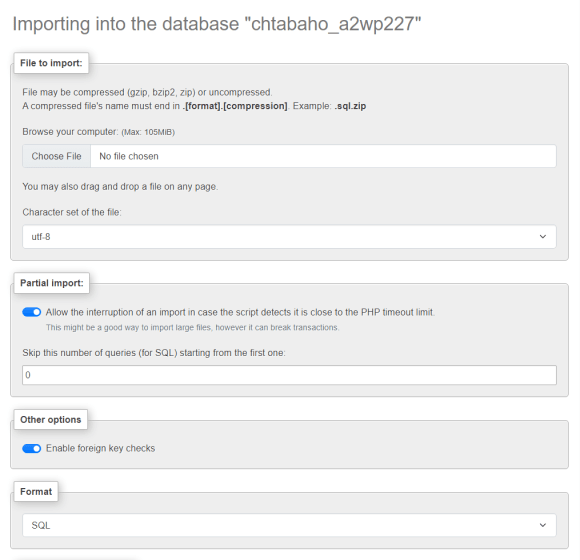
First, you’ll restore the WordPress database files. Note that this will overwrite existing content on your website and restore it to the state of the database file you’re importing. To do this, go to phpMyAdmin in the cPanel dashboard, select the database you want to overwrite, and click on the Import button in the menu at the top of the screen.

To do this, go to phpMyAdmin in the cPanel dashboard, select the database you want to overwrite, and click on the Import button in the menu at the top of the screen.
@acenewsservices

The Import page will ask you to select what file to upload, its format, and the character set. Since you’re uploading a SQL file, and you didn’t make any configuration changes during the export process, you don’t need to change any of the settings here. Simply select the SQL file from your local device and click on Import at the bottom of the screen. The amount of time this process takes will depend on the size of the database. When it’s done, phpMyAdmin will display a success message.

2. Upload the WordPress root directory

Restoring the WordPress root directory is a bit more complicated. Since the directory can have new files created after you made the backup, it’s safest to replace the entire thing. To do this, go to the cPanel dashboard and open the File Manager. Locate the root directory once more and make a note of where it is. Now, we’re going to upload the zipped backup file you created earlier. Select the Upload option at the top of your screen. Make sure you are outside of the existing root directory. This will load a new page where you can select which file to upload. Locate the zipped backup file that includes the copy of your WordPress files.
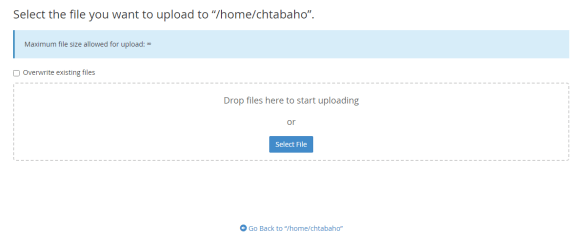
This will load a new page where you can select which file to upload. Locate the zipped backup file that includes the copy of your WordPress files.
@acenewsservices

Uploading this file might take a while depending on its size and the speed of your server. Once the file is available, there are two ways you can go about replacing the existing root directory:

  • Option one: Delete the existing root directory, then uncompress the backup file to use it. You’ll have a new root directory containing the old site files.
  • Option two: Uncompress the backup file and rename the compressed root directory to something else. You’ll want to be sure you can distinguish between these two similar directories. Then, rename the one you’re replacing (to something different) and set the name of the new backup directory to that of the original. After that, you can feel free to delete the other copy.

With both approaches, there might be a few minutes where your WordPress site won’t have a root directory. That means it won’t load or work, but this shouldn’t last for long if the backup directory has the correct name. In either case, you’ll need to right-click on the zipped backup file within the file manager and select the Extract option.

In either case, you’ll need to right-click on the zipped backup file within the file manager and select the Extract option.
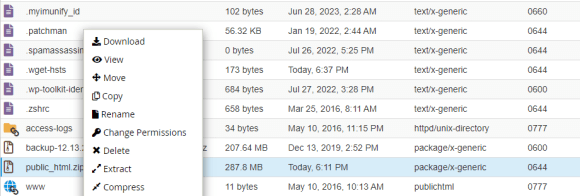
The file manager will ask where you want to extract the files. It’ll make your job easier to extract them at the same level as the root directory you want to replace. When this process is done, the backup is complete. You’ve restored both the WordPress site files and database. If you access the website, it should have reverted to a previous version of itself. The best real‑time WordPress backup plugin. Save every change and get back online quickly with one‑click restores from VaultPress Backup.Get VaultPress Backup

How to automate WordPress backups with Jetpack VaultPress backup

Now that you know how to create a WordPress cPanel backup, you’re better equipped to decide what kind of backup solution you want to use. If you’re interested in a more hands-off solution, you might consider using VaultPress Backup.

What is Jetpack VaultPress Backup?

Jetpack VaultPress Backup is a plugin that’s part of the Jetpack suite of tools. You can use VaultPress Backup alongside other Jetpack plugins. VaultPress Backup offers completely automated, real-time backups and ultra-secure offsite storage. The plugin creates backups every time you make changes to your site.
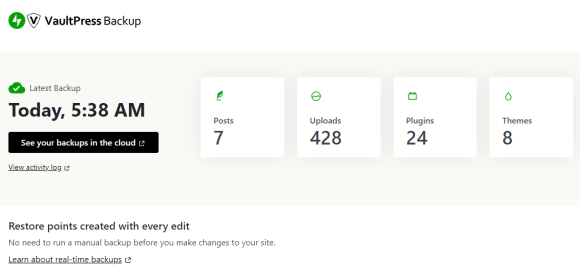
VaultPress Backup offers completely automated, real-time backups and ultra-secure offsite storage. The plugin creates backups every time you make changes to your site.

That means, not even the smallest changes to your site will slip through the cracks. At any time, you can check out available VaultPress Backups by going into the Jetpack → VaultPress Backup tab in the WordPress dashboard. Click on See your backups in the cloud, and you’ll be able to see a list of existing copies of your site. All of this happens automatically, without any manual work on your end. When you want to restore a backup, you can select an option from the list and VaultPress Backup will revert your site to that state.
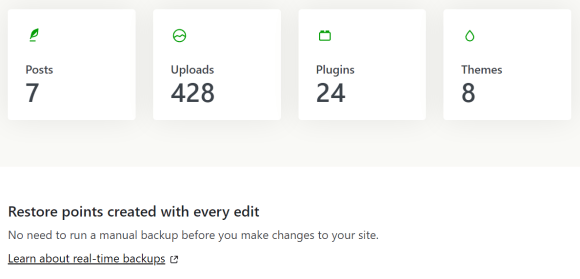
Jetpack VaultPress Backup works automatically once it’s installed. You don’t need to configure the plugin to create backups.

Comparing cPanel Backups to Jetpack VaultPress Backup

Jetpack VaultPress Backup has the edge over cPanel backups in nearly every aspect. For one, the plugin entirely automates the process. That means you don’t even need to access cPanel or create copies of the database and WordPress root directory manually. With VaultPress Backup, the entire process is hands-off. Backups occur automatically, and you don’t need to worry about them until it’s time to restore one. Additionally, if you run a WooCommerce store, VaultPress will also back up your ecommerce data. That includes products, orders, customer history, and more. VaultPress Backup enables you to restore backups with a single click. On the other hand, with cPanel, you’ll have to import the database using phpMyAdmin and then re-upload the root directory using the web-based file manager, which can be time-consuming and risky.

How to back up your site with Jetpack VaultPress Backup

Jetpack VaultPress Backup works automatically once it’s installed. You don’t need to configure the plugin to create backups. It does this instantly every time you make a change to your site. This means you don’t need to worry about creating backups before making significant changes to your website. That’s usually a good practice to follow before updating your site, but it becomes unnecessary if you’re using VaultPress Backup. You can check the list of available copies of your site in the cloud at any time. Plus, you can restore any of these backups instantly.

Frequently asked questions

If you still have any questions left about WordPress cPanel backups, or backups in general, this section will hopefully answer them.

What is cPanel, and how do I access it?

cPanel is a hosting control panel. It enables you to manage your website and your server. Many hosting providers offer access to this software in their plans.

How often should I back up my WordPress site?

Ideally, you’ll want to create backups any time there’s a change. So, if it gets regular updates, you’ll need to back up the site daily (if not more). This is why automated, real-time backup solutions are the best way to go.

Is it possible to back up only specific files or folders using cPanel?

cPanel gives you full control over the site backups you create. You can use the file manager tool to select what files and folders inside the WordPress root directory to include in a backup and which to leave out. 

Can I store my backups in a remote location or cloud storage using cPanel?

If you create backups using cPanel, you’ll need to download them to a local device. Once you have the backup files, you’re free to save them using a cloud storage solution or in a remote location of your choice. 

How can I ensure the integrity of my backup files?

It’s relatively uncommon to encounter integrity issues with backup files created using cPanel. These issues can pop up if you lose the connection to the server while downloading the backup files. The only way to check for integrity issues is to try restoring the backups to see if they work. This is one of the many reasons why it’s important to have multiple site backups at any time.

How long does it take to create a backup using cPanel?

This will depend on the size of your website and the server speed. Typically, it takes longer to back up WordPress site files, compress, and download them than creating a copy of the database.

Is there a faster way to back up my WordPress site?

If creating manual backups takes too much time for your schedule, you might prefer an automated backup solution. VaultPress Backup creates real-time backups of your website and stores them in a secure, remote location.

How does VaultPress Backup compare to cPanel backups?

VaultPress Backup is a premium backup solution. It enables you to automate the entire backup process as opposed to creating backups manually. This type of solution can save you a lot of valuable time, particularly if you run an ecommerce site.

Does Jetpack VaultPress Backup provide any additional security features for my WordPress site?

Jetpack VaultPress Backup is available as part of the Jetpack Securityplan or through its own plugin with a plan that covers backups only. The Security suite also includes tools for protecting your site against spam, an activity log for tracking actions taken on your site, a website firewall, and real-time malware scanning among other security features.

How do I get started with VaultPress Backup?

You can get started with VaultPress Backup by purchasing a license for the product. Note that signing up for the full Jetpack Security suite only costs a bit more than a standalone VaultPress Backup license. 

VaultPress Backup: The best real‑time backup plugin for WordPress

@acenewsservices

If you use shared hosting, you probably have access to a cPanel account. This enables you to interact with your server, as well as its databases and files. You can use cPanel to create backups of your WordPress website and restore them.  This process is relatively simple, but it’s entirely manual, and it can take a while depending on the size of your site. You’ll need to export your website’s database via phpMyAdmin, then download a copy of your rootdirectory through the file manager. Therefore, it can make more sense to use a backup plugin. VaultPress Backup creates copies of your WordPress site in real-time. So, every time you make a change to your website, the plugin will save it to the cloud. You can then restore backups with a single click!

@acenewsservices

At Sterling Publishing & Media Service Agency, we value transparency and accountability. We want to inform you that we are not responsible for any external content, links, or posts. Nonetheless, we are dedicated to providing exceptional services and sincerely appreciate your support. Thank you.

@acenewsservices
@acenewsservices
Categories
PEACE & TRUTH WORDPRESS

Rabbi K Marshall ~

You’re writing your autobiography. What’s your opening sentence?

The phrase “Don’t judge a book by its cover” is a well-known adage that urges us to avoid assessing people based solely on their appearance. It’s critical to take a moment to empathize with others and try to understand what they might be going through before forming an opinion about them. Each person has their own unique story, and it’s impossible to fully comprehend what someone is experiencing until we’ve walked in their shoes. It’s essential to cultivate compassion and understanding towards others, particularly during challenging times. By treating one another with kindness and encouragement, we can foster a more positive and inclusive atmosphere. Let’s keep in mind that everyone faces their own difficulties, and a little bit of empathy can go a long way in brightening someone’s day. Therefore, let’s be more scrupulous in our approach to others and take the time to understand their circumstances before making any judgments.

Chapter 1

Some of us never make an autobiography about themselves as they never made it .

Some people are struggling to wish away moments lost

When someone become famous for something, it often leads to them becoming even more well-known as a result. One way this happens is through the creation of biographical works, such as books. However, it is not uncommon for famous individuals to have ghostwriters come along and create these books for them. These ghostwriters are skilled at creating polished and compelling narratives that make the subject of the book seem like a hero. The end result is often a glossy paperback that can be found for sale on websites such as Amazon.

Yeah ☺️ that’s how to write your autobiography

And so I’m a man who is nothing important, no money 💰 who’s out there going to make me a hero.

Chapter 2.

Oh yes I have girls nothing happened with that chapter either

Chapter 3.

That’s so cool! You rescued a frog yesterday? Tell me more! I love hearing about acts of kindness towards animals.

Chapter 4.

Not going to work . He died in my coffee cup

Chapter 5.

That’s all folks 😂 I am nobody yet

Mr Trump ☺️🐸
Categories
WORDPRESS

WORDPRESS JETPACK 13.1 – UPDATE REPORT: New Engagement Blocks to Customise

@acenewsservices

AceNewsDesk – With our most recent update, we’ve made it easier for you to customize and interact with your website. We’ve transformed some familiar features into user-friendly blocks, and we’ve also addressed minor bugs and improved performance.

Ace Press News From Cutting Room Floor: Published: Feb.09: 2024: Updated on February 6, 2024 – Sami Falah: TELEGRAM Ace Daily News Link https://t.me/+PuI36tlDsM7GpOJe

A new release from Jetpack
@acenewsservices

Here are the highlights:

  • Introducing new Blocks for engagement: The well-loved Likesand Sharing Buttons settings are now available as standalone Jetpack Blocks, offering you the flexibility to incorporate these tools across your site using the Block Editor. This transformation simplifies adding interactive and social elements to your posts, pages, or custom layouts, making it easier than ever to engage with your audience and extend your content’s reach. Designed to integrate smoothly with block-based themes, these blocks ensure a seamless user experience, enhancing your site’s interactivity and social connectivity in a few simple clicks.
  • Performance improvements: This release also includes several bug fixes and performance enhancements to improve your Jetpack experience. For more details, please check the changelog.

Put your site in your pocket

The Jetpack mobile app gives you everything you need to create, design, manage, and grow your WordPress website. Here are some cool things you can do from your phone with the Jetpack app:

  • Write, edit, upload, and publish content even when you’re away from your desk.
  • Get updates when your favorite site publishes a new post, when someone comments on your post, or when you get a new subscriber.
  • Watch your traffic grow with industry-leading stats and helpful insights. Learn more about your visitors and their habits.
  • Easily share your website content on all your social media channels from one place. Auto-publish on Facebook, LinkedIn, and Tumblr.
  • Comment, like, or save a post to read it later.

Visit jetpack.com/app or scan this code with your mobile device to download the Jetpack mobile app :

@acenewsservices

A big thank you to everyone who contributed to this release:

This entry was posted in Releases and tagged release. Bookmark the permalink.


@acenewsservices
Editor says Sterling Publishing & Media Service Agency is not responsible for the content of external sites or any reports, posts, or links. Thanks for following, as always; I appreciate every like, reblog, retweet, and comment. Thank you

@acenewsservices
@acenewsservices
Categories
WORDPRESS

FEATURED WORDPRESS JETPACK 13.0 REPORT: AI Assistant experience improvements and more

@acenewsservices

AceNewsDesk – This month, we’re shipping several small AI Assistant experience improvements and bug fixes to make Jetpack work even better for you and your website.

Ace Press News From Cutting Room Floor: Published: Jan.15: 2024: Updated on January 11, 2024 – Kuba Birecki – TELEGRAM Ace Daily News Link https://t.me/+PuI36tlDsM7GpOJe

@acenewsservices

Here are the highlights:

  • When content is larger than the viewport, the AI Assistant block will remain floating at the bottom of the viewport.
  • Some of the interaction elements in the AI Assistant block have been improved.
  • This release also includes other minor bug fixes and improvements — check the changelog for more.

To use the latest version of Jetpack on your site, update your existing installation or install Jetpack.

@acenewsservices

Put your site in your pocket

The Jetpack mobile app gives you everything you need to create, design, manage, and grow your WordPress website. Here are some cool things you can do from your phone with the Jetpack app:

  • Write, edit, upload, and publish content even when you’re away from your desk.
  • Get updates when your favorite site publishes a new post, when someone comments on your post, or when you get a new subscriber.
  • Watch your traffic grow with industry-leading stats and helpful insights. Learn more about your visitors and their habits.
  • Easily share your website content on all your social media channels from one place. Auto-publish on Facebook, LinkedIn, and Tumblr.
  • Comment, like, or save a post to read it later.

Visit jetpack.com/app or scan this code with your mobile device to download the Jetpack mobile app :

@acenewsservices

A big thank you to everyone who contributed to this release:

@acenewsservices
Adnan Haque, Andrei Demian, Andrii Lysenko, Andrés Blanco, Anthony Grullon, Aurorum, Boro Sitnikovski, Brad Jorsch, Brandon Kraft, Brent Nef, Bryan Elliott, Carlos Garcia, Caroline Moore, Chris Jean, Chris McCluskey, Christian Gastrell, Christopher Smith, Damián Suárez, Daniel Bachhuber, Daniel Ihenetu, Derek Smart, Dion Hulse, Dognose, Donncha Ó Caoimh, Douglas Henri, Dylan Munson, Enej Bajgoric, Erick Danzer, Eru Penkman, Esteban Cairol, Filipe Varela, Foteini Giannaropoulou, Gabriel Demichelis, Gergely Márk Juhász, Griffith Chen, Heyde Moura, Ian Ramos, Igor Zinovyev, Imran Hossain, Ivan Ottinger, JPark, Jasper Kang, Jeremy Herve, Jeroen P, Joseph Scott, Juan Lucha, Juanma Rodriguez Escriche, Karen Attfield, Kev, Kosta, Kristian Vitozev, Kuba Birecki, Linas Valiukas, Luiz Kowalski, MILLER/F, Manzoor Wani, Marcelo Serpa, Marin Atanasov, Matthew Reishus, Michael Kelly, Miguel Lezama, Miguel San Segundo, Mikael Korpela, Mike Stott, Nate Weller, Nauris Pūķis, Osk, Panos Kountanis, Paulo Cruz, Peter Petrov, Pieterjan Deneys, Piotr Stankowski, Renan Carvalho, Robert Sreberski, Samiff, Sergey Mitroshin, Siobhan Bamber, Steve D, Thomas Roberts, Tim Broddin, VassilisDimitrakis, Wojtek Naruniec, Yan Sern, Yashwin Poojary, arthur791004, bindlegirl, daledupreez, dkmyta, gogdzl, jboland88, okmttdhr, tada, tbradsha, thingalon, valterlorran

This entry was posted in Releases. Bookmark the permalink.


@acenewsservices

Editor says Sterling Publishing & Media Service Agency is not responsible for the content of external sites or from any reports, posts or links, and thanks for following as always. I appreciate every like, reblog, retweet and comment. Thank you

@acenewsservices
@acenewsservices
@acenewsservices
@acenewsservices
Categories
WORDPRESS

FEATURED WORDPRESS JETPACK REPORT: How to Automate Content Creation: A Step-by-Step Guide

@acenewsservices

AceNewsDesk – The key to staying relevant is not just consistent content creation, but ensuring it engages and adds value to your audience. This presents a dual challenge: maintaining a steady flow of quality content while managing time and resources effectively. This is where content automation can help — a dynamic solution that’s transforming the landscape of content generation.

@acenewsservices

Ace Press News From Cutting Room Floor: Published: Jan.15: 2024: Updated on January 12, 2024 – Rob Pugh – TELEGRAM Ace Daily News Link https://t.me/+PuI36tlDsM7GpOJe

@acenewsservices
Content automation leverages technology to streamline the process, freeing creators from the grind of repetitive tasks and allowing them to focus on strategy and creativity. This method is not about replacing the human touch. Instead, it’s about enhancing it with efficiency and precision.
@acenewsservices

With the right tools and an understanding of how to effectively integrate them, businesses and individuals can automate aspects of their content strategy without compromising quality. 

Among these tools is Jetpack AI Assistant, a versatile application designed for WordPress sites, poised to revolutionize how we approach content automation. It promises to be an invaluable ally in crafting content that resonates with audiences and achieves strategic goals.

Understanding automation in content creation

@acenewsservices
Before you can harness its power, you have to understand the full depth of content creation automation tools. 

What is automated content creation?

Automated content creation is the process of using software to generate content with minimal human intervention. This technology relies on algorithms and artificial intelligence (AI) to produce written, visual, or audio content.

It’s a step beyond simple templates or content management systems. Automated content creation tools understand context and language nuances, and can even align with a brand’s voice. As a result, they can create comprehensive blog posts, social media updates, and other forms of content that previously required a human throughout the entire process.

The benefits of automating content creation

The benefits of automating content creation are multifaceted. Primarily, it can significantly save time by taking over routine and repetitive tasks, allowing creators to devote more efforts towards strategic and creative endeavors.

Additionally, automation can increase content output without a proportional increase in resources, resulting in greater productivity. It also brings consistency to content, providing steady engagement with audiences and ensuring a uniform brand voice across all channels. Automation can assist in scaling content strategies, handling everything from data analysis to personalizing content for different audience segments.

Differentiating automation from autonomy

It’s crucial to distinguish between automation and autonomy in content creation. Automation involves using tools to create content based on input and rules set by humans. 

In contrast, autonomy implies a system that operates independently, making decisions without human guidance. Current automated content creation tools do not function autonomously — they require human oversight to ensure relevance, quality, and alignment with strategic goals.

Potential challenges and misconceptions

Challenges in content automation include the risk of creating generic or irrelevant content if the tools are not properly guided. There’s also the potential for a loss of personal touch, which can be a differentiator for brands.

Furthermore, since AI technology simply restates existing knowledge, the content it produces cannot introduce new thought leadership ideas. Content that’s truly unique, written by a human, will actually increase in value as it stands alone among a sea of restated ideas. This is why content should not be fully automated if you’re looking for long-term brand development. 

Misconceptions about content automation often involve fears that it will lead to a decrease in content quality or replace human creativity. However, when used correctly, automation serves to augment human talent, not replace it. It enables content creators to leverage their skills more effectively by removing the burden of menial, time-consuming tasks.

The technology behind AI‑driven content creation

Spotlight on Jetpack AI Assistant for WordPress sites

Jetpack AI Assistant represents the fusion of AI and content creation within the WordPress ecosystem. The tool embodies the technology’s advancements, allowing users to create, optimise, and manage content with an unprecedented level of efficiency. 

Equipped with natural language processing capabilities, Jetpack AI Assistant can understand context, tone, and stylistic nuances to produce content that aligns with the specific needs of a website.

Features and capabilities

@acenewsservices
Jetpack AI Assistant offers a range of features to streamline content creation and boost your search engine optimization efforts. 

It can construct forms and comparison tables, suggest headlines, craft social media posts adjusted to the specifications of different platforms, and even create entire article drafts. It’s designed to support creators at every stage of the content lifecycle. 

Additionally, Jetpack’s other tool, Jetpack Stats, provides analytics insights to help WordPress site owners understand content performance — facilitating informed decisions about future strategies.

How it integrates with WordPress

@acenewsservices

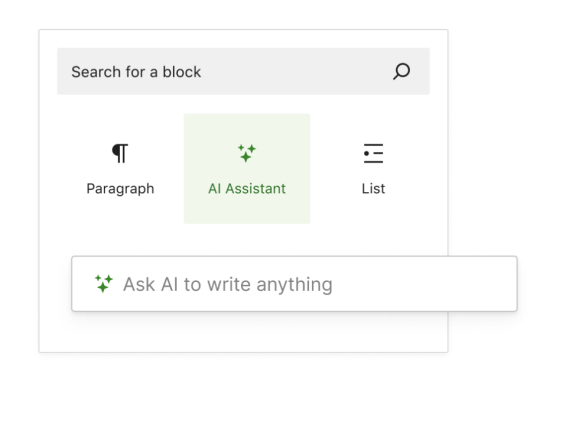
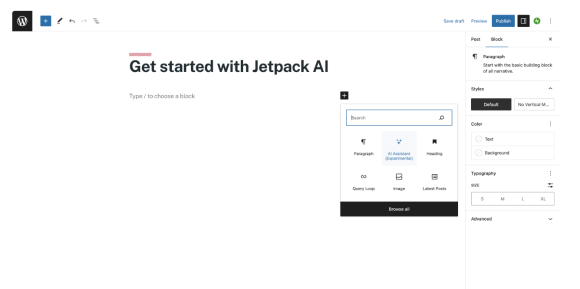
Integration with WordPress is seamless. Jetpack AI Assistant enhances the content management experience without altering the familiar WordPress interface. Users can access AI capabilities directly from the block editor, making it simple to apply AI suggestions to posts or pages. 

Users can access AI capabilities directly from the block editor, making it simple to apply AI suggestions to posts or pages. 
@acenewsservices
This integration ensures that users benefit from AI assistance while working within the comfort of the WordPress environment they are accustomed to. 

The symbiosis between Jetpack AI Assistant and WordPress is a powerful combination for content creators. It’s a natural extension of WordPress’s functionality, reinforcing the platform’s reputation as a comprehensive content management system.

Preparing for content automation

@acenewsservices

1. Evaluate your content needs and goals

Before diving into content automation, it’s important to conduct a thorough evaluation of your needs and goals. Start by identifying the type of content that resonates with your audience and aligns with your brand vision.

Consider the purpose of your work: Is it to educate, inform, entertain, or sell? Also, assess your capacity for content production and identify areas where automation could enhance efficiency and effectiveness. 

These initial steps ensure that the implementation of automation tools like Jetpack AI Assistant is purposeful and strategic.

2. Understand your audience

Understanding your audience is pivotal to successful content automation. Develop detailed audience personas to capture the interests, needs, and behaviors of your target demographic. 

Data analytics tools can provide insights into what content performs well and why. With this knowledge, you can tailor your automated content to speak directly to your audience’s preferences and pain points.

3. Establish a content strategy

A well-thought-out strategy is the backbone of any content automation endeavor. This game plan should define the themes, topics, and types of content you’ll produce. It should also outline the frequency of publication and how it will be distributed across channels.

A strategy acts as a roadmap for content automation tools, guiding the production of creative work that fulfills strategic objectives.

4. Choose the right automation tools

Selecting the right tools is critical to the success of your automated content creation process. Evaluate tools based on their ability to meet your specific content requirements, ease of integration with your current systems, and the user experience. 

Jetpack AI Assistant, as part of the broader Jetpack suite, offers a robust solution that integrates deeply with WordPress, provider for a smooth content automation experience.

5. Integrate Jetpack AI Assistant with your content strategy

Integrating Jetpack AI Assistant into your content strategy involves setting up the tool to understand the subtleties of your brand voice and the informational needs of your audience. It means configuring the AI to recognise the topics that you cover frequently and the style that your readers have come to expect.

@acenewsservices

With Jetpack AI Assistant, you have the advantage of a tool that’s designed to adapt to various content creation needs, making it a versatile addition to your content strategy toolkit.

Learn more about Jetpack AI Assistant here.

Crafting automated content

1. Define content templates and guidelines

The establishment of content templates and guidelines is an essential precursor to automation. These templates serve as a foundation upon which Jetpack AI Assistant can construct content. 

Clear guidelines ensure that, even with the varied possibilities that AI offers, the content remains within the parameters of your brand’s voice and editorial standards. Define the structure of articles, the tone, and the style to maintain consistency across all your content.

2. Generate content ideas and outlines

Content ideas and outlines are the blueprints for your automated content. Utilizing tools like Jetpack AI Assistant, you can come up with content topics that are not only relevant to your audience but also optimized for search engines. 

Outlining involves determining the key points and structure of the content before it’s fully developed. This process guides the AI in creating content that is coherent and logically structured.

3. Create the content with an AI content creation tool

With the groundwork laid, creating content using an AI tool like Jetpack AI Assistant can begin. The tool can draft various kinds of content based on the input provided in the templates and outlines. While the AI does the heavy lifting, human oversight is crucial to refine the content and ensure that it is high-quality and relevant.

using the AI Assistant block to create content
@acenewsservices

4. Optimize the content for SEO

Optimizing content for search engines is a key component of content creation. Jetpack AI Assistant can suggest keywords, meta descriptions, and other SEO elements to enhance the visibility of your content. Nevertheless, it’s important to review these suggestions to ensure they align with the latest SEO best practices and fit naturally within the content.

5. Ensure quality and authenticity

The authenticity of content is vital to building trust with your audience. When content is generated by AI, some work must be put in to make it feel authentic and personal. Regular reviews and edits are absolutely necessary. This step may involve fine-tuning language, adding personal insights, or adjusting the content to better reflect the brand’s unique perspective.

The most powerful AI tool for WordPress

Turn your ideas into ready-to-publish content at lightspeed.Elevate your content

6. Incorporate multimedia elements

Multimedia elements such as images, videos, and infographics can significantly enhance the appeal and engagement of content. Jetpack AI Assistant, in collaboration with other Jetpack features, can assist in selecting relevant multimedia content. However, the final choice should be made with consideration for the overall content theme and the message that needs to be conveyed.

Enhancing content quality and originality

Plagiarism checks and originality assurance

The flood of AI articles means originality is not just a desirable attribute — it’s a necessity for standing out and maintaining credibility. To ensure the content produced remains unique, Jetpack AI Assistant integrates plagiarism checks that cross-reference material across the web. 

These checks are a safeguard, ensuring that the generated content is fresh and provides genuine value to readers. This step is critical in upholding your brand’s reputation and avoiding the negative consequences associated with duplicate content.

Utilizing AI for multilingual content creation

In a global marketplace, the ability to communicate across linguistic boundaries is invaluable. AI has broken down these barriers, enabling the creation of multilingual content with ease. 

Jetpack AI Assistant extends its capabilities to craft content in multiple languages, thus broadening your reach. This function allows brands to cater to a diverse audience, fostering inclusivity and expanding market presence. While AI facilitates this process, human insight is essential to tailor the content based on cultural nuances and contextual subtleties.

Jetpack AI Assistant tools for quality and originality

1. Advanced spelling and grammar tool

The caliber of content is often judged by its accuracy and articulation. Jetpack AI Assistant incorporates an advanced spelling and grammar tool that fine-tunes content to near perfection. This feature underpins the credibility of the content, instilling confidence in readers and upholding the professional image of the publisher.

2. Multilingual content creation

With the multilingual content creation feature, Jetpack AI Assistant doesn’t merely translate words, but adapts content to resonate within different cultural contexts. This capability is crucial in ensuring that the brand’s message is understood and appreciated by a global audience.

3. Automated translations across numerous languages

For brands that operate on an international scale, automated translations are a vital feature. Jetpack AI Assistant can translate content into numerous languages, significantly streamlining the process of internationalization. 

While automated, it’s important to review these translations to ensure they maintain the intended message and tone, further emphasizing the irreplaceable value of human oversight.

Streamlining content publication and sharing

Step 1: Create content with Jetpack AI Assistant

The content creation journey begins with an idea that grows into a narrative. Jetpack AI Assistant, which is built into the WordPress block editor, facilitates this process by providing an intuitive interface for content development. The tool assists in constructing coherent and engaging narratives that are aligned with the brand’s voice. 

Users can initiate the content creation process directly within WordPress, making use of the AI to generate drafts, get suggestions, and refine their message before finalizing posts.

Step 2: Scheduling and publishing with WordPress

Once content is ready, consistency in posting becomes the next essential step. WordPress offers a robust scheduling system that allows creators to plan their publication calendar effectively. This feature enables users to maintain a steady flow of content, which is crucial for engaging and growing an audience.

choosing social media platforms to sync with
@acenewsservices

Step 3: Automate social media sharing with Jetpack Social

The final step in the content dissemination process is sharing across social platforms. Jetpack Social provides an automated sharing solution that links a website to various social media accounts. When a post is published on WordPress, it can automatically post across selected social networks.

This seamless integration ensures broader visibility and engagement, as content is distributed to a wider audience with minimal effort. The automation of this process is invaluable for creators who wish to optimize their online presence and connect with their community on various platforms.

Frequently asked questions

What’s the main goal of automating content creation?

The primary goal of automating content creation is to enhance efficiency while maintaining a high standard of quality. Automation tools like the Jetpack AI Assistant are designed to streamline the content development process, from ideation to publication. 

This allows content creators to focus on strategic tasks, such as market research and brand message fine-tuning, while the repetitive and time-consuming aspects of content creation are handled by the AI.

Can automated content really match the quality of human‑generated content?

Automated content, particularly when powered by advanced AI like the Jetpack AI Assistant, has made significant strides in matching the nuances of human-generated content. 

But while AI can produce content that is grammatically correct and contextually relevant, human oversight is crucial to ensure that it aligns with the brand’s ethos and connects on a personal level with the audience.

How do I choose the right tools for automating content creation?

Choosing the right tools for content automation should be based on a brand’s specific needs. Consider factors such as the tool’s integration capabilities with your current platform, the level of customization it offers, its ease of use, and the quality of the output. 

For WordPress users, Jetpack AI Assistant offers a streamlined experience by being fully integrated into the WordPress ecosystem, making it a compelling choice.

How can I maintain a consistent brand voice and tone with automated content?

To maintain a consistent brand voice and tone with automated content, it’s crucial to customize the AI’s output to reflect brand standards. This involves training the AI using examples of the brand’s existing content and providing feedback to refine the outputs. Regular reviews and tweaks ensure the AI remains aligned with the brand’s voice.

What’s the typical learning curve for using AI content creation tools?

The learning curve for AI content creation tools like Jetpack AI Assistant varies depending on the user’s familiarity with technology and content creation principles. However, these tools are designed to be user-friendly, with intuitive interfaces that simplify the process, making it easier for individuals to get started and see results quickly.

Can I still be creative and innovative with automated content?

Yes, automated content creation tools are meant to augment creativity, not replace it. They provide a foundation upon which creators can build, refine, and innovate. The human element is essential in the creative process, and AI tools offer more time and space for creative thinking by handling the labor-intensive parts of content creation.

What are some best practices for achieving a balance between human and AI collaboration in content creation?

To achieve a balance between human and AI collaboration in content creation, it’s important to:

  1. Set clear goals for what you want the AI to achieve.
  2. Use AI for initial drafts and idea generation, then infuse human creativity for storytelling and emotional engagement.
  3. Continuously review and adjust AI outputs to align with brand standards.
  4. Leverage AI insights to understand audience preferences and behaviors, allowing for more targeted content creation.

Are there any risks of over‑reliance on automated content generation?

Over-reliance on automated content generation can lead to a lack of personal touch and potential audience disconnection. While AI can generate content efficiently, it may not fully grasp the subtleties of human emotion and cultural context. So, it’s vital to maintain a balance, ensuring that human intuition and emotional intelligence guide the use of AI in content creation.

Since AI programs parse existing information to generate content, new or original ideas may no longer be produced, resulting in stagnant messaging and growth. AI programs can also confidently state false information or make up new narratives — relying on automated content generation without human fact-checking can result in the publication of misleading information that damages a brand’s reputation. 

Jetpack AI Assistant: Automated content creation for WordPress Sites

WordPress has long been a cornerstone for creators, businesses, and individuals looking to carve out their space on the web. In an era where content is king, the demand for consistent, high-quality, and engaging material is at an all-time high. 

Enter the Jetpack AI Assistant: a tool that seamlessly integrates with the WordPress environment, empowering users to automate the content creation process without compromising the personal touch that readers value.

For WordPress site owners, this means that the transition to using an AI Assistant doesn’t require a steep learning curve. The tool’s interface is intuitive, minimizing the time from initial setup to content publication. The content generated by the AI Assistant can then be scheduled and shared across various platforms with Jetpack’s existing features, streamlining the entire workflow.

In conclusion, the Jetpack AI Assistant represents a forward leap in automated content creation for WordPress sites. It provides users with the time-saving benefits of automation while allowing for the essential human touch that characterizes impactful content. For brands looking to stay ahead in the digital space, this tool is not just a convenience — it’s a strategic asset, unlocking potential for greater reach and engagement in an ever-evolving online landscape.

See what Jetpack AI Assistant has to offer by visiting its official webpage: https://jetpack.com/ai/

This entry was posted in Learn. Bookmark the permalink.


Rob Pugh

Rob is the Marketing Lead for Jetpack. He has worked in marketing and product development for more than 15 years, primarily at Automattic, Mailchimp, and UPS. Since studying marketing at Penn State and Johns Hopkins University, he’s focused on delivering products that delight people and solve real problems.

The most powerful AI tool for WordPress

Turn your ideas into ready-to-publish content at lightspeed.Elevate your content

@acenewsservices

Editor says Sterling Pubsays Sterling Service Agency is not responsible for the content of external sites or any reports, posts or links. Thanks for following, as always; I appreciate every like, reblog, retweet and comment. Thank you

@acenewsservices
@acenewsservices
Categories
WORDPRESS

FEATURED WORDPRESS SECURITY REPORT: The Top 28 WordPress Security Best Practices & Tips

@acenewsservices

AceNewsDesk – WordPress is a powerful content management system (CMS), but its popularity means equal attention as a target among hackers. Without the necessary security measures, your site can be vulnerable to attacks.In this article, we’ll guide you through 28 WordPress security best practices to help you ensure that your site is protected.

@acenewsservices

Ace Press News From Cutting Room Floor: Published: Jan.07: 2024: Updated on December 29, 2023 – Jen Swisher: TELEGRAM Ace Daily News Link https://t.me/+PuI36tlDsM7GpOJe

@acenewsservices

Fortunately, there are several things you can do to keep your site safe. This ranges from simple tasks like updating plugins and performing backups to more involved strategies, like migrating to a hosting provider with stronger security measures.

1. Keep WordPress, plugins, and themes updated

Outdated software poses a huge threat to websites. When a plugin or theme hasn’t been updated in months or years, hackers will have had more time to look for vulnerabilities in the software and find a way into sites that use it.

Simply put: If you’re using an older version of WordPress, your site is vulnerable to attacks. This also applies to any plugins or themes on your website.

It’s important to keep in mind that WordPress is staggeringly popular. It powers around 43 percent of all known websites. That means that a single plugin with a security issue can lead to hundreds or thousands of sites with an open door for cybercriminals.

The easiest way to protect yourself against these vulnerabilities is to keep WordPress and all its components up to date. This can be as simple as checking the dashboard every day to see what updates are available and executing them.

updates available in the WordPress dashboard
@acenewsservices

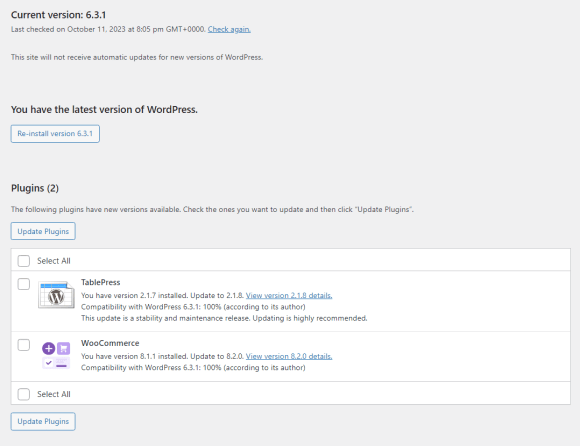
In the case of plugins, you can configure them to update automatically on a one-by-one basis. To do this, go to Plugins → Installed Plugins and click on Enable auto-updates for the plugins you want to update automatically.

turning on auto updates in WordPress
@acenewsservices

2. Change the default “admin” username

One of the biggest security mistakes that WordPress users can make is choosing a username like “admin” or “administrator”. Those are the default usernames that WordPress sets for you, and keeping them in place makes it easier for attackers to force their way in.

Many hackers try to break into a website by trying as many combinations of usernames and passwords as possible. This is called a brute force attack. If someone already knows your username, it means they only have to guess one login factor.

WordPress doesn’t let you change the username for the administrator account once you set it. To make a change, you’ll need to create a new account, give it the Administrator user role, and delete the old one.

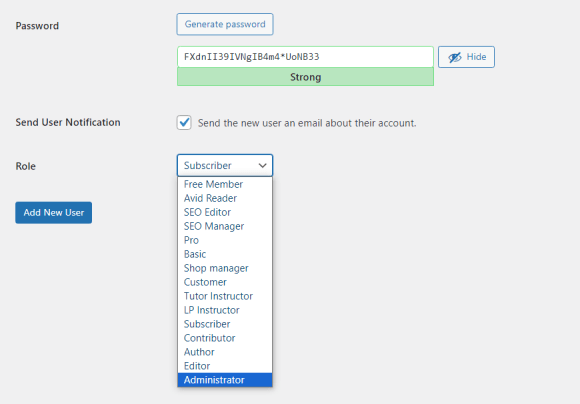
You can do this by going to Users → Add New. Then, enter the details for the account, including a username that’s hard to guess, and choose Administrator from the Role menu.

resetting password in WordPress
@acenewsservices

The next time you create a WordPress website, you’ll need to set the administrator username to something different. This simple change will make it much harder for attackers to access the account.

3. Use strong passwords and change them regularly

If you use an easy password like “1234” or have the same one for every account, it’s just a matter of time until someone gains access to your site. 

While there are ways to regain access to stolen accounts, the process can be arduous. Plus, a hacker might do irreparable damage to your content and reputation. 

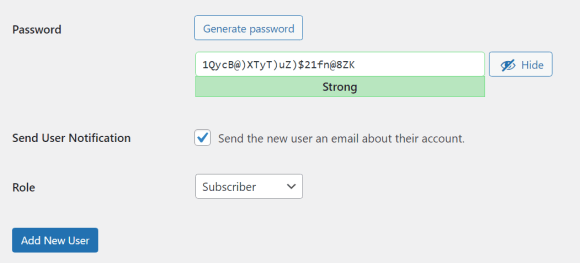
When you create a new account in WordPress, the CMS will generate a strong password for you. This is typically a combination of letters, numbers, and special characters. 

You can use this password or change it to something more memorable (while retaining a mixture of letters and numbers).

creating a strong password in WordPress
@acenewsservices

You could even use a credentials manager if you have trouble remembering it. Password managers can help you generate secure passwords for all your accounts and keep them safe. 

For added security, you’ll want to change your passwords periodically. This way, if there’s a leak of credentials, your account will be safe.

4. Implement two‑factor authentication (2FA)

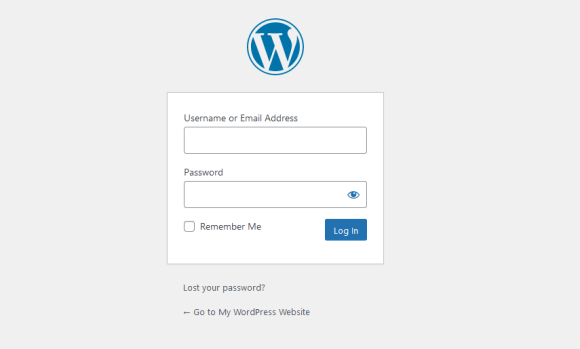
Like many other websites, WordPress requires a username and a password to log in. This means login security largely depends on how strong your credentials are.

WordPress login screen
@acenewsservices

Even with the strongest password, there’s a chance someone might gain access to your account or others on your site. An effective way to avoid this breach is to use two-factor authentication (2FA).

When you enable 2FA, your site will require an additional method of verification for users to log in. Typically, this is a one-time code sent via SMS, email, or an authentication app.

Since hackers don’t have access to your mobile device or emails, they won’t be able to log into your account. Some websites offer the option of using 2FA, whereas others enforce it.

If you use Jetpack, you can enable users to log in with their WordPress.com accounts. There’s also an option for using WordPress.com’s 2FA functionality.

turning on two-factor authentication in WordPress.com

You can find these settings by navigating to Jetpack → Settings and locating the WordPress.com login section. Then, simply toggle the corresponding switch.

5. Use HTTPS encryption through an SSL certificate

A secure sockets layer (SSL) certificate enables your website to load over HTTPS, which is the secure version of HTTP. The certificate verifies that your website is genuine and that communication between the browser and the server is encrypted.

You can obtain an SSL certificate for free from several authorities, like Let’s Encrypt. Many WordPress web hosts will automatically set up an SSL certificate for your website. Other web hosts will enable you to set up a certificate manually via cPanel.

6. Install a reputable security plugin

WordPress security plugins often come with a collection of features and tools that help you protect your website. These typically include:

  • Spam protection
  • Denial of service (DDoS) attack protection
  • A web application firewall (WAF)
  • Malware scanning and cleanup
  • Automatic backups

You can find individual WordPress plugins that do each of those tasks separately. But if you opt for a comprehensive security tool, you’ll be able to manage multiple features from the same place, which can make your work easier.

In fact, using the right plugin can help you check off several items in this list of the best WordPress security practices. Jetpack Security includes all the features just mentioned, and many others.

7. Regularly back up your website

Backing up your data regularly is arguably the most important thing you can do to keep it safe. When it comes to websites, a full backup can be a lifesaver in the case of a security breach or malfunction.

If your site gets hacked or ceases to function properly, the easiest way to solve the problem might be to restore a recent backup. The more recent the backup is, the less likely it becomes that you’ll lose any critical information. 

Once the site is functioning properly again, you can take the necessary steps to secure it from further attacks.

There are a lot of backup options for WordPress. Some web hosts offer automatic backups as part of your hosting plan (typically if it’s a managed service). However, it’s best not to rely solely on these backups. If your server is compromised — by a coding mistake, host error, or hack — the backups can be, too.

A better option is to use a plugin that stores backups off-site. Jetpack VaultPress Backup is one such option. The tool is available as an individual plugin and as part of the Jetpack Security bundle mentioned before. It backs up your site automatically whenever you make a change.

Jetpack VaultPress backup homepage
@peacetruth51

These real-time backups are ideal if you’re constantly adding new content to your website. It means you’ll always have a copy of the latest version. Plus, the backups are stored off-site, so you’ll always have access to them, even if your site is completely down.

8. Use a web application firewall (WAF)

A WAF is a type of firewall that’s designed to filter traffic to and from a website. It uses rules to filter specific types of traffic and it can blocklist known malicious IPs.

WAFs are designed to help you stop common types of cyberattacks, including SQL injections, cross-site scripting (XSS), and cross-site request forgeries (CSRF). They’re capable of doing this thanks to their complex systems of rules.

The more comprehensive the rules of the firewall, the more effective it is. A lot of security plugins (including Jetpack Security) boast sophisticated WAFs with rulesets designed from years of experience dealing with WordPress attacks.

Although you can set up and configure a WAF manually, your best bet is to use either a web host or a security plugin that sets one up for you. This way, you can leverage their existing database of threats and simply toggle the firewall on.

9. Regularly scan for malware

Scanning your website for malware involves using a third-party tool or a security plugin. This software goes through your site’s files, plugins, and themes to look for malware infections. If it detects anything amiss, it will let you know where the problem is.

Jetpack Scan hmoepage
@acenewsservices

Remember when you used to run antivirus scans on your computer and it would take forever? Now, most antivirus software just runs in the background and only bothers you if there’s an issue. Malware scans with Jetpack Security work just as seamlessly.

And, unlike with other tools that only tell you there’s a problem, if Jetpack finds something, it will usually provide solutions to fix the problem — often with a single click. 

If you take steps to secure your site, malware infections should be exceedingly rare. Even so, it never hurts to have automatic malware scans set up in case you get hit by a zero-day exploit or some other type of attack that’s difficult to stop.

10. Block form and comment spam

Any WordPress site with open comment sections or forms may encounter spam. This can range from competitors posting links to their sites to attackers sharing malicious URLs or trying to use scripts to gain unauthorized access.

The simple solution to this problem is to moderate comments on your site. But as your site grows, filtering spam comments can become a full-time job. It’s not uncommon to have thousands of messages waiting for moderation.

You could try to use a CAPTCHA to stop robot spam submissions, but you’ll inevitably annoy some users and diminish the legitimate engagement and conversions your site needs to thrive. 

The best option is to use Akismet. This tool works completely in the background to stop spam submissions on comments and forms, so you don’t even notice it’s happening. Legitimate users are allowed to continue without the need to solve a puzzle, answer a riddle, or even click a box.

All of this happens with 98% accuracy. 

Akismet is also customizable, to immediately delete certain comments and retain others for you to manually review and approve or deny. 

You can get Akismet as its own plugin, but if you’re committed to improving your overall security and user experience with the least amount of effort (and expense) you can also get it as part of the Jetpack Security plan. 

11. Implement secure file permissions using FTP

Every file and folder in a UNIX-based system has a set of permissions. These permissions are represented by sets of three numbers. For example, “777” means that every user has full write, read, and execution permissions for a file or directory.

The first of the three numbers represents who owns the file or directory. The second number stands for accounts in an owner group, and the third for every other user.

In the example above, each seven means that each of those types of users has read (four), write (2), and execution (1) permissions. If you add up those values you get a seven.

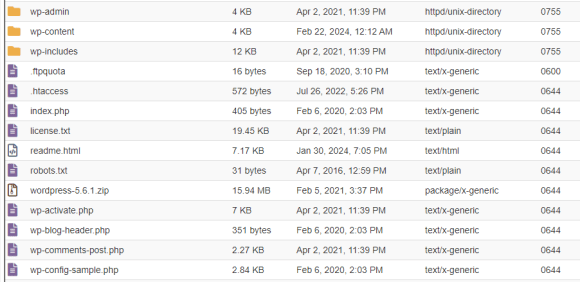
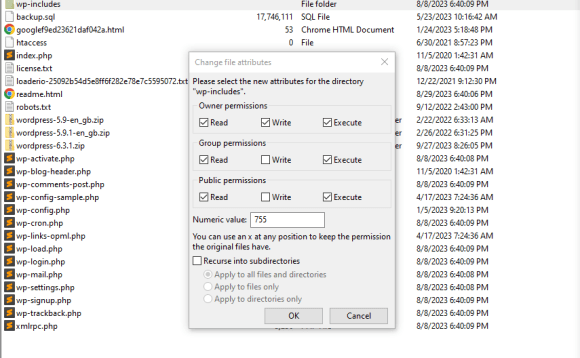
The file permissions you assign to WordPress files and directories will govern who can access, read, and edit them. The recommended file permissions for WordPress are 755 for directories and 644 for files.

To set these permissions, you’ll need to connect to your website via a file transfer protocol (FTP) tool like FileZilla. You can get your FTP credentials from your hosting account. 

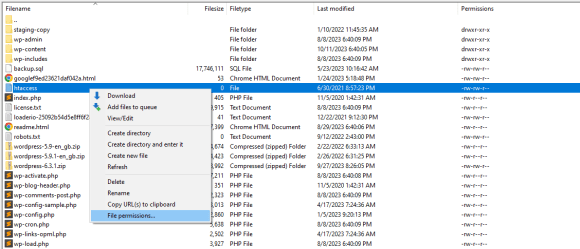
Once you connect to your site, navigate to the root directory (this is usually labeled public_html). Inside this folder, you can select any subdirectory or file you want, right-click on it, and choose the option that says File permissions.

editing file permissions in FileZillal
@acenewsservices

A new window will pop up where you can set the permission for the file or directory you selected through the Numeric value field.

editing file permissions for wp-includes
@acenewss@acenewsservices ervices

If you change permissions for directories, you’ll also see an option that says Recurse into subdirectories. This will enable you to set the same permissions for all subdirectories or files.

Note that there are some exceptions to the rule when it comes to the optimal permissions for WordPress files. One of them is the wp-config.php file, which we’ll discuss in the next section.

12. Secure your wp‑config.php file

The wp-config.php file includes critical information about your website and its database. It’s one of the most important WordPress core files, which means you should take additional steps to secure it.

In terms of permissions, it’s best to set wp-config.php to either 400 or 440. If you remember the breakdown from the previous section, you’ll know those permission values translate to:

  • 400: Only the owner can read the file.
  • 440: Only the owner and users in the owner’s group can read the file.

This removes writing permissions from wp-config.php altogether. This is usually a safe choice, since it prevents anyone from being able to modify the file’s settings.

Another way you can secure wp-config.php is to move one level above the root directory. WordPress will look for the file one directory up if it can’t find it in the default location.

That means WordPress will still function as normal, but attackers might be fooled by the fact they can’t find the file. 

13. Disable file editing in your wp‑config.php file

WordPress offers several options for editing files. One of them is using the plugin and theme file editors, which are available from the dashboard.

These file editors enable you to make changes to your site’s code without having to connect to it via FTP. The downside of this approach is that if a hacker gains access to an account that has permission to use these editors, they can wreak havoc on your website.

Therefore, you might want to consider disabling file editing in WordPress. You can do this by opening the wp-config.php file and adding the following line of code to it:define('DISALLOW_FILE_EDIT', true);

Note that some themes and plugins will automatically disable file editing. If you don’t see the file or theme editors in the dashboard, it’s likely that you’re using one of these tools.

14. Restrict directory browsing in your .htaccess file

If directory browsing is enabled, you can visit yourwebsite.com/content/. Instead of getting a 403 forbidden error, you’ll see a list of the subdirectories and files inside that folder.

Disabling directory browsing is a must if you want to protect your site. If anyone can see the contents of your site’s folders, they can get a lot of information, like what theme and plugins you use. They’ll also be able to navigate media files unrestricted, which is terrible from a privacy standpoint.

Most WordPress web hosts disable directory browsing by default. If yours doesn’t offer this feature, you can enable it yourself by editing the .htaccess file in the root directory.

To do this, open the file and add the following line of code:Options -Indexes

Save the changes and close the file. Now, if you try navigating to a directory through a browser, you’ll get an error saying you don’t have access to it.

15. Restrict access to the wp‑admin directory

wp-admin is the default location for the WordPress directory. If you visit your website’s homepage and add /wp-admin to the end of the URL, you’ll get to the WordPress dashboard (after going through the login page).

This structure is standard for WordPress websites. This makes it easy to find and access the dashboard, both for you and for attackers.

One way to protect the WordPress admin is to secure it with a password. This way, users will need to enter a different password after making it through the login page.

If your web host uses cPanel, you can add a password to the wp-admin directory by using the Directory Privacy tool.

finding "directory privacy" in cpanel
@acenewsservices

Once you’re inside this tool, browse through the folders until you find the wp-admin directory. Click on the EDIT button next to it, and on the following page, tick the option that says Password protect this directory.

option to password protect a directory
@acenewsservices

Now the directory privacy tool will ask you to set a password for wp-admin. After you save the password, try accessing the WordPress dashboard. A password pop-up should appear directly within the browser.

16. Hide your wp‑admin login URL

Another way to protect the WordPress admin is to change the URL that leads to the login page. If you combine this strategy with the additional password protection covered in the section above, no attacker should be able to get into your site’s dashboard.

You can change the wp-login URL manually, but using a plugin can simplify the process. WPS Hide Login is a simple tool that enables you to set a new login URL without needing to edit any of your site’s code.

WPS Hide Login plugin
@acenewsservices

Once you install the plugin, go to Settings → WPS Hide Login and look for the section that says Login url. Use the field next to that option and replace the default login URL with a custom one.

You might want to use a random mix of letters and numbers. This will make it more difficult for attackers to guess. Just make sure to either bookmark the new login page, or set a URL that you can remember.

17. Limit login attempts

As mentioned earlier, attackers can gain access to your site by trying out multiple combinations of usernames and passwords. Setting strong passwords can be an effective way to block their attempts, but there’s another thing you can do to stop brute force attacks

This involves limiting the number of login attempts that users can make in a specific period of time. This limitation won’t affect regular users, but it should be enough to foil brute force attacks that use bots. By limiting the rate at which they can try new credentials, you can minimize the chances they’ll succeed.

There are a lot of tools you can use to limit login attempts in WordPress. If you use Jetpack, you have access to its brute force protection feature. This automatically limits login attempts that Jetpack identifies as malicious.

option to turn on brute force attack protection with Jetpack
@acenewsservices

Jetpack can also help you allowlist IP addresses, so they’re not blocked by the brute force protection tool. You can use this for your IP address and those of your coworkers to prevent false flags.  

18. Log idle users out automatically

A lot of websites will log you out of your account after a set period of time. This is a security measure designed to prevent other people from hijacking your session if they get access to your computer.

This might not be an issue depending on where you log in from, but it’s still a security measure worth implementing. That applies particularly if there are other people who have access to your site’s dashboard.

WordPress doesn’t log out users automatically. To add this functionality, you’ll need to use a plugin like Inactive Logout.

Inactive Logout plugin

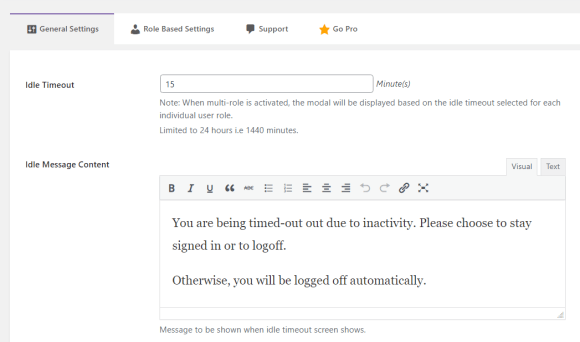
Once you install the plugin, go to Settings → Inactive Logout  → General Settings. Look for the Idle Timeout option and set the value to whatever timer you want, in minutes.

setting the idle timout in minutes
@acenewsservices

Now, users will be automatically logged out if they’re idle for that amount of time. The plugin also enables you to configure a message that informs them why their session is closed, so they’re not confused when they return.

19. Change the default WordPress database prefix

Every WordPress database has a name. By default, that name is wp_something, with the “something” standing in for the actual name of the database.

What’s really important here is the prefix. By default, WordPress uses the wp_ prefix, which means that attackers can easily guess the full name of the database. 

Simply changing the prefix can make that task much more difficult for attackers. Unfortunately, it’s not that simple to change the WordPress database prefix.

This process requires you to edit both core files and make changes to the database itself. So before you do anything else, you’ll need to perform a full website backup, which includes all files and the database. That way, if anything goes wrong, you can restore the backup.

To get started, access the website via FTP and go to the wp-config.php file. Open the file and look for this line inside:$table_prefix = ‘wp_’;

You can go ahead and replace the “wp_” prefix with something else, like “newprefix_”. That’s just an example, though. You’ll want to choose something that’s difficult to guess.

Now, save the file and access the database using phpMyAdmin. Select the WordPress database from the list to the left and click on SQL in the menu at the top of the screen above the list of tables.

This will open a page where you can execute SQL commands that affect the database. What you need to do now is replace the existing table prefixes for all tables in the database. By default, that means the following tables:

  • wp_options
  • wp_postmeta
  • wp_posts
  • wp_term_relationships
  • wp_term_taxonomy
  • wp_terms
  • wp_commentmeta
  • wp_comments
  • wp_links

Keep in mind that some plugins may also add new tables to the database. You’ll need to update the prefixes of these tables, too. 

For each table, you’ll need to run the following SQL command:RENAME table wp_xxxx TO newname_xxxx;

The “xxxx” placeholders stand for the name of each table after the underscore. Likewise, you’ll need to change the newname_ prefix to the one you set earlier when modifying wp-config.php.

Repeat this process as needed for each table in the database. When you’re ready, you can return to the dashboard.

Changing the database prefix can break any active plugins and themes on your site. These tools won’t recognize the updated database until you deactivate and reactivate them. 

Therefore, you’ll need to go through each plugin and theme on your site and follow that process. When you’re done, check your site to make sure that everything is working as it should. 

20. Hide your WordPress version

In the past, WordPress used to display the version of the software that a site was using in the footer. The idea was that this information could be useful for troubleshooting purposes, and it would be much easier to find if it were readily available to front-end visitors. 

The problem with that approach is that displaying the version number means attackers can look up vulnerabilities specific to that release. This gives malicious actors a lot of information that they can use to carry out an attack on your website. 

Plus, this feature has no practical benefit for you. After all, you can always check your site’s WordPress version from the dashboard.

Newer versions of WordPress no longer display that information on the front end. If you can see the version number in the footer, it means your website is overdue for a WordPress update.

21. Keep your PHP version up‑to‑date

As you probably know, WordPress is built largely on PHP. It relies on this programming language to perform most of the admin tasks. 

PHP is also a software. This means it gets regular updates with new features and functions, and improved performance.

WordPress requires your server to run PHP version 7.4 or higher. There are more recent versions of PHP, and each of them brings performance and security upgrades to the software. Those upgrades also carry over to WordPress itself.

Most reputable web hosts update PHP on their servers as new versions come out. Some providers even enable you to switch between versions manually (which can be necessary for troubleshooting errors on your WordPress site).

You can check what version of PHP your site is running by navigating to Settings → Site Health → Info → Server in your WordPress dashboard. Here you’ll see an overview of your server’s configuration, including the version of PHP that it uses.

server information in WordPress
@acenewsservices

If that version is outdated, you may want to contact your web host. They might be able to update PHP for you. Even so, this is something you shouldn’t need to do if you’re using a reputable hosting provider, as they’ll take care of it for you.

22. Turn off PHP error reporting

WordPress comes with a debugging tool that enables the CMS to log PHP errors. You can use these error reports to troubleshoot technical issues on your website. 

Unfortunately, these reports can also lead to security issues. If attackers gain access to PHP error logs, they can get a lot of information about how your site works. They might be able to see what plugins are active on your site (if they display errors), as well as important files on your site with PHP issues.

Unless you’re actively troubleshooting an error in WordPress, you don’t need to enable PHP error reporting. If you’re using it to diagnose a problem, you’ll want to disable the WordPress debug mode as soon as you get the information you need.

Disabling PHP error reporting requires you to modify the wp-config.php file, which is located in the WordPress root directory. You can access the directory via FTP, as shown earlier.

Then, open the wp-config.php file and add the following line of code:define ( ‘WP_DEBUG’, true );

Change the true value to false and save the file. This will disable error logs in WordPress.

You can turn them back on at any time as needed. You’ll just need to change the value back to true.

23. Remove unnecessary plugins and themes

Plugins and themes are what make WordPress such a versatile platform. They add new features to your site and enable you to customize its design. 

The problem is that some people install dozens of plugins and themes, but only use a few of them. For example, you might try many different themes before settling on your favorite, but never uninstall the rest. 

Every active plugin on your website presents a security risk. Typically, this risk is minimal for plugins that get regular updates and have a reputable development team behind them. For outdated plugins or those that no longer receive updates, that risk increases drastically.

The same applies to themes. Having themes you don’t use on your site can lead to vulnerabilities. 

If you’re not actively using a specific theme or plugin, the safest bet is to uninstall it (not just deactivate it). This only takes a few minutes, but it can make a huge difference to your site’s security. Plus, if you change your mind, you can always reinstall a deleted plugin or theme. 

However, there is an exception here. You may want to keep a default theme like Twenty Twenty-Three installed, but inactive, for the purposes of troubleshooting.

24. Remove unnecessary user accounts

As a rule of thumb, no one should have access to your website unless it’s absolutely necessary. If you do need to give someone access (to publish content, perform maintenance, or update the site), you’ll want to make sure that you don’t assign them a user role with more permissions than they need.

Once a person no longer needs access to the website, you can go ahead and delete their account. This will prevent them from altering the website without your approval.

These user accounts pose another risk. Some people might reuse credentials from their personal accounts to log into your website. If these credentials are leaked in a security breach, attackers will be able to use them to gain access to your website.

Deleting user accounts in WordPress is simple. To do this, go to Users → All Users and select an account. Once you identify the account you want to remove, hover over it and click on Delete.

Note that this option will only appear if you’re the administrator. As long as no one else has access to the admin account, you should be the only person with the ability to delete user accounts.

25. Monitor user activity

If you run a WordPress website where other people have access to the dashboard to publish content, make changes to the site, and update it, you’ll likely encounter security issues sooner or later. For instance, someone might get their credentials stolen or install a plugin that introduces a security risk to the site.

For this reason, it’s a good idea for the administrator to keep an eye on what others do when they’re using the site.

Activity logs are tools that monitor specific events and take note of when they happen. You can access that log and see who did what and when. This enables you to spot events and actions that can negatively impact your site’s security.

This feature isn’t available in WordPress by default, but you can add it with a plugin. Jetpack Security includes an activity log that stores data from the past 30 days. 

The log is hosted offsite. Therefore, if you lose access to the site, you can check the log to see what happened, before restoring a recent backup.

26. Use a CDN to reduce the risk of a DDoS attack

Content delivery networks (CDNs) can help you drastically reduce load times. They do this by caching your website using a network of data centers distributed around the world. When someone visits the site, the CDN intercepts the request and loads a copy from the closest server.

Using a CDN offers a host of benefits beyond reducing load times. For example, there’s less strain on your server, which means your website will be better positioned to handle large spikes in traffic. Moreover, a CDN can act as a barrier in case of an attack.

If your website is the target of a DDoS attack, the CDN can shut it down quickly. A lot of CDNs may ask visitors to verify if they’re human if the network detects something strange with the connection. Since DDoS attacks rely on bots, they often can’t bypass these types of security checks.

Even if the DDoS attack manages to reach the CDN, its data centers are built to manage massive influxes of traffic. In the meantime, your website itself will be protected by the CDN.

You can integrate any CDN you want with WordPress. Jetpack CDN is very easy to set up. You can enable it for free in the Jetpack plugin, and the CDN will start caching media files from your website.

27. Migrate to a security‑focused hosting provider

Every web host has its own selling point. For instance, some hosting providers are more focused on security and performance, while others prioritize affordable pricing.

Ideally, you’ll pick a web host that promises top-notch performance and security (and doesn’t charge an unfair rate for it). There are a lot of web hosts that fit these criteria and handle essential security tasks for you. Those tasks may include:

If you want to spend more time and energy on running your website and less on protecting it against attacks, you’ll want to pick a host that values security. To get started, you might want to take a list of recommended WordPress hosts.

Web hosts that provide managed hosting plans tend to offer more in terms of security. Of course, these services will be a bit pricier than unmanaged plans, but they can help put your mind at ease. 

28. Consider an enterprise security solution

If you run an enterprise-level website, your security measures should go beyond updating plugins and making backups. You’ll need a security solution that provides end-to-end protection for your website.

WPScan has the largest database of WordPress security vulnerabilities on the market.

WPScan offers an enterprise-focused security solution. This can be tailored to your company’s needs and the kind of website you have. You can reach out to WPScan directly to get an assessment of your site’s security and request a quote.

Frequently asked questions

This list of WordPress security tips has covered the most important measures for protecting your site. If you still have any questions about how to improve your website’s security, this section will aim to answer them.

What common threats can be mitigated by these WordPress security best practices?

This guide covers everything from basic protective measures to more advanced security practices. If you take the time to implement every measure outlined in this article, your website should be protected against the most common threats. These include brute force attacks, data theft, and malware. 

The ultimate goal of these measures is to ensure that no malicious actor can access your site and cause damage. They can also prevent mistakes by inexperienced users, like installing a bad plugin.

What is the easiest way to improve WordPress security?

If you don’t have time to implement every measure in this guide, the best thing you can do is set up a WordPress security plugin. These tools will automatically enable a myriad features that help protect your website.

Jetpack Security is an all-in-one solution that automates many essential tasks. It performs real-time backups, sets up a firewall, scans and provides quick fixes for malware, protects your site against spam, and more. It also provides you with access to activity logs, so you can identify any actions on your site that may have caused a security problem (and who performed them). 

What is the best security plugin for WordPress?

There are many WordPress security plugins to choose from, but Jetpack Security is one of the most comprehensive solutions on the market. It handles most of the security practices discussed in this post, including backups, malware scanning and removal, and spam protection. 

How do I back up my WordPress site, and where should I store the backups?

There are multiple ways to back up a WordPress website. You can back up all files and the database manually, use a plugin that does it for you, or sign up for a hosting plan that includes some limited backups.

In most cases, you don’t want to store backups locally or in just one location. This is why it’s not typically recommended to rely on hosting backups alone. Cloud backups tend to be more secure, since most providers store multiple copies for the sake of redundancy.

Jetpack Security includes real-time cloud backups. Everything is stored offsite, and a new backup is made every time you make a change to your website.

How often should I update my WordPress site?

Ideally, you should update WordPress and its components as soon as there are updates available. Using the latest version of any software will boost your site’s security and performance. Plus, it provides you with access to the latest features.

A lot of updates are focused on patching security vulnerabilities. Ideally, you’ll want to check your site for updates daily. You could even enable auto-updates for plugins. All of this and more is possible with Jetpack Security, the top real-time security and backup plugin.

How often should I scan my WordPress site for malware?

If you can, you should scan your website for malware daily. Since this is such a critical task, it makes sense to automate it. That way, your security plugin or malware scanner will still be on the lookout for vulnerabilities even if you’re not available.

Jetpack Security includes automated malware scanning. The plugin scans your site periodically and notifies you if it finds anything suspicious.

Jetpack Security: Round‑the‑clock WordPress protection and backups

Protecting a WordPress website can be a lot of work. You’ll need to perform regular backups, carry out updates, scan your site for malware, and more. Additionally, you’ll want to ensure that anyone with access to your site is using strong usernames and passwords.

An all-in-one solution like Jetpack Security can handle most of these tasks for you. You’ll get automated backups and scans, spam protection, a powerful firewall, and more. All you need to do is install the plugin and enable these features. 

Are you ready to boost your site’s security? Get started with Jetpack Security today!

This entry was posted in Security. Bookmark the permalink.


Jen Swisher is a Happiness Engineer for Jetpack. She has been working with WordPress and Jetpack for over a decade. Prior to starting at Automattic, Jen has helped small businesses, local non-profits, and Fortune 50 companies create engaging web experiences for their customers. She is passionate about teaching others how to create on the web without fear.

@acenewsservices
T@acenewsservices

Editor says …Sterling Publishing & Media Service Agency is not responsible for the content of external site or from any reports, posts or links and thanks for following as always appreciate every like, reblog or retweet and comment thank you

@acenewsservices
@acenewsservices
Categories
WORDPRESS

FEATURED WORDPRESS JETPACK REPORT: What is “Web Analytics”? An In-Depth Guide with Metrics, Tools, and Tips

@acenewsservices

AceNewsDesk – Web analytics, when used correctly, can illuminate a clear path to engagement, business growth, and profitability. As we get into this comprehensive guide on web analytics, you’ll discover metrics, tools, and actionable tips to optimize your digital strategy

@acenewsservices

Ace Press News From Cutting Room Floor: Published: Jan.03: 2024: Updated on December 29, 2023 – Rob Pugh: TELEGRAM Ace Daily News Link https://t.me/+PuI36tlDsM7GpOJe

@acenewsservices

What is “web analytics”?

The term “web analytics” encompasses the collection, measurement, and interpretation of data to understand user behavior on websites. It focuses on revealing actionable insights, which businesses can use to optimize their digital experience and achieve their objectives. At its core, the practice of web analytics monitors not just the quantity, but the quality of website traffic.

Every digital touchpoint a user encounters, from the pages they visit to the buttons they click, generates data. When brought together and analyzed, this data provides a snapshot of user behavior and preferences. Web analytics serves as both a diagnostic tool, identifying areas of friction or inefficiency, and a strategic asset, offering opportunities for growth.

Think for a moment about the control panel of an airplane. It presents pilots with real-time data about altitude, speed, and other critical parameters. Web analytics plays a similar role for businesses in the digital realm. It provides data that, in the right hands, steers a website towards its desired outcomes.

A common misconception is that web analytics revolves solely around tracking website visitors. While this is an integral component, modern web analytics goes deeper, scrutinizing page load times, user navigation paths, and even the effectiveness of content. 

WordPress users, for instance, can employ plugins such as Jetpack Statsto capture a holistic view of their site’s performance, aligning their strategies with the needs and preferences of their audience.

How do businesses benefit from using web analytics?

There are seemingly endless opportunities for businesses to refine how they engage, convert, and nurture their audiences. Yet, the sheer size of the online world poses challenges. How does one discern the areas that need the most attention or the strategies that warrant adjustment? Web analytics emerges as the beacon in this scenario, offering businesses valuable insights. 

Here are some things you can do with the information provided by web analytics:

1. Understand user behavior to enhance UX/UI

Every click, scroll, and interaction on a website tells a story about the user. Web analytics deciphers this narrative, allowing businesses to tailor their user experience (UX) and user interface (UI) to match audience preferences. 

For example, if a significant number of users abandon a page midway, it might signal that the content is irrelevant or there’s a major flaw in the design. Based on this, teams can make adjustments so that the page meets visitors’ expectations.

2. Optimize conversion funnels

A conversion funnel represents the journey a user takes from casual browser to loyal customer. By leveraging web analytics, businesses can identify bottlenecks or drop-offs in this journey. 

Perhaps a sign-up form is too lengthy, or a product page lacks vital information. Recognizing these pain points allows WordPress site owners to streamline the conversion process.

3. Improve site performance

People have limited patience. Slow-loading pages or frequent crashes can deter potential customers and followers. Web analytics tracks site performance metrics, spotlighting areas that require optimization. Whether it’s reducing image sizes or enhancing server response times, data-driven decisions can significantly improve your site’s effectiveness.

4. Maximize ROI of marketing campaigns

Marketing campaigns, whether organic or paid, are investments. Web analytics measures the effectiveness of these campaigns, providing insights into metrics like click-through, bounce, and conversion rates. Such data assists businesses in tweaking their marketing strategies, ensuring that every dollar spent yields optimal returns.

5. Bolster retargeting and remarketing efforts

Not every visitor converts on their first visit. In fact, most likely won’t. Web analytics identifies these visitors and enables businesses to retarget them with personalized content or offers. This keeps potential customers engaged and gently nudges them towards a conversion.

From enhancing content strategies based on popular pages to understanding seasonal traffic fluctuations, web analytics offers a multitude of insights. With this in hand, businesses are better equipped to navigate their digital efforts with confidence and clarity.

What are the different types of web analytics metrics?

When you start to look into web analytics, you’ll encounter a plethora of metrics. Each serves a distinct purpose and, collectively, they provide a comprehensive understanding of a website’s health, user behavior, and performance. Let’s explore these metrics.

Traffic metrics

1. Visits / sessions. This represents the number of individual sessions initiated by visitors on your site. A higher number often signifies more interest and engagement with your content.

2. Unique visitors. These are individuals who have visited your site during a set period. This metric is crucial for gauging the breadth of your site’s reach.

3. Page views. This denotes the number of pages viewed by visitors. A high number could indicate engaging content, but paired with other metrics, it can also hint at users not efficiently finding what they’re looking for.

4. Average session duration. As the name suggests, this metric provides the average time a user spends on your site during a session. A longer duration indicates better engagement and content relevance.

5. New vs. returning visitors. This differentiates between first-time visitors and those returning. It’s a gauge of how well your site retains interest.

Engagement metrics

1. Bounce rate. This represents the percentage of visitors who navigate away after viewing only one page. A high bounce rate might indicate irrelevant traffic or a disconnect between visitor expectations and site content.

2. Pages per session. The average number of pages a visitor views during a single session. A higher number here often indicates that people are interested in the content of your site.

3. Average time on page. This metric measures the average amount of time someone spends on a particular page. It helps in understanding which content resonates the most with your audience.

4. Exit rate. The percentage of exits from a specific page, highlighting potential content or design issues on that page.

Acquisition metrics

1. Channels. This measures the sources driving traffic to your site. It can include organic search, direct visits, social media, referrals, and paid search.

2. Traffic source. More specific than channels, this pinpoints the exact origin of your traffic — a search engine, social media platform, another site, or something else.

3. Keywords. The keyword metric lists the specific terms users typed into search engines to find your site. It’s a pivotal data point for refining SEO strategies.

Conversion metrics

General conversion metrics

1. Conversion rate. This is a measurement of the percentage of visitors who take a desired action, like signing up for a newsletter or making a purchase. It’s a direct indication of your site’s effectiveness in meeting your key objectives.

2. Goal completion. With the goal completion metric, you can track how often visitors complete specific goals on your site.

3. Cost per conversion. Teams use this to calculate the average cost of acquiring a conversion, a vital stat for understanding the efficiency of marketing efforts.

chart of ecommerce analytics like orders and average order value
@acenewsservices

Ecommerce conversion metrics

1. Transactions. A useful metric to quickly understand the number of completed purchases on your website, this provides insights into sales trends, the effectiveness of promotions, and the overall health of your business.

2. Average order value (AOV). Average order value is a calculation of the average gross total of every order placed over a defined period. This is critical to understand the value generated from each purchase.

3. Cart abandonment rate. This is the percentage of users who add items to their cart but don’t complete the purchase. A high rate could signify issues with pricing or the checkout process.

4. Product performance. With this stat, teams can analyze sales, quantities, and revenues of individual products. It helps identify top-performing products and those that might need promotion or reevaluation.

5. Audience metrics

1. Demographics. This is data about the age, gender, and other characteristics of your site’s visitors.

2. Interests. This provides information about what your audience is generally interested in. This aids in tailoring content and advertising.

3. Geolocation. Analyze the geographical locations of your audience to better target specific regions.

4. Device usage. This metric details whether visitors are accessing your site from desktops, tablets, or mobile devices. Knowing this information can influence many important design and user experience decisions.

5. Browser and OS. Understanding the browsers and operating systems used by your visitors allows you to prioritize compatibility and smooth user experiences in the most important areas.

For WordPress site owners, Jetpack Stats simplifies the complexity of these metrics, presenting them in an intuitive manner. Capturing and understanding this data enables teams to refine their approach so strategies are not only effective, but resonate deeply with the intended audience.

What are examples of popular web analytics tools?

Web analytics tools are essential for successful digital strategies, offering rich insights to optimize website performance and enhance the user experience. They help brands turn raw data into actionable insights. Below, we’ll look at some of the most popular tools in the market and what sets them apart.

Google Analytics homepage
@acenewsservices

1. Google Analytics

A household name in the world of web analytics, Google Analytics offers comprehensive insights into website traffic, user behavior, and conversions. Its robust set of features include audience demographics, acquisition channels, and detailed reports on user journeys. 

Google Analytics also integrates with Google Ads, making it invaluable for those leveraging Google’s advertising solutions.

Adobe Analytics homepage
@acenewsservices

2. Adobe Analytics

Heralded for its deep customization capabilities, Adobe Analytics offers real-time stats, advanced segmentation, and a suite of reporting tools. Especially suited for large enterprises, it provides detailed insights on audience profiles and cross-channel marketing. Plus, it integrates seamlessly with other Adobe Marketing Cloud products.

Jetpack Stats homepage
@acenewsservices

3. Jetpack Stats for WordPress sites

While some other tools offer an overwhelming number of features, Jetpack Stats keeps things simple, yet insightful. It’s tailored specifically for WordPress websites. 

How Jetpack Stats compares

Unlike generic analytics tools, Jetpack Stats focuses completely on WordPress sites. The information is presented in a clear, digestible format, ensuring that even beginners can grasp their website’s metrics without a steep learning curve.

Key features and benefits of Jetpack Stats

Jetpack Stats offers daily insights, including top posts and pages, referral sources, and search terms that lead visitors to the site. It also provides data on the geographic location of visitors, which can be valuable for businesses targeting specific regions.

Seamless integration with WordPress

As a dedicated tool for WordPress, Jetpack Stats integrates effortlessly, ensuring that the data generated is accurate and reflective of the website’s performance.

Setting up Jetpack Stats

Installation is straightforward. Users simply need to install the Jetpack plugin, connect it to their WordPress.com account, and the analytics feature is automatically activated. From there, they can access their stats from their WordPress dashboard or the dedicated Jetpack app.

While the choice of analytics tool often depends on specific business needs, preferences, and budget constraints, Jetpack Stats emerges as a reliable choice for those using WordPress. Its simplicity combined with depth ensures that site owners get the best of both worlds — comprehensive insights without overwhelming complexity.

What are common challenges (and solutions) in web analytics?

Web analytics, though a powerful ally for businesses, isn’t without challenges. Understanding these challenges and finding ways to navigate them can mean the difference between actionable insights and misleading data. Let’s look at some of these hurdles and discuss solutions to tackle them effectively.

1. Handling cookie consent and privacy laws

The global emphasis on user privacy has led to strict regulations, like the General Data Protection Regulation (GDPR) in Europe and the California Consumer Privacy Act (CCPA) in the U.S. These laws mandate clear user consent before collecting any personal data, including web analytics.

Challenge

Ensuring that your analytics practices don’t breach any privacy regulations can be tricky. Inadvertent non-compliance can lead to hefty penalties.

Solution

Always be transparent about the data you collect. Implement clear cookie consent banners and privacy policies on your site. Regularly update your protocols in line with the ever-evolving privacy laws, and consider using tools designed with compliance in mind.

2. Managing bot traffic and referral spam

Over the years, there’s been a huge surge in automated bots, both benign and malicious. These bots can skew your data, presenting an inaccurate view of website traffic and engagement.

Challenge

Differentiating genuine human traffic from bot traffic and ensuring that the latter doesn’t distort your analytics data.

Solution

Utilize advanced filtering options available in most analytics tools to exclude known bots. Regularly monitor referral sources and set up filters to exclude suspicious or irrelevant referrals.

3. Ensuring data accuracy and reliability

The adage “garbage in, garbage out” applies quite well to web analytics. If the input data is flawed, the insights derived will be too.

Challenge: Ensuring that the data you’re basing your decisions on is both accurate and reliable.

Solution: Regularly audit and validate your analytics setup. Check for tracking code issues, duplicate tags, or missing data. A seamless integration between your website and analytics tool, like the synergy between WordPress and Jetpack Stats, can significantly enhance data reliability.

4. Overcoming analysis paralysis

With the vast amount of data available, it’s easy to get overwhelmed. Too much information can lead to indecision or misguided actions.

Challenge

Sifting through mountains of data to extract actionable insights without becoming overwhelmed.

Solution 

Focus on key performance indicators (KPIs) relevant to your goals. Simplify your dashboard to display only the most pertinent data. Periodically review your KPIs to ensure they align with your evolving objectives. Remember, the goal is to derive actionable insights, not merely collect the most data possible.

Frequently asked questions about web analytics

Navigating the world of web analytics can spark a myriad of questions, especially for those just getting started. Below you’ll find some of the most common queries and their answers.

How often should I check my web analytics data?

The frequency with which you review web analytics data largely depends on your business goals and the nature of your website. If your site witnesses dynamic changes or if you’re running short-term marketing campaigns, daily or weekly checks are advisable.

For more static websites or long-term campaigns, a monthly review might suffice. That said, periodic check-ins allow for timely adjustments to strategies and offer insights into emerging trends.

What is the most important web analytics metric for beginners to focus on?

While various metrics cater to different goals, “traffic Source” is fundamental for beginners. Understanding where your visitors originate — from search engines, social media, direct links, etc. — provides a foundation upon which you can understand other metrics. This allows for informed decisions about how to invest efforts and resources.

What is bounce rate, and how can a website owner reduce it?

Bounce rate refers to the percentage of visitors who navigate away from the site after viewing only one page. A high bounce rate might indicate that visitors aren’t finding what they’re looking for or the site’s user experience is lacking. Here are some quick ways to reduce bounce rate:

  • Improve site load time. Ensure that your website loads quickly. Visitors tend to abandon slow-loading sites.
  • Optimize content. Create relevant, well-organized content that addresses the needs of your audience.
  • Clear navigation. A well-structured and intuitive navigation system encourages visitors to explore more pages.
  • Mobile optimization. Make sure that your site is responsive and offers a seamless experience across devices.

What are the common challenges in interpreting web analytics data?

Interpreting web analytics data isn’t always straightforward. Some challenges include:

  • Data overload. Being overwhelmed by the sheer volume of data available.
  • Misaligned KPIs. Using metrics that don’t align with business objectives.
  • Diverse traffic sources. Differentiating between organic, paid, and social traffic.
  • Understanding user behavior. Simply knowing numbers without comprehending the reasons behind user actions.

How do I ensure that the data collected through web analytics is accurate and reliable?

Ensuring data accuracy involves several steps, including:

  • Regular audits. Periodically review and validate your tracking setup.
  • Filter out noise. Exclude bot traffic and known irrelevant sources.
  • Use trusted tools. Employ reliable web analytics tools that offer consistent tracking and reporting.

Notably, integrating an analytics tool that melds seamlessly with your website plays a pivotal role in the accuracy and reliability of the data. 

Jetpack Stats, for instance, is designed specifically for WordPress sites. Its integration is not only seamless, but also ensures that data is captured without gaps or redundancies, making the journey from raw data to actionable insights smoother and more efficient.

Jetpack Stats: Simple, powerful analytics for WordPress sites

Web analytics, with all its intricacies, has the potential to reshape your online strategies, driving engagement, conversions, and growth. But harnessing this power doesn’t require difficult setups or complex dashboards. Sometimes, simplicity paired with capability can lead to profound insights.

Jetpack Stats stands as a testament to the idea that robust analytics can be both uncomplicated and efficient. Designed specifically for WordPress sites, it captures the essence of what site owners need: clear, actionable data without the clutter.

WordPress users have a distinct advantage. With Jetpack Stats, there’s no steep learning curve. It complements the WordPress environment, so that site owners can focus on what truly matters: their content, audience, and growth.

So, why wade through the myriad of generic web analytics tools when there’s one crafted just for you? Dive into Jetpack Stats and let the tailored insights propel your WordPress site to new heights. Discover Jetpack Stats here.

This entry was posted in Analytics. Bookmark the permalink.

@acenewsservices

Editor says …Sterling Publishing & Media Service Agency is not responsible for the content of external site or from any reports, posts or links and thanks for following as always appreciate every like, reblog or retweet and comment thank you

@acenewsservices
@acenewsservices
Categories
WORDPRESS

FEATURED WordPress JETPACK REPORT: How to Create Tables in WordPress Using Plugins & Integration

@acenewsservices

AceNewsDesk – Tables are essential for many websites. When you think about tables, you might imagine simple, boring Excel spreadsheets. Yet, WordPress sites use tables in all kinds of interesting ways, from pricing and comparisons to feature lists and more

@acenewsservices

Ace Press News From Cutting Room Floor: Published: Jan.01: 2024: Updated on December 20, 2023 – Jen Swisher: TELEGRAM Ace Daily News Link https://t.me/+PuI36tlDsM7GpOJe

@acenewsservices

Once you know how to create tables in WordPress, you’ll be able to build all kinds of elements that are beneficial to your audience. A well-designed table can convey a lot of information or compare options in a way that’s easy for visitors to understand.

In this article, we’ll talk about why it makes sense to use tables in WordPress, and go over four methods for creating them. We’ll also show you how to import and style tables. So let’s get right to it!

Why you might want to use tables in WordPress

Tables are not unique to WordPress websites. They’re one of the core elements of the web, and you can find them on many of the websites you visit. That includes online stores, web hosting providers, and so on.

Tables are popular because they enable you to share lots of information in a simple format. For instance, consider a typical pricing table.

Imagine if you had to describe all of this information using paragraphs. Not only would that be challenging to create, but the details would also be more difficult for visitors to understand.

On the other hand, most people intuitively understand how tables work, and that enables you to use them in creative ways. You can put information side by side, and visitors will know they’re meant to compare two or more things.

Aside from making it easier to present complex information, tables also look appealing. This is more important than you might expect, as many visitors shy away from pages with endless paragraphs. Elements like tables, images, lists, and buttons make websites look more visually interesting and less intimidating.

How to create tables in WordPress (4 easy ways)

As with most tasks in WordPress, there are several ways you can approach creating tables. The method you choose will depend on the type of table you want to create, as well as what tools you prefer to use.

Method 1: Use the WordPress Table block

You can use the WordPress block editor to add almost any element to your website, including tables. The advantage of this approach is that it doesn’t require you to install additional tools.

If you’re familiar with other types of blocks, learning to use the Tableblock should only take a minute. To get started, open the block editor and select the option to add a new block. Look for the Table option and click on it.

adding a table block to a pricing page
@acenewsservices

After selecting the Table block, WordPress will ask how many columns and rows it should include. Set whatever numbers you like, and click on Create Table.

setting columns and rows for the table
@acenewsservices

Tables have no styles by default. That means you’ll see a blank grid of rows and columns, ready for you to enter the information.

empty table with cells
@acenewsservices

If you select the Table block, you can access a contextual menu that will enable you to add or remove rows and columns, as well as format the text inside.

The block Settings menu to the right of the editor includes options to set fixed widths for cells, as well as add header and footer sections. Here’s how a basic WordPress table looks with headers included:

empty tables with header labels
@acenewsservices

The Styles tab of the block settings lets you switch between a default grid and a stripes-based table. Here’s how the latter looks:

style options for an empty table
@acenewsservices

You can also change the default text and background color for cells in the table, as well as the typography and cell dimensions. With a little work, tables built this way can look simple but still visually appealing.

beautiful table with three column colors
@acenewsservices

Keep in mind that some themes will include block patterns for the Table block with pre-designed tables. That means you’ll be able to create tables with set styles, and only worry about adding your own content to them.

Method 2: Generate tables instantly with an AI tool

If you’ve experimented with AI tools like ChatGPT, you know you can ask them to generate many types of text. That includes a simple table based on a prompt.

This is an example of a table created using AI in WordPress. It was made using the Jetpack AI Assistant and Jetpack Blocks:

creating a pricing table with the Jetpack AI assistant
@acenewsservices

If you have access to the Jetpack AI Assistant, you use it in the block editor by selecting the AI Assistant block (note that this is an experimental feature).

the AI Assistant block in WordPress
@acenewsservices

Once you select the block, you’ll be able to enter a prompt. This prompt can ask the AI to generate text or other kinds of elements, including tables.

empty Jetpack AI prompt
@acenewsservices

In the earlier example, the AI was asked to generate a table with three plans for a hosting provider. The more detail you include in your prompt, the more likely you’ll get a result that you’re happy with.

Keep in mind that the AI tool can’t access information from your website or the web in general. That means if you ask it to create a table that includes information on the page you have opened, you won’t get the results you need.

Any table you generate using AI will need some level of editing. You’ll want to correct information, and include data the AI didn’t add on its own. Still, this can be a useful tool if you’re wondering how to structure a table, want to see an example of what kind of information to include, or are simply looking to quick start the process.

Method 3: Create tables in the classic editor

If you’re still using the Classic Editor, adding tables is a bit more complex than it is with blocks. For one, the classic editor doesn’t include any tools or options for adding tables to your content.

There are two ways to bypass this limitation. The first is to use the HTML editor, and create a table manually using code. Adding a table using HTML isn’t hard, but it can take a while if you’re new to the language.

A faster alternative is to use a tool that enables you to create tables and generate the corresponding HTML code for them.

creating a new table with HTML
@acenewsservices

The above example is from HTML Table Generator. This is a free tool that enables you to build tables using a simple editor, and then generate the corresponding HTML code.

Once you have that code, you can go into the Classic Editor and select the Text tab. Then, paste the code wherever you want the table to go.

adding table HTML to WordPress
@acenewsservices

Switch over to the Visual tab, and you’ll see the full table instead of the HTML. At that point, you can edit it directly.

editing the content of a table in the Visual Editor
@acenewsservices

Note that if you want to add or remove rows or columns (or make any other customizations), you’ll need to jump back to the Text tab and change the HTML code. If you plan on using tables in the Classic Editor, you’ll need some level of comfort working with HTML.

Method 4: Install and use a dedicated WordPress table plugin

If you don’t want to use the previous methods for building tables, there are alternatives. For instance, many plugins add new options for creating tables in WordPress, like TablePress.

TablePress plugin page
@acenewsservices

Your experience will vary a lot depending on which plugin you use. With TablePress, for instance, you use a table editor that works like a spreadsheet.

creating a new table with TablePress
@acenewsservices

This editor enables you to re-arrange cells using a drag-and-drop system. You can click on any cell to edit its content, and you have access to formatting tools.

TablePress also supports multiple features that we’re going to discuss in further sections, including pagination as well as search and filter capabilities. These features are key to helping visitors navigate tables that contain large amounts of data.

Every table you create using TablePress has a unique shortcode assigned to it. You can use that shortcode to place the table on your website. If you use the block editor, you’ll also get access to a TablePress Table block.

adding the TablePress table block to WordPress
@acenewsservices

If you want to use plugins to create tables in WordPress, it’s best to experiment with multiple options until you find one that fits your needs. Keep in mind that most table plugins need to be active for their elements to work. That means if you decide to switch plugins, some of the tables you’ve created might stop working, and you’ll need to remake them.

How to import tables from Excel, Google Sheets, and similar platforms

There are two ways to import tables from platforms like Excel and Google Sheets into WordPress. The first method is to use a plugin that offers an import tool for the type of spreadsheet you’re working with.

In the previous section, you saw how to use TablePress. That same plugin also includes an option to import tables from XLSX, CSV, HTML, and JSON files. You can access the plugin’s import tool by navigating to TablePress → Import a table.

importing a table into WordPress
@acenewsservices

You’ll need to download or save the table you want to import in the correct format. Once you do, you can upload the file using this importer, select the option to Add as a new table, and click on Import.

The plugin will translate the file into a table you can embed in your website. You’ll also be able to modify the table using the plugin’s built-in editor.

editing the HTML of a table
@acenewsservices

Note that the editor supports HTML, and it will try to replicate styles from the file using code. The code might look messy in the editor, but if you preview it, you’ll see the front-end formatting.

Another option for importing tables to WordPress is to copy and paste them. You can copy entire elements from Excel, Google Sheets, and similar software and websites. When you past tables into the block editor, WordPress will create a Table block including the original content.

copying and pasting a table into WordPress
@acenewsservices

Note that you should only copy and paste simple tables. Styles and formatting can be lost during the process. For complex tables, you’re better off using a table plugin that supports importing files directly.

How to style tables with CSS

You can use CSS to style tables in HTML. All WordPress tables use HTML, and CSS gives you a lot of control over how each element looks (if you know how to use it).

If you’re building tables using the block editor, you can go into the block settings for any table and look for the Advanced → Additional CSS Class(es) option.

adding a CSS class to a table
@acenewsservices

This will enable you to add classes to the table. You can assign CSS styles to these individual classes by modifying your theme’s style.css file.

Note that if you don’t know how to use CSS, learning enough to style a table creatively can be a significant effort. In most cases, you’ll be better off using the block editor’s built-in styling options (although they’re limited).

Table plugins also tend to offer a significant number of styling options. If you want to design tables and style them from top to bottom, you’ll need to use either CSS or plugins, depending on whether you’re comfortable using code.

Enhancing the user experience: Three ways to go beyond simple tables

Adding simple tables in WordPress is easy. If you look around online, though, you’ll notice that a lot of tables include advanced elements, like sorting options or buttons. Let’s talk about how to add those to your tables.

1. Add filters and search functionality

Online tables can include as much information as you need. Yet, the larger the tables become, the more difficult they are to navigate. That’s why a lot of tables on websites include filter and search functionality.

filters and search bar on a table
@acenewsservices

Without these features, it can be hard for visitors to find the information or items they’re looking for. Even with pagination, most visitors won’t go through multiple pages to identify a single entry.

The block editor doesn’t enable you to add filtering or search functionality to tables. If you want to do this, you’ll need to use a table plugin that includes these features.

One example of a plugin that does this is TablePress. When you’re using the TablePress editor, you can scroll down to Table Features for Site Visitors, and tick the Search/Filter option.

options for tables with checkboxes
@acenewsservices

Once you enable the feature, a search bar will appear on a row above the rest of the table’s contents. When visitors use the search feature, the table will update dynamically to show the corresponding results.

using a table's filter
@acenewsservices

Note that other table plugins might approach filtering and sorting differently. When you’re choosing a plugin to use, make sure that it includes the features you want your tables to have.

2. Create interactive tables by adding buttons and links

Tables in WordPress can include a lot more than text. They can incorporate links, images, and even video.

Adding links to tables is simple. You just need to select the relevant text in the block editor, and use the formatting menu to add the URL it should link to.

adding links to a table
@acenewsservices

As for buttons, you won’t be able to place them directly within tables. But you can add buttons directly below each column or next to each row. This gives visitors a visual cue that the buttons correspond to specific elements within the table.

Generally speaking, adding buttons to tables can be tricky. You’ll need to tinker with their design so that the placement matches the table, and be mindful that buttons might move around on smaller devices.

Not all table plugins offer support for buttons. One example that does this is Ninja Tables. This plugin offers a table editor that feels less like using a spreadsheet tool and more like a page builder.

When you create a table using this plugin, you can select from a list of elements to drag and drop, including buttons.

creating a table with NinjaTables
@acenewsservices

This plugin gives you full control over the style of the buttons, and you can add links to them. This is perfect for tables where you want to include a call to action that asks visitors to sign up or make a purchase.

3. Design visualization tools to pair with your tables

Tables aren’t the only elements you can use to visualize data in WordPress. Charts and graphs are also excellent ways to organize and display lots of information.

By default, WordPress doesn’t include tools or blocks that enable you to add charts and graphs. If you want to use these types of elements, you’ll have to turn to plugins. 

There are a lot of great (and free) charts and graphs plugins you can use in WordPress. Most of them synergize with tables, since you can use them as datasets to generate accompanying graphs. One example is wpDataTables.

This plugin enables you to create tables for your site and transform them into graphs or charts. When you create a chart or graph, you can choose from a collection of styles, including columns, pies, and scatter charts.

options for charts and graphs
@acenewsservices

Here’s an example of two pie charts generated from table data using this plugin:

two pie charts created in WordPress
@acenewsservices

Charts and graphs can be effective tools for showcasing data in a more visual way than with tables. You can read more about how to use wpDataTables by checking out its documentation.

working to make a table mobile responsive
@acenewsservices

Troubleshooting common table issues in WordPress

If you plan to use a lot of tables in WordPress, you may run into technical issues at some point. Here’s what to do if you have trouble with your website’s tables.

1. Your table is not displaying correctly

If you create tables using plugins, they may occasionally display incorrectly. A lot of table plugins need to remain active, or the elements you create with them will cease to work. Plugins that use shortcodes to place tables are particularly prone to this problem.

If your table is missing elements, has a broken layout, or isn’t displaying at all, it’s probably due to an issue with the source plugin. Your first step in troubleshooting the issue should be to see if there’s an update available for the plugin, by checking the download page or developer site.

You can also troubleshoot this issue by disabling your site’s plugins one by one. Chances are there’s one specific plugin causing compatibility issues with tables, and identifying this will help you fix the issue. Make sure to perform this test (and all troubleshooting) on a staging site, and back up your site first.

Another alternative is to export the table data and import it using a different plugin. This can be time-consuming if your website uses a lot of tables, so it’s only recommended as a last resort.

2. Your table isn’t displaying well on certain devices

It’s essential that any table you create looks good, no matter what type or size of device a visitor uses to view your site. If you create tables using the block editor, this shouldn’t be an issue. Blocks are responsive by default, which means your tables will resize to fit the visitor’s screen.

In some cases, this will mean that columns or rows shift downward. Some table plugins also enable you to create scrollable tables, so visitors can navigate them regardless of their device.

If you design a table that doesn’t adapt to different screen sizes, chances are the plugin you’re using is not responsive. The simplest way to test your tables is to open your site on a mobile device and take a look.

The more rows and columns in the table, the harder it becomes to render on a mobile device. If the plugin you’re using isn’t responsive, you’ll need to find an alternative, like TablePress or Ninja Tables (discussed earlier).

3.  You’re encountering plugin conflicts or having import/export issues

If you’re using a table plugin and the elements you create stop working, it might be an issue with the plugin itself. Most of the time, if a plugin suddenly stops working or starts displaying errors, it’s due to compatibility issues.

The plugin might not be compatible with other elements on your site, or with the version of WordPress you’re running. The easiest way to avoid these types of issues is to keep WordPress up to date, along with your theme and all of your site’s plugins.

The same applies to any issues you encounter when trying to import and export tables. There’s likely a problem with whatever plugin or tool you’re using for the import/export process. Either it’s broken, or it’s incompatible with some other element of your site.

If updating WordPress and your plugins doesn’t fix the error with your tables, you’ll need to pinpoint which tool is causing the problem. This means disabling plugins one by one until your tables start displaying correctly again. Once you identify the source of the conflict, you can decide whether to keep the plugin or remove it and look for an alternative. 

Frequently asked questions

In case you still have any questions about how to create tables in WordPress, let’s explore some common topics.

Can I create tables in WordPress without any technical knowledge?

If you know how to use spreadsheet software or a text editor, you can create tables in WordPress. The block editor makes it easy to create simple tables and add the content you want.

Another option is to use the Jetpack AI Assistant. It can create full tables from a simple prompt, which means less work on your end. Once the table is ready, all you have to do is edit its content.

How can I leverage AI to easily build tables in WordPress?

If you have the Jetpack AI Assistant and Jetpack Blocks, you can use AI to build tables in WordPress. You can access the AI Assistant block using the block editor, and give it a prompt to generate a table for you.

The assistant enables you to fine-tune the prompt until you’re happy with the results. Once the table is set, you can edit it just as with any other block in WordPress.

Is it possible to convert existing content into tables?

If you have a web page full of information, you can easily make it more readable by converting it into a table. Just start by creating a table using any method you prefer, and then copy over the relevant details from the existing content.

Can I embed media like images and videos within tables?

WordPress enables you to embed any type of content you want in tables. That includes images, videos, lists, and so on.

If you’re embedding large elements, keep in mind that they can distort the dimensions of the table. You may need to resize images and video embeds to ensure that the tables look good.

Is there a way to create tables that allow visitors to filter or sort data on the front end?

WordPress doesn’t include a filter or search option in tables by default. To add these features, you’ll need to use a table plugin that supports them. If you plan to create tables with large sets of data, it might be smart to use a plugin to build them instead of the block or classic editor.

Can I link an external database to dynamically update the content in my WordPress tables?

Some table plugins enable you to embed elements from other sources, like Google Sheets. These embedded tables update automatically if the source document changes.

It’s important to note that this feature is only available in some plugins. Different table plugins may support different sources for importing or embedding tables.

How do I handle large tables that might be cumbersome for readers?

Some WordPress table plugins include pagination options. This is useful for tables with dozens or hundreds of elements. Without pagination, those elements would be impossible to navigate.

If you’re building tables that include lots of entries, it’s often best to use plugins to create them. Ideally, these plugins should include pagination, filtering, and sorting functionality.

What’s the impact of tables on WordPress loading speed?

The impact of tables on your site’s loading speed should be negligible. Tables are text-based elements, so they have minimal impact on your site’s performance (unless you add a lot of media to them).

What is the easiest way to start building tables right now?

If you don’t want to deal with blocks or plugins, the easiest way to build tables in WordPress is with the Jetpack AI Assistant. The assistant can transform prompts into full-blown tables inside the block editor.

You’ll still need to select and add the AI Assistant block manually in WordPress. After that, the assistant takes over as soon as you enter a prompt.

Jetpack AI Assistant: WordPress AI content and table generator

WordPress offers several ways to create tables and add them to your website. You can create any kind of table you want, and style it to look unique using blocks, plugins, or CSS.

If you want access to a tool that can help you generate all kinds of text-based content, including tables, consider using the Jetpack AI Assistant. It can help you generate full pages of content and even tables, all starting from a single prompt!

This entry was posted in Learn. Bookmark the permalink.


Jen Swisher

Jen is a Happiness Engineer for Jetpack. She has been working with WordPress and Jetpack for over a decade. Prior to starting at Automattic, Jen has helped small businesses, local non-profits, and Fortune 50 companies create engaging web experiences for their customers. She is passionate about teaching others how to create on the web without fear.

@acenewsservices

Editor says …Sterling Publishing & Media Service Agency is not responsible for the content of external site or from any reports, posts or links and thanks for following as always appreciate every like, reblog or retweet and comment thank you

@acenewsservices
@acenewsservices