Categories
WORDPRESS

FEATURED WordPress JETPACK REPORT: How to Create Tables in WordPress Using Plugins & Integration

@acenewsservices

AceNewsDesk – Tables are essential for many websites. When you think about tables, you might imagine simple, boring Excel spreadsheets. Yet, WordPress sites use tables in all kinds of interesting ways, from pricing and comparisons to feature lists and more

@acenewsservices

Ace Press News From Cutting Room Floor: Published: Jan.01: 2024: Updated on December 20, 2023 – Jen Swisher: TELEGRAM Ace Daily News Link https://t.me/+PuI36tlDsM7GpOJe

@acenewsservices

Once you know how to create tables in WordPress, you’ll be able to build all kinds of elements that are beneficial to your audience. A well-designed table can convey a lot of information or compare options in a way that’s easy for visitors to understand.

In this article, we’ll talk about why it makes sense to use tables in WordPress, and go over four methods for creating them. We’ll also show you how to import and style tables. So let’s get right to it!

Why you might want to use tables in WordPress

Tables are not unique to WordPress websites. They’re one of the core elements of the web, and you can find them on many of the websites you visit. That includes online stores, web hosting providers, and so on.

Tables are popular because they enable you to share lots of information in a simple format. For instance, consider a typical pricing table.

Imagine if you had to describe all of this information using paragraphs. Not only would that be challenging to create, but the details would also be more difficult for visitors to understand.

On the other hand, most people intuitively understand how tables work, and that enables you to use them in creative ways. You can put information side by side, and visitors will know they’re meant to compare two or more things.

Aside from making it easier to present complex information, tables also look appealing. This is more important than you might expect, as many visitors shy away from pages with endless paragraphs. Elements like tables, images, lists, and buttons make websites look more visually interesting and less intimidating.

How to create tables in WordPress (4 easy ways)

As with most tasks in WordPress, there are several ways you can approach creating tables. The method you choose will depend on the type of table you want to create, as well as what tools you prefer to use.

Method 1: Use the WordPress Table block

You can use the WordPress block editor to add almost any element to your website, including tables. The advantage of this approach is that it doesn’t require you to install additional tools.

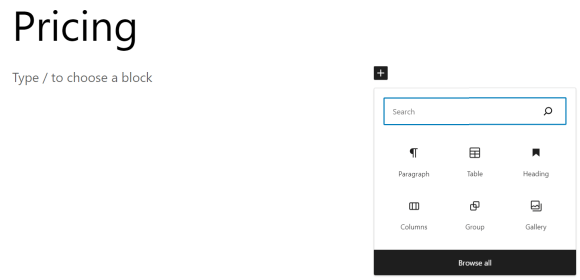
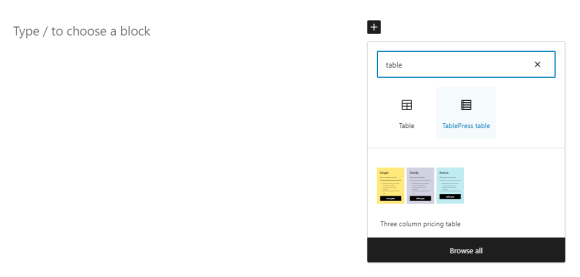
If you’re familiar with other types of blocks, learning to use the Tableblock should only take a minute. To get started, open the block editor and select the option to add a new block. Look for the Table option and click on it.

adding a table block to a pricing page
@acenewsservices

After selecting the Table block, WordPress will ask how many columns and rows it should include. Set whatever numbers you like, and click on Create Table.

setting columns and rows for the table
@acenewsservices

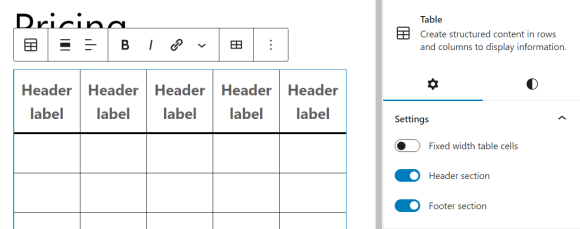
Tables have no styles by default. That means you’ll see a blank grid of rows and columns, ready for you to enter the information.

empty table with cells
@acenewsservices

If you select the Table block, you can access a contextual menu that will enable you to add or remove rows and columns, as well as format the text inside.

The block Settings menu to the right of the editor includes options to set fixed widths for cells, as well as add header and footer sections. Here’s how a basic WordPress table looks with headers included:

empty tables with header labels
@acenewsservices

The Styles tab of the block settings lets you switch between a default grid and a stripes-based table. Here’s how the latter looks:

style options for an empty table
@acenewsservices

You can also change the default text and background color for cells in the table, as well as the typography and cell dimensions. With a little work, tables built this way can look simple but still visually appealing.

beautiful table with three column colors
@acenewsservices

Keep in mind that some themes will include block patterns for the Table block with pre-designed tables. That means you’ll be able to create tables with set styles, and only worry about adding your own content to them.

Method 2: Generate tables instantly with an AI tool

If you’ve experimented with AI tools like ChatGPT, you know you can ask them to generate many types of text. That includes a simple table based on a prompt.

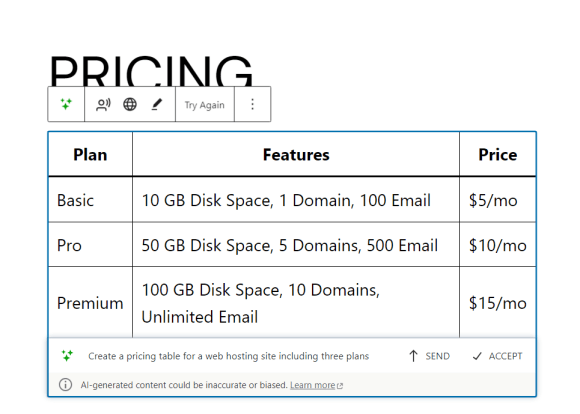
This is an example of a table created using AI in WordPress. It was made using the Jetpack AI Assistant and Jetpack Blocks:

creating a pricing table with the Jetpack AI assistant
@acenewsservices

If you have access to the Jetpack AI Assistant, you use it in the block editor by selecting the AI Assistant block (note that this is an experimental feature).

the AI Assistant block in WordPress
@acenewsservices

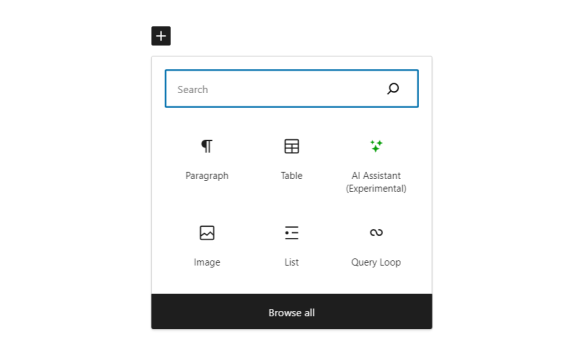
Once you select the block, you’ll be able to enter a prompt. This prompt can ask the AI to generate text or other kinds of elements, including tables.

empty Jetpack AI prompt
@acenewsservices

In the earlier example, the AI was asked to generate a table with three plans for a hosting provider. The more detail you include in your prompt, the more likely you’ll get a result that you’re happy with.

Keep in mind that the AI tool can’t access information from your website or the web in general. That means if you ask it to create a table that includes information on the page you have opened, you won’t get the results you need.

Any table you generate using AI will need some level of editing. You’ll want to correct information, and include data the AI didn’t add on its own. Still, this can be a useful tool if you’re wondering how to structure a table, want to see an example of what kind of information to include, or are simply looking to quick start the process.

Method 3: Create tables in the classic editor

If you’re still using the Classic Editor, adding tables is a bit more complex than it is with blocks. For one, the classic editor doesn’t include any tools or options for adding tables to your content.

There are two ways to bypass this limitation. The first is to use the HTML editor, and create a table manually using code. Adding a table using HTML isn’t hard, but it can take a while if you’re new to the language.

A faster alternative is to use a tool that enables you to create tables and generate the corresponding HTML code for them.

creating a new table with HTML
@acenewsservices

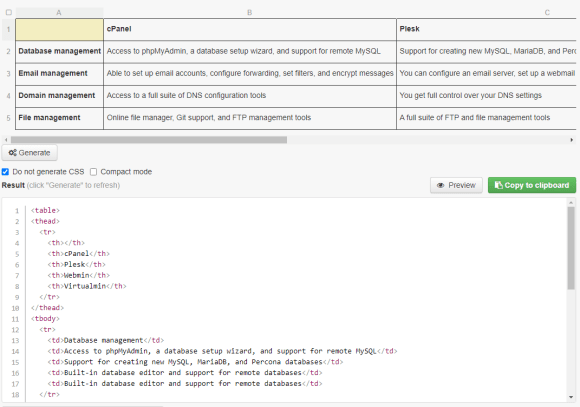
The above example is from HTML Table Generator. This is a free tool that enables you to build tables using a simple editor, and then generate the corresponding HTML code.

Once you have that code, you can go into the Classic Editor and select the Text tab. Then, paste the code wherever you want the table to go.

adding table HTML to WordPress
@acenewsservices

Switch over to the Visual tab, and you’ll see the full table instead of the HTML. At that point, you can edit it directly.

editing the content of a table in the Visual Editor
@acenewsservices

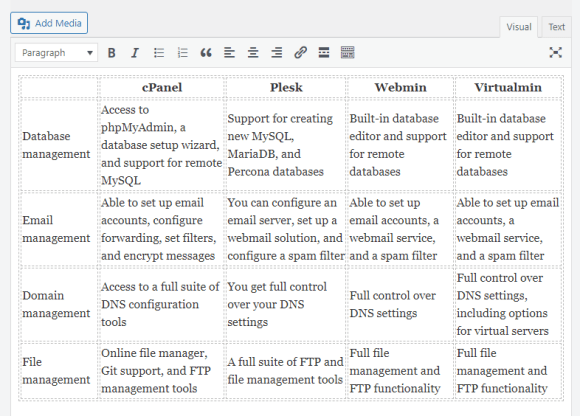
Note that if you want to add or remove rows or columns (or make any other customizations), you’ll need to jump back to the Text tab and change the HTML code. If you plan on using tables in the Classic Editor, you’ll need some level of comfort working with HTML.

Method 4: Install and use a dedicated WordPress table plugin

If you don’t want to use the previous methods for building tables, there are alternatives. For instance, many plugins add new options for creating tables in WordPress, like TablePress.

TablePress plugin page
@acenewsservices

Your experience will vary a lot depending on which plugin you use. With TablePress, for instance, you use a table editor that works like a spreadsheet.

creating a new table with TablePress
@acenewsservices

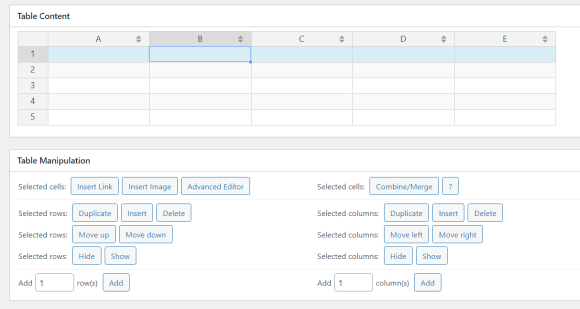
This editor enables you to re-arrange cells using a drag-and-drop system. You can click on any cell to edit its content, and you have access to formatting tools.

TablePress also supports multiple features that we’re going to discuss in further sections, including pagination as well as search and filter capabilities. These features are key to helping visitors navigate tables that contain large amounts of data.

Every table you create using TablePress has a unique shortcode assigned to it. You can use that shortcode to place the table on your website. If you use the block editor, you’ll also get access to a TablePress Table block.

adding the TablePress table block to WordPress
@acenewsservices

If you want to use plugins to create tables in WordPress, it’s best to experiment with multiple options until you find one that fits your needs. Keep in mind that most table plugins need to be active for their elements to work. That means if you decide to switch plugins, some of the tables you’ve created might stop working, and you’ll need to remake them.

How to import tables from Excel, Google Sheets, and similar platforms

There are two ways to import tables from platforms like Excel and Google Sheets into WordPress. The first method is to use a plugin that offers an import tool for the type of spreadsheet you’re working with.

In the previous section, you saw how to use TablePress. That same plugin also includes an option to import tables from XLSX, CSV, HTML, and JSON files. You can access the plugin’s import tool by navigating to TablePress → Import a table.

importing a table into WordPress
@acenewsservices

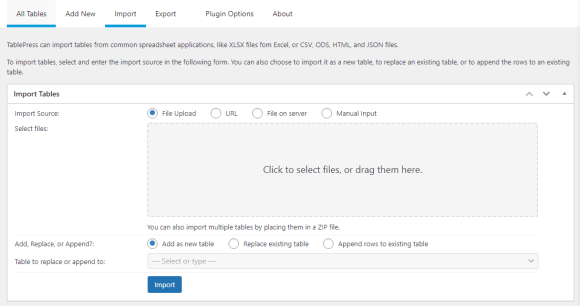
You’ll need to download or save the table you want to import in the correct format. Once you do, you can upload the file using this importer, select the option to Add as a new table, and click on Import.

The plugin will translate the file into a table you can embed in your website. You’ll also be able to modify the table using the plugin’s built-in editor.

editing the HTML of a table
@acenewsservices

Note that the editor supports HTML, and it will try to replicate styles from the file using code. The code might look messy in the editor, but if you preview it, you’ll see the front-end formatting.

Another option for importing tables to WordPress is to copy and paste them. You can copy entire elements from Excel, Google Sheets, and similar software and websites. When you past tables into the block editor, WordPress will create a Table block including the original content.

copying and pasting a table into WordPress
@acenewsservices

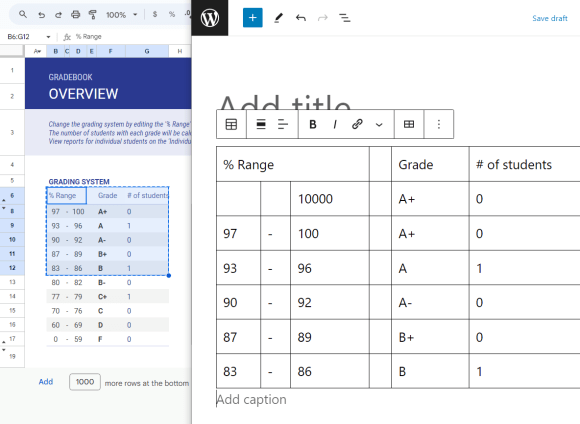
Note that you should only copy and paste simple tables. Styles and formatting can be lost during the process. For complex tables, you’re better off using a table plugin that supports importing files directly.

How to style tables with CSS

You can use CSS to style tables in HTML. All WordPress tables use HTML, and CSS gives you a lot of control over how each element looks (if you know how to use it).

If you’re building tables using the block editor, you can go into the block settings for any table and look for the Advanced → Additional CSS Class(es) option.

adding a CSS class to a table
@acenewsservices

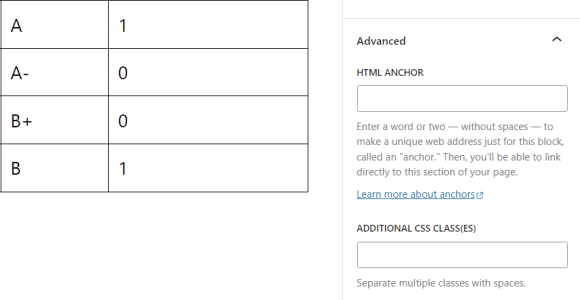
This will enable you to add classes to the table. You can assign CSS styles to these individual classes by modifying your theme’s style.css file.

Note that if you don’t know how to use CSS, learning enough to style a table creatively can be a significant effort. In most cases, you’ll be better off using the block editor’s built-in styling options (although they’re limited).

Table plugins also tend to offer a significant number of styling options. If you want to design tables and style them from top to bottom, you’ll need to use either CSS or plugins, depending on whether you’re comfortable using code.

Enhancing the user experience: Three ways to go beyond simple tables

Adding simple tables in WordPress is easy. If you look around online, though, you’ll notice that a lot of tables include advanced elements, like sorting options or buttons. Let’s talk about how to add those to your tables.

1. Add filters and search functionality

Online tables can include as much information as you need. Yet, the larger the tables become, the more difficult they are to navigate. That’s why a lot of tables on websites include filter and search functionality.

filters and search bar on a table
@acenewsservices

Without these features, it can be hard for visitors to find the information or items they’re looking for. Even with pagination, most visitors won’t go through multiple pages to identify a single entry.

The block editor doesn’t enable you to add filtering or search functionality to tables. If you want to do this, you’ll need to use a table plugin that includes these features.

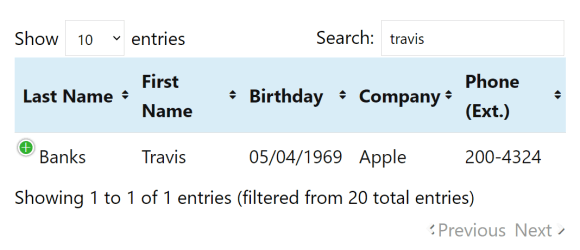
One example of a plugin that does this is TablePress. When you’re using the TablePress editor, you can scroll down to Table Features for Site Visitors, and tick the Search/Filter option.

options for tables with checkboxes
@acenewsservices

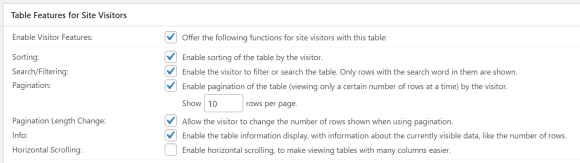
Once you enable the feature, a search bar will appear on a row above the rest of the table’s contents. When visitors use the search feature, the table will update dynamically to show the corresponding results.

using a table's filter
@acenewsservices

Note that other table plugins might approach filtering and sorting differently. When you’re choosing a plugin to use, make sure that it includes the features you want your tables to have.

2. Create interactive tables by adding buttons and links

Tables in WordPress can include a lot more than text. They can incorporate links, images, and even video.

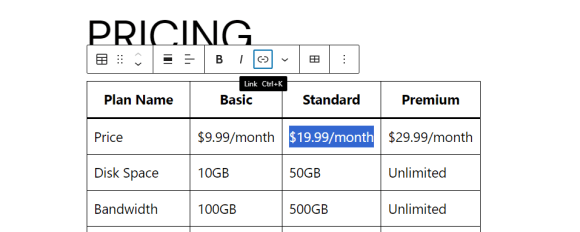
Adding links to tables is simple. You just need to select the relevant text in the block editor, and use the formatting menu to add the URL it should link to.

adding links to a table
@acenewsservices

As for buttons, you won’t be able to place them directly within tables. But you can add buttons directly below each column or next to each row. This gives visitors a visual cue that the buttons correspond to specific elements within the table.

Generally speaking, adding buttons to tables can be tricky. You’ll need to tinker with their design so that the placement matches the table, and be mindful that buttons might move around on smaller devices.

Not all table plugins offer support for buttons. One example that does this is Ninja Tables. This plugin offers a table editor that feels less like using a spreadsheet tool and more like a page builder.

When you create a table using this plugin, you can select from a list of elements to drag and drop, including buttons.

creating a table with NinjaTables
@acenewsservices

This plugin gives you full control over the style of the buttons, and you can add links to them. This is perfect for tables where you want to include a call to action that asks visitors to sign up or make a purchase.

3. Design visualization tools to pair with your tables

Tables aren’t the only elements you can use to visualize data in WordPress. Charts and graphs are also excellent ways to organize and display lots of information.

By default, WordPress doesn’t include tools or blocks that enable you to add charts and graphs. If you want to use these types of elements, you’ll have to turn to plugins. 

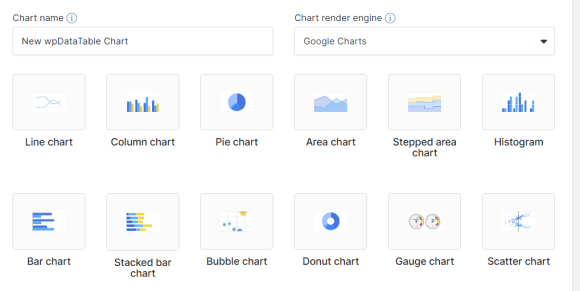
There are a lot of great (and free) charts and graphs plugins you can use in WordPress. Most of them synergize with tables, since you can use them as datasets to generate accompanying graphs. One example is wpDataTables.

This plugin enables you to create tables for your site and transform them into graphs or charts. When you create a chart or graph, you can choose from a collection of styles, including columns, pies, and scatter charts.

options for charts and graphs
@acenewsservices

Here’s an example of two pie charts generated from table data using this plugin:

two pie charts created in WordPress
@acenewsservices

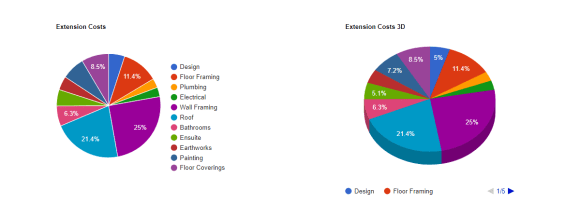
Charts and graphs can be effective tools for showcasing data in a more visual way than with tables. You can read more about how to use wpDataTables by checking out its documentation.

working to make a table mobile responsive
@acenewsservices

Troubleshooting common table issues in WordPress

If you plan to use a lot of tables in WordPress, you may run into technical issues at some point. Here’s what to do if you have trouble with your website’s tables.

1. Your table is not displaying correctly

If you create tables using plugins, they may occasionally display incorrectly. A lot of table plugins need to remain active, or the elements you create with them will cease to work. Plugins that use shortcodes to place tables are particularly prone to this problem.

If your table is missing elements, has a broken layout, or isn’t displaying at all, it’s probably due to an issue with the source plugin. Your first step in troubleshooting the issue should be to see if there’s an update available for the plugin, by checking the download page or developer site.

You can also troubleshoot this issue by disabling your site’s plugins one by one. Chances are there’s one specific plugin causing compatibility issues with tables, and identifying this will help you fix the issue. Make sure to perform this test (and all troubleshooting) on a staging site, and back up your site first.

Another alternative is to export the table data and import it using a different plugin. This can be time-consuming if your website uses a lot of tables, so it’s only recommended as a last resort.

2. Your table isn’t displaying well on certain devices

It’s essential that any table you create looks good, no matter what type or size of device a visitor uses to view your site. If you create tables using the block editor, this shouldn’t be an issue. Blocks are responsive by default, which means your tables will resize to fit the visitor’s screen.

In some cases, this will mean that columns or rows shift downward. Some table plugins also enable you to create scrollable tables, so visitors can navigate them regardless of their device.

If you design a table that doesn’t adapt to different screen sizes, chances are the plugin you’re using is not responsive. The simplest way to test your tables is to open your site on a mobile device and take a look.

The more rows and columns in the table, the harder it becomes to render on a mobile device. If the plugin you’re using isn’t responsive, you’ll need to find an alternative, like TablePress or Ninja Tables (discussed earlier).

3.  You’re encountering plugin conflicts or having import/export issues

If you’re using a table plugin and the elements you create stop working, it might be an issue with the plugin itself. Most of the time, if a plugin suddenly stops working or starts displaying errors, it’s due to compatibility issues.

The plugin might not be compatible with other elements on your site, or with the version of WordPress you’re running. The easiest way to avoid these types of issues is to keep WordPress up to date, along with your theme and all of your site’s plugins.

The same applies to any issues you encounter when trying to import and export tables. There’s likely a problem with whatever plugin or tool you’re using for the import/export process. Either it’s broken, or it’s incompatible with some other element of your site.

If updating WordPress and your plugins doesn’t fix the error with your tables, you’ll need to pinpoint which tool is causing the problem. This means disabling plugins one by one until your tables start displaying correctly again. Once you identify the source of the conflict, you can decide whether to keep the plugin or remove it and look for an alternative. 

Frequently asked questions

In case you still have any questions about how to create tables in WordPress, let’s explore some common topics.

Can I create tables in WordPress without any technical knowledge?

If you know how to use spreadsheet software or a text editor, you can create tables in WordPress. The block editor makes it easy to create simple tables and add the content you want.

Another option is to use the Jetpack AI Assistant. It can create full tables from a simple prompt, which means less work on your end. Once the table is ready, all you have to do is edit its content.

How can I leverage AI to easily build tables in WordPress?

If you have the Jetpack AI Assistant and Jetpack Blocks, you can use AI to build tables in WordPress. You can access the AI Assistant block using the block editor, and give it a prompt to generate a table for you.

The assistant enables you to fine-tune the prompt until you’re happy with the results. Once the table is set, you can edit it just as with any other block in WordPress.

Is it possible to convert existing content into tables?

If you have a web page full of information, you can easily make it more readable by converting it into a table. Just start by creating a table using any method you prefer, and then copy over the relevant details from the existing content.

Can I embed media like images and videos within tables?

WordPress enables you to embed any type of content you want in tables. That includes images, videos, lists, and so on.

If you’re embedding large elements, keep in mind that they can distort the dimensions of the table. You may need to resize images and video embeds to ensure that the tables look good.

Is there a way to create tables that allow visitors to filter or sort data on the front end?

WordPress doesn’t include a filter or search option in tables by default. To add these features, you’ll need to use a table plugin that supports them. If you plan to create tables with large sets of data, it might be smart to use a plugin to build them instead of the block or classic editor.

Can I link an external database to dynamically update the content in my WordPress tables?

Some table plugins enable you to embed elements from other sources, like Google Sheets. These embedded tables update automatically if the source document changes.

It’s important to note that this feature is only available in some plugins. Different table plugins may support different sources for importing or embedding tables.

How do I handle large tables that might be cumbersome for readers?

Some WordPress table plugins include pagination options. This is useful for tables with dozens or hundreds of elements. Without pagination, those elements would be impossible to navigate.

If you’re building tables that include lots of entries, it’s often best to use plugins to create them. Ideally, these plugins should include pagination, filtering, and sorting functionality.

What’s the impact of tables on WordPress loading speed?

The impact of tables on your site’s loading speed should be negligible. Tables are text-based elements, so they have minimal impact on your site’s performance (unless you add a lot of media to them).

What is the easiest way to start building tables right now?

If you don’t want to deal with blocks or plugins, the easiest way to build tables in WordPress is with the Jetpack AI Assistant. The assistant can transform prompts into full-blown tables inside the block editor.

You’ll still need to select and add the AI Assistant block manually in WordPress. After that, the assistant takes over as soon as you enter a prompt.

Jetpack AI Assistant: WordPress AI content and table generator

WordPress offers several ways to create tables and add them to your website. You can create any kind of table you want, and style it to look unique using blocks, plugins, or CSS.

If you want access to a tool that can help you generate all kinds of text-based content, including tables, consider using the Jetpack AI Assistant. It can help you generate full pages of content and even tables, all starting from a single prompt!

This entry was posted in Learn. Bookmark the permalink.


Jen Swisher

Jen is a Happiness Engineer for Jetpack. She has been working with WordPress and Jetpack for over a decade. Prior to starting at Automattic, Jen has helped small businesses, local non-profits, and Fortune 50 companies create engaging web experiences for their customers. She is passionate about teaching others how to create on the web without fear.

@acenewsservices

Editor says …Sterling Publishing & Media Service Agency is not responsible for the content of external site or from any reports, posts or links and thanks for following as always appreciate every like, reblog or retweet and comment thank you

@acenewsservices
@acenewsservices
Categories
WORDPRESS

FEATURED WORDPRESS JETPACK SECURITY REPORT: The Only WordPress Security Checklist You’ll Need in 2024

@acenewsservices

AceSecurityDesk WordPress is a secure content management system (CMS), but the way you set up and configure your website can affect its level of security. If you don’t take steps to protect your site, you might end up facing a data breach or losing your content.

@acenewsservices

Ace Press News From Cutting Room Floor: Published: Dec.18: 2023: WordPress News: Updated on December 11, 2023 – Jen Swisher TELEGRAM Ace Daily News Link https://t.me/+PuI36tlDsM7GpOJe

WordPress login screen
@acenewsservices

Yes, WordPress offers some security measures. Your admin dashboard is protected by a login page that requires users to enter a valid username and password.

Jetpack Security homepage
@acenewsservices

To help you out, we’ve created the ultimate WordPress security checklist. This will guide you through all the steps you need to protect your website against bots and attackers.

WordPress update screen
@acenewsservices
turning on auto-updates in WordPress
@acenewsservices
strong password notification in WordPress
@acenewsservices
turning on 2FA from WordPress.com
@acenewsservices
turning on Jetpack's WAF settings
@acenewsservices
malware scan results in WordPress
@acenewsservices
latest backup information from Jetpack VaultPress Backup
@acenewsservices
restore options from Jetpack VaultPress Backup
@acenewsservices
activity log from Jetpack
activity log in WordPress
@acenewsservices
dropdown list of user roles
@acenewsservices

In this post, we’ll take a look at the built-in security features of WordPress. Then, we’ll show you 30 things you can do to further protect your site.

number of attacks blocked on a site
@acenewsservices
options to turn on the Jetpack site accelerator CDN
@acenewsservices @acenewsservices
SSL certificate on the Jetpack site
@acenewsservices
finding SFTP details in a Pressable hosting environment
@acenewsservices
list of recommended WordPress hosts
@acenewsservices

Does WordPress offer built‑in security?

The CMS also gets regular patches and updates to eliminate known WordPress security issues and vulnerabilities. Generally speaking, if you keep WordPress and its components up to date, you’ll be spared from the most common vulnerabilities.

Having said that, there’s also the human element to consider. In many cases, WordPress sites are hacked because of human error, like sharing or reusing login credentials. If an attacker gains access to an account with a high level of privileges, they can wreak havoc on your website.

Since the CMS is such a popular platform, attackers scan the web trying to find WordPress sites with known vulnerabilities. The more your site grows, the bigger a target that it will become.

What is the easiest way to secure a WordPress site?

Securing a WordPress website requires you to change your site’s configuration and add several features that make it harder for attackers to break in. If you don’t have time to follow this entire WordPress security checklist, the best thing you can do is install a security plugin.

Jetpack Security provides you with access to several security features, like automatic malware scanning and removal, spam protection, and real-time backups.

It’s important to note that no single plugin can protect your website against all the potential threats it can face. Therefore, you’ll want to secure your site even further if you’re serious about protecting your data and hard work.

For example, you’ll want to enforce strong passwords and enable two-factor authentication (2FA). We’ll take a closer look at these security measures (and many others) in our checklist.

30‑step WordPress security checklist

Remember that you don’t need to work on all of these security measures at once. Crossing off every item in the checklist may take a while, but most of them are fixes that you only need to implement once. 

So, here are 30 ways you can boost your site’s security. 

1. Keep WordPress updated

Outdated WordPress installations are perhaps the biggest cause of security breaches. A lot of users forget to update WordPress, along with the plugins and themes on their sites. This is a significant problem, as outdated software tends to be a primary target among attackers.

The older the software is, the more time attackers have had to analyze its code and find security loopholes. Developers monitor these threats and fix them as they appear. Therefore, you’ll want to run updates as soon as they’re released. 

Fortunately, WordPress makes it easy to stay on top of updates. In your dashboard, go to the Updates tab, and you’ll see an overview of everything available.

If you have a lot of updates to run, it’s important to back up your WordPress website before you proceed. This is especially important when updating to a newer WordPress version, as it can sometimes cause compatibility issues with plugins and themes.

You’ll want to check your updates page daily. Alternatively, you can enable auto-updates for your plugins and themes.

This way, if you forget to check your site for updates, these will be run automatically. 

2. Create strong usernames and passwords

Your website is only as secure as the credentials you use to access it. WordPress itself will let you know if you’re setting a weak password when creating a new account.

A “weak” password is anything that is easy to guess. If your credentials are something like “administrator” and “1234”, your site will likely fall victim to brute force attacks.

Ideally, your password should contain at least eight characters and a combination of letters, numbers, and special characters. If you have multiple users on your WordPress site, you may want to remind them to use strong credentials and change their passwords every few months. 

3. Add an extra layer of protection with 2FA

Two-factor authentication is a security measure that requires you to use a second layer of authentication when logging into a site. For instance, some websites may require you to enter a one-time code sent via email or SMS.

The goal of 2FA is to make it nearly impossible for attackers to guess your credentials. Without access to another device or account, they won’t be able to log into WordPress.

By default, WordPress doesn’t include 2FA functionality, so you’ll need to use a plugin like Jetpack to add this feature to your site. With Jetpack, you can add 2FA (called secure authentication) that works with your WordPress.com account.

4. Install a trusted security plugin

Powerful WordPress security plugins will help you cross off several items on this WordPress security checklist. Ideally, you’ll choose a single tool that offers the following features:

Malware scanning

If your website becomes infected, you’ll want to know as soon as possible. Regular malware scans will let you know if any part of your website is at risk.

Malware removal tools

If your security plugin identifies malware, you’ll want help to remove it. This may involve deleting the files or replacing them, depending on the part of your WordPress site that’s infected.

Backups

There are a lot of standalone backup solutions and plugins for WordPress. Some of the best WordPress security plugins include automatic backups, so you won’t need to install an additional plugin. 

Security logs

Ideally, you’ll want to know everything that happens on your website. Security logs record events in WordPress and enable you to search them to find suspicious activity.

2FA implementation

As we discussed earlier, 2FA is a critical tool that can help you minimize the risk of security breaches due to stolen credentials.

Jetpack Security includes all of those features, so you can carry out several steps in this security checklist with one tool.

5. Use a web application firewall (WAF)

A WAF is a security solution that helps protect applications and websites — including WordPress sites — from attacks by filtering and monitoring traffic. Depending on the software, it should be able to identify malicious traffic using preset rules or databases of known attackers.

A lot of web hosts automatically set up firewalls for their customers. You can also use Jetpack Security to add a WAF for your WordPress website.

Jetpack Security enables you to configure the WAF to use its preset rules and block specific IP addresses. You can also share activity data with Jetpack, which helps make the WAF more effective by growing the database of known threats.

6. Regularly scan WordPress for malware and vulnerabilities

Scanning your WordPress website for malware and vulnerabilities involves reviewing all of its files to look for unauthorized modifications or malicious code. While the process may seem daunting, there are tools that can do it for you.

Jetpack Security uses WPScan (the largest database of known WordPress vulnerabilities) to scan your website.

If the WordPress plugin finds malware or vulnerabilities, it can immediately notify you and even help remove or repair the affected files. This is much simpler than the manual approach, which requires you to determine which files to delete and figure out how to repair them.

7. Back up your site regularly or in real‑time

Backups are a critical component of website security. If anything ever happens to your site, they enable you to get up and running again quickly. 

Relying on your hosting provider for backups isn’t a safe option, as a compromise of your server could render both your WordPress site and its backups useless. 

Instead, you need a real-time, off-site backup solution to ensure that you’re protected 24/7 and can restore your site at a moment’s notice  — even if it’s completely down.

Jetpack VaultPress Backup does just this, saving your site every time you make a change.

The plugin stores these backups in the cloud to avoid overcrowding the server. It uses a combination of incremental and differential backups, so it doesn’t need to copy your entire site and database each time you make a change, which makes the process much more efficient.

Beyond website changes, Jetpack VaultPress Backup saves new comments, orders, and other user actions. It’s the premier backup tool for WooCommerce stores, as it will save orders even if you have to revert your WordPress site to a previous version. 

8. Store your backups on a separate server

As mentioned above, simply taking backups isn’t enough. You need to store them in multiple, secure, off-site locations so if there’s a digital security breach or physical disaster at one data center, you can still access and restore your site files. This is the same reason you can’t rely on backups from your host alone — your site and backups could both be compromised at once.

If you’re using VaultPress Backup, all of this is taken care of for you. Your backups are stored in multiple locations in the cloud and are always accessible, even if your site is down.

9. Keep track of user activity

If you have access to your site’s activity logs, you’ll be able to see when someone tries to log in multiple times and fails, if there’s a modification to a WordPress file, if someone installs a new plugin, and more.

Think about logs as the tech equivalent of security recordings. You hope you never have to use them, but they’re a widely-used security feature for a reason. WordPress doesn’t offer this functionality by default, so you’ll need to look for a plugin that does.

Jetpack Security enables you to monitor everything that happens on your website. It keeps an activity log that records who does what, with dates and times. If you run into a security issue, you can check this log to see what caused it. 

It also integrates with VaultPress Backup functionality, so you can restore your site to a specific moment based on what you find in the activity log. 

10. Control user access and permissions

One of the simplest ways to keep any system safe is to limit who has access to it. If you’re the only person working on your site, no one else should know your WordPress login information.

When working with a team, it’s important that you make full use of the WordPress user role system. The CMS offers multiple roles you can assign to users, depending on what permissions you want them to have.

The highest role is that of administrator and that’s the only user with full access to all WordPress features and settings. Other WordPress users, like authors, can only publish their own content and won’t be able to change the site’s configuration or even access its settings.

When considering what role to assign to each user, think about the permissions they need to carry out their tasks. At no point should any user have more permissions than they need. These restrictions will keep your site safer.

11. Limit the number of login attempts allowed

Repeated login attempts can be a sign that someone forgot their credentials. But if the number of attempts is more than a handful, you’re probably dealing with someone who’s trying to break into your website.

You should limit login attempts allowed within a specific time period to stop automated brute force attacks. Once again, you can use Jetpack to implement this security measure. 

The plugin can block attackers that try to use common credentials to get into your website. You can also configure it to allowlist specific IP addresses, so only their users can log into WordPress.

12. Use a CDN to help protect against DDoS attacks

A content delivery network (CDN) is a data system that stores copies of your website on servers in different locations around the world — reducing the latency that can result when someone tries to visit a site hosted in a country far away. When someone attempts to visit your WordPress site, the CDN will automatically respond to the request from a nearby server. 

The CDN can lighten the load on your servers, help you handle more traffic, reduce loading times, and protect you against distributed denial-of-service (DDoS) attacks. Since the attacks won’t hit your server directly, it won’t be as heavily impacted if it’s flooded by bot traffic.

If you use Jetpack Security, you have access to an image CDN that can help you cache media files for faster loading times. Plus, it automatically resizes images and serves the best option based on each visitor’s individual device. You can also consider integrating other CDNs with WordPress to reduce loading times even further and protect your site from sudden increases in traffic.

13. Install an SSL certificate

A secure sockets layer (SSL) certificate is a signal that your website can be trusted. It also enables you to load your site over HTTPS, which encrypts data that flows to and from your website. 

Most browsers signal that websites have SSL certificates with a simple lock icon in the navigation bar.

These days, most reputable web hosts offer free SSL certificates and automatic setup for users. If your web host doesn’t do this, you can obtain a free certificate from a source like Let’s Encrypt.

Once the certificate is ready, you’ll need to install it and then enable HTTPS. There are several ways to force WordPress to load over HTTPS. Really Simple SSL lets you do this with a simple click.

We guard your site. You run your business.

Jetpack Security provides easy‑to‑use, comprehensive WordPress site security, including real‑time backups, a web application firewall, malware scanning, and spam protection.Secure your site

14. Prefer SFTP to FTP when transferring files

File transfer protocol (FTP) enables you to connect to your website and upload, download, and modify files directly. The protocol uses a different set of credentials, which your web host should provide for you.

Some hosts use an updated and safer version of the protocol called SFTP. Modern FTP clients support both protocols and they work the same. The main difference is that SFTP encrypts the data you send and receive from the server (much like HTTPS).

If your web host enables you to use both FTP and SFTP, default to the latter. In case your web host only supports FTP, you might want to consider switching to a provider that offers better security features.

15. Keep your PHP version updated

WordPress is built on PHP, and the version you use plays an important role in site speed. Newer versions of PHP include security fixes that can help your website run faster and prevent exploits.

You can see what version of PHP your server uses by navigating to Site Health → Info and opening the Server tab.

Compare that information to the latest PHP release and see if your web host is using the latest version. Some web hosts may enable you to switch between PHP versions. If yours doesn’t, it might be time to consider switching to a new WordPress host

16. Delete inactive WordPress themes and plugins

It’s a good rule of thumb to deactivate and delete any plugins or WordPress themes you no longer use. This can decrease the chances of compatibility issues or vulnerabilities.

Deleting inactive themes and plugins will keep your website safer and more organized. You’ll want to review your active plugins periodically and make note of the ones you’re no longer using.

17. Carefully assess new plugins and themes

Before you install any plugin or theme on your website, it’s important to ensure that it comes from reputable developers and that it has a good track record. You can do this by checking its ratings and reviews.

The same goes for WordPress themes. Most plugin and theme repositories will show you an update history. A reputable plugin or theme will have regular updates, which means the developers are actively working on it.

You want to avoid WordPress plugins and themes that don’t receive updates anymore. No matter how useful they might be, they can lead to vulnerabilities on your website since the code is outdated.

18. Invest in a secure hosting provider

Not all hosting providers offer the same level of service, performance, and features. Some are better than others, and that doesn’t necessarily mean they’re more expensive.

Choosing a strong, secure WordPress hosting provider is a crucial decision as you’ll typically be bound to them for a long period of time. It’s important that you read as many reviews as possible and do your research before committing to any service. 

If you need help, you can check out this list of Jetpack-recommended hosts, some of which include key Jetpack features as part of managed WordPress hosting services.

19. Change the default admin username

When you set up WordPress, it’ll create the admin username by default. This makes it easy to remember your credentials, but it also makes it easy for attackers to guess your details. 

If your WordPress admin account is already set up, you have two options to change the default administrator username: 

  1. Create a new administrator account. You can create a new administrator account with any username you want and then switch to it. Once you do, you can delete the old account and proceed with using the new one.
  2. Change the username using phpMyAdmin. If you want to keep the existing account, you can modify the username through the database.

No username should be easy to guess, especially when it comes to the administrator account. If someone gets access to it, they’ll be able to make any changes they want to your website.

20. Change the default database prefix

The default database prefix in WordPress is wp_. That means if an attacker knows the name of the database, they can also guess the prefix and use that information to try and query it.

You can minimize that risk by changing the default database prefix to anything besides wp_. This is a two-step process. The first step is changing the database prefix in the wp-config.php file, which should have a line that looks like this:$table_prefix = 'wp_';

After making the change in wp-config.php, you’ll need to update the tables in the database with the new prefix. You can do this using phpMyAdmin and running multiple queries similar to this one:RENAME table `wp_options` TO `wp_a1b2c3d4_options`;

You can use that query structure and change what comes after the “TO”to match the table name with the updated prefix. Keep in mind that you’ll need to run that query for each table in the database, and until you do, your site won’t function properly.

21. Change the default /wp‑admin and /wp‑login.php URLs

The /wp-admin and /wp-login.php URLs enable you to access the dashboard and the login page in WordPress. These URLs are easy to remember, but they make your site more vulnerable. If someone wants to break into your website, they’ll often start with the default WordPress login URL.

You can make life harder for attackers by changing those default URLs. There are plugins that enable you to do this, like WPS Hide Login. Alternatively, you can change the login URLs through the .htaccess file if you prefer a manual approach.

22. Limit wp‑admin access to authorized IP addresses only

The /wp-admin URL opens the dashboard in WordPress. Technically, no one should have access to the dashboard without the right credentials. You can take security a step further by limiting access only to allowlisted IPs.

That is not a feature that WordPress offers. To implement it, you’ll need to add the following code to the .htaccess file:<Directory /root/wp-admin/>   Order Deny,Allow   Deny from all   Allow from xxx.xxx.xxx.xxx </Directory>

The xxx.xxx.xxx.xxx stands for the IP address you want to allowlist. Note that you can add multiple IPs by copying that line and entering the different addresses.

You’ll also need to modify the directory path, so it matches the location of the root directory in the server. After saving the file, any IP address not on the list will see an error if they try to access the dashboard.

23. Limit FTP access to authorized IP addresses only

You can limit FTP/SFTP access to your website by restricting who has access to the corresponding credentials. Some hosting control panels also enable you to limit FTP access by IP address.

This is ideal if you have a static IP address, since it will prevent anyone else from connecting to the website and accessing its files via FTP, even with the right credentials. Without a static IP, this setting may limit even your own access to the site.

Keep in mind that only a select few people should be able to connect to the website using FTP. If you’re working with others, and they don’t have a reason to access or edit core files directly, they shouldn’t have access to your FTP credentials.

24. Secure your wp‑config.php file

The wp-config.php file contains critical information about your website, including details about the database. By default, the file is located in the WordPress root directory.

The easiest way to secure the file is to move it directly outside the root directory. If WordPress can’t find wp-config.php where it usually is, it will look for it in one directory above its regular location.

Another option is to configure the file’s permissions to restrict access to anyone besides the administrator (that’s you). To do this, you’ll need to understand how file permissions work in UNIX-based systems and change the file’s configuration using SFTP.

25. Disable file editing to block malicious changes

Only the administrator should have permission to access and modify WordPress core files. Typically, you’ll be able to access file editing functionality from the dashboard. This means you can directly edit core, plugin, and theme files without leaving the WordPress admin.

Depending on the level of permissions users have, they might be able to access the file editor. The best way to prevent this is to disable file editing altogether. 

To implement this safety measure, open the wp-config.php file and add the following line of code before the end: define('DISALLOW_FILE_EDIT', true);

Save the changes to the file and close it. Note that you’ll still be able to edit files, but you’ll need to use SFTP to do it, which is a better (and safer) option than using the WordPress file editor.

26. Disable PHP file execution

Disabling PHP file execution in specific directories of your WordPress website is a security measure that helps prevent malicious scripts from running. If an attacker manages to upload a PHP script to your website, they might be able to execute it to gain unauthorized access, manipulate data, or distribute malware.

You can disable PHP file execution in specific directories by connecting to WordPress via FTP and navigating to the root folder. Inside, you can select what directories you want to protect and create new .htaccess files inside each of them. 

Here’s the code you need to add to those files:<Files *.php>   Order Allow,Deny   Deny from all </Files>

Note that disabling PHP execution at the root directory level might impact WordPress’ functionality. After all, the entire CMS is built on top of PHP. That means it’s better to disable it for individual folders like the media file directory.

27. Turn off PHP error reporting

Displaying errors publicly can expose potential vulnerabilities in your WordPress website to attackers. PHP error messages can include sensitive information like file paths, database structure details, or other data that can be used for exploiting your website.

WordPress enables you to disable PHP error reporting by changing the wp-config.php file. You can add the following code to the file to disable the WordPress debug mode and hide errors on the front end:// Turn off all error reporting error_reporting(0); // Disable display of errors and warnings  define('WP_DEBUG', false); define('WP_DEBUG_DISPLAY', false); // Hide errors from being displayed in the browser @ini_set('display_errors', 0);

Add that code before the end of the wp-config.php file and make sure you have a recent backup of your WordPress site before saving it. Keep in mind that error reporting can sometimes be useful for troubleshooting, so you may need to re-enable this feature at some point.

28. Disable directory browsing on your website

Directory browsing is a feature that enables visitors to access URLs like yourwebsite.com/wp-content and see the content of that directory. If directory browsing is enabled, users will be able to see lists of internal folders and files and even access them depending on their permissions.

From a security standpoint, it makes sense to disable directory browsing. A lot of WordPress web hosts do this by default. If yours doesn’t, you can disable directory browsing by adding the following code to your .htaccess file:Options -Indexes

This is a simple change, so it shouldn’t take long to implement. Afterward, if users try to visit a directory, they’ll see a simple error message instead.

29. Hide your WordPress version

By default, the current version of WordPress you’re using is listed in your source code. If someone knows what version of WordPress you’re using (and it’s an outdated one), they can look into specific vulnerabilities for that version, making it easier to breach your website.

To hide your WordPress version, you can add this code to your functions.php file:function remove_version_info() { return ''; } add_filter('the_generator', 'remove_version_info');

30. Avoid CAPTCHA for spam protection

CAPTCHA is a decent solution for protecting websites and forms against spam, but it’s not without problems.

Adding CAPTCHA to your WordPress website adds a layer of complication that can annoy and turn away legitimate visitors and even be impossible to solve — especially for those with impairments. 

Recent developments in attack vectors have also made CAPTCHAs less effective. If you care about preventing spam (which can result in a security breach) but also want to maximize conversion rates through an optimal user experience, it’s time to consider alternatives.  

Akismet is an all-in-one spam protection solution for WordPress that works completely in the background. The WordPress plugin helps you block spam by using its database of known malicious actors, and identifying and blocking specific words and URLs from comments on your site. It does all of that automatically, without visitors having to use CAPTCHAs to verify if they’re human.

Frequently asked questions about WordPress security

If you still have questions about how to protect your WordPress website, this section will answer them.

What are the benefits of having a WordPress security checklist?

Having access to a WordPress security checklist will help you determine what measures you’ve taken to protect your site and what is still left to do. The checklist is a simple resource you can refer to at any time to see what security measures you can implement in WordPress.

What is the fastest way to enhance my WordPress security?

The fastest way to protect your WordPress website is by using WordPress security plugins. Depending on the plugin you use, you’ll get access to features like 2FA, activity logs, backup tools, and malware scanning. Jetpack Security includes all of those features.

How can I scan my WordPress site for malware and vulnerabilities?

You can use a plugin like Jetpack Security to scan your WordPress site for malware. This tool will also highlight any potential vulnerabilities in your website. Then, you can take the necessary steps to eliminate these problems. 

If you don’t need a comprehensive WordPress security plugin, you can also get malware scanning through a standalone WordPress plugin like Jetpack Protect.

What is the most reliable way to back up and restore my WordPress site?

Your best option is to use an automated solution, so you don’t need to create backups manually. The plugin should also save copies on an off-site storage solution to avoid issues if your server is compromised.

The Jetpack VaultPress Backup plugin offers real-time backups. It also makes safe copies of your WordPress site on the cloud. You can also access VaultPress Backup along with a host of other features as part of Jetpack Security

Jetpack Security: The #1 security plugin for WordPress

Jetpack Security offers a collection of security features that will protect your WordPress website. With this plugin, you can cross off several items from the WordPress security checklist.

For instance, you get access to a backup solution, malware scanning and one-click removal, spam protection, activity logs, two-factor authentication and more. This makes Jetpack one of the most comprehensive security tools you can use for WordPress.

Are you ready to boost your site’s security? Get started with Jetpack security today!


Jen Swisher

Jen is a Happiness Engineer for Jetpack. She has been working with WordPress and Jetpack for over a decade. Prior to starting at Automattic, Jen has helped small businesses, local non-profits, and Fortune 50 companies create engaging web experiences for their customers. She is passionate about teaching others how to create on the web without fear.

We guard your site. You run your business.

Jetpack Security provides easy‑to‑use, comprehensive WordPress site security, including real‑time backups, a web application firewall, malware scanning, and spam protection.Secure your site

@acenewsservices

Editor says …Sterling Publishing & Media Service Agency is not responsible for the content of external site or from any reports, posts or links and thanks for following as always appreciate every like, reblog or retweet and comment thank you

@acenewsservices
@acenewsservices
Categories
WORDPRESS

FEATURED JETPACK PLUGIN REPORT: How to Improve Your Website Speed With Five Proven Tips Quickly

@acenewsservices

AceNewsDesk – On the web, milliseconds matter. Site visitors demand swift, responsive experiences, and just a few extra seconds of loading time can make the difference between a loyal customer and a lost opportunity. As website owners seek to improve their online presence, speed simply cannot be overlooked

@acenewsservices

Ace Press News From Cutting Room Floor: Published: Dec.16: 2023: Updated on December 15, 2023 – Jen Swisher TELEGRAM Ace Daily News Link https://t.me/+PuI36tlDsM7GpOJe

@acenewsservices

In this comprehensive guide, we’ll delve into the importance of website speed and offer five tried-and-true strategies to supercharge your site’s performance.

For WordPress users, we spotlight Jetpack Boost, a valuable plugin and ally in the quest for speed optimization.

Why website speed matters

1. It impacts the user experience and bounce rate

When a visitor lands on your site, expectations are high. A delay in the site’s response may not be met kindly. People want sites to load in less than a couple of seconds. Any delay beyond this threshold, and the person is more likely to abandon the site, causing your bounce rate to skyrocket.

The bounce rate is the percentage of visitors who navigate away from your site after viewing only one page. This number is more than just a statistic — it reflects user satisfaction that can impact revenue.

2. There’s a direct correlation between speed and conversions

Studies have consistently demonstrated a direct link between site speed and conversion rates. For every second longer it takes your site to load, you could lose nearly 5% of conversions

3. It helps determine search engine rankings

Search engines have one primary goal: to offer users the most relevant and efficient results. Site speed serves as an essential metric in determining these results because search engines recognize that visitors value speed and are more likely to spend time on a site that loads quickly.

Faster websites not only offer better user experiences, but also gain favor in search engine rankings. Google, the search giant, has explicitly statedthat site speed is one of the signals used by its algorithm to rank pages. With SEO becoming more competitive, website speed optimization is no longer optional.

How to benchmark your current site speed

1. Use tools like Google PageSpeed Insights, GTMetrix, and Pingdom

Before embarking on the journey of speed optimization, you must first identify where you stand. Several benchmarking tools can help assess your site’s performance from different perspectives. 

Google PageSpeed Insights offers insights based on the latest web best practices, GTMetrix provides a combined analysis using Google PageSpeed and YSlow, and Pingdom delivers visual reports and performance grades.

2. Interpret the results and understand key metrics

While these tools generate comprehensive reports, it’s imperative to understand their metrics. Some key parameters to consider include:

  • First Contentful Paint (FCP), which measures the time taken from the moment the page starts loading to when any part of the page’s content is rendered on the screen.
  • Largest Contentful Paint (LCP), which indicates the point when the main content has loaded and is visible to users.
  • Total Blocking Time (TBT), which captures the total amount of time that the main thread is blocked and can’t respond to user inputs. In other words, this is the amount of time that a site visitor is essentially unable to interact with anything on the site. 
  • Cumulative Layout Shift (CLS), which evaluates the visual stability of the site, checking for elements that shift unexpectedly.

Each metric serves a unique role in understanding the holistic health of your site’s speed and performance.

3. Use Jetpack Boost’s actionable performance scores for WordPress sites

The evolving landscape of website optimization calls for tools that are not just informative, but actionable. Jetpack Boost steps into this void, particularly for WordPress sites. It doesn’t just present you with data — it offers actionable solutions, enabling users to directly enhance their website’s performance. 

With Jetpack Boost, WordPress site owners can leap from problem identification to solution implementation swiftly and effectively.

Five essential tips to quickly improve your website speed 

Stepping into the practical realm of speed optimization, the vast array of potential improvements can be daunting. But we’ve distilled the information down to six pivotal strategies that have been tested and proven to yield substantial speed gains. 

As we go through these vital areas, we highlight Jetpack Boost’s capabilities to demonstrate how WordPress website owners can quickly capitalize on these recommendations.

1. Optimize images

The importance of image optimization

Images often constitute the largest share of webpage content. While visually engaging, unoptimized images can hinder a site’s performance considerably. Efficient image compression and optimization ensures that visuals are delivered without compromising speed.

Lossless vs lossy compression

Two primary methods exist for image compression:

  • Lossless Compression. This method reduces file size without any reduction in image quality. Here, redundant data is eliminated, allowing the image to be reconstructed perfectly when it’s displayed.
  • Lossy Compression. With this method, some image data is removed, which results in a slight loss in quality. However, it achieves significantly reduced file sizes.

The choice between these methods depends on the website’s goals and the specific use of each image.

How to make the proper image format selection (JPEG, PNG, WebP)

Here are several options for image formats:

  • JPEG. Best for photographs or images with gradients, it uses lossy compression, which can be adjusted to strike a balance between size and quality.
  • PNG. Suitable for images requiring transparency or fine details, it employs lossless compression, preserving the maximum quality.
  • WebP. A modern format introduced by Google, it offers superior compression and has been gaining widespread acceptance for web use.

Using responsive images and the ‘srcset’ attribute

Responsive images ensure that visitors get the optimal image size based on their device’s screen size and resolution. The ‘srcset’ attribute allows developers to specify multiple image variations, enabling browsers to select the best fit.

A spotlight on Jetpack Boost’s built‑in image optimization capabilities

For WordPress users, Jetpack Boost is an indispensable tool in the image optimization toolkit.

Jetpack Boost shines brilliantly in the realm of image optimization. The Image CDN offloads images, serving them from a global network and ensuring speedy delivery. The Image Guide provides concise best practices, and lazy image loading ensures that images load only when they come into the viewport, conserving bandwidth and enhancing speed. 

For WordPress users, Jetpack Boost is an indispensable tool in the image optimization toolkit.

Learn more about Jetpack Boost here.

2. Reduce your server response time

Factors affecting server response time

Server response time, sometimes referred to as time to first byte (TTFB), is the duration taken by a server to start delivering content in response to a visitor’s request. Here are some of the factors that can influence this:

  • Web hosting. The physical server’s capabilities and configuration play a pivotal role.
  • Traffic volume. An influx of simultaneous visitors can strain server resources.
  • Web software efficiency. The efficiency of a CMS or web applications in use can make a big difference.
  • Database management. Retrieval time from databases can add to delays.

The importance of quality hosting

High-quality hosting is the bedrock of speedy server response. Strong hosting solutions provide optimized hardware, efficient server-side software, and competent support. Moreover, they manage traffic spikes effectively and guarantee uptime.

Utilizing server‑side caching

Caching refers to the practice of storing copies of files in easily accessible locations, so they don’t need to be reprocessed or fetched from scratch for each request. Server-side caching can be broken down into:

  • Bytecode cache, which speeds up scripts by caching their compiled state.
  • Object cache, which saves database query results.
  • Page cache, which stores entire rendered HTML pages.

A spotlight on WP Super Cache for WordPress sites

For WordPress sites, WP Super Cache stands out as the optimal caching solution.

For WordPress sites, WP Super Cache stands out as the optimal caching solution. By creating static HTML files from dynamic WordPress blogs, WP Super Cache significantly reduces server processing. This means that visitors are served a cached page, dramatically improving speed, without realizing they’re viewing a cached version.

This tool, combined with the prowess of Jetpack Boost, empowers WordPress users to achieve much faster websites.

3. Optimize CSS Delivery

The importance of a critical rendering path

The critical rendering path represents the sequence in which a browser processes HTML, CSS, and JavaScript to render a webpage. Critical CSS entails extracting and inlining the necessary CSS for rendering page content above the fold. By focusing on this, it ensures that visitors can see a page’s essential content quickly, even if the complete stylesheet hasn’t loaded.

Eliminating render‑blocking CSS

Every CSS file referenced in an HTML document head is render-blocking by default. This means that the browser will halt rendering until it has fetched and processed these stylesheets. This can be circumvented by either inlining critical CSS or asynchronously loading non-essential stylesheets.

Using Jetpack Boost to optimize CSS loading on WordPress

Jetpack Boost offers tools tailored for WordPress sites to handle render-blocking CSS. The plugin identifies and optimizes CSS delivery, ensuring that a page’s visible content (above-the-fold) loads quickly. Jetpack Boost’s intuitive interface ensures that WordPress users, regardless of their technical acumen, can optimize CSS loading seamlessly.

4. Optimize JavaScript handling

Understanding JavaScript’s impact on performance

JavaScript is instrumental in creating interactive web pages. When mismanaged, however, it can become a significant impediment to load times. Browsers must not only download JavaScript files, but also parse and execute them. When these files are render-blocking, they delay the rendering of web pages, sometimes noticeably so.

Asynchronous and deferred loading of JavaScript

Two popular methods mitigate the render-blocking nature of JavaScript: asynchronous and deferred loading.

Asynchronous loading. Scripts set to load asynchronously will be processed at the same time as the rest of the page’s content. This means that visitors’ browsers won’t experience downtime because they’ll keep working while the code is executed in the background.

Deferred loading. When scripts are deferred, they maintain their appropriate order, so the first will be executed while the browser waits to load the others in turn. 

The easiest speed optimization plugin for WordPress

Jetpack Boost gives your site the same performance advantages as the world’s leading websites, no developer required.Boost your site for free

Leveraging Jetpack Boost for efficient JavaScript loading

Jetpack Boost takes the intricacies of JavaScript loading into account. It offers features that automatically handle JavaScript files, ensuring that they don’t stand in the way of rapid content rendering.

With a few simple clicks, WordPress administrators can set up the optimal loading strategy for their scripts, enhancing site performance without getting into the complexities of JavaScript. 

5. Use a content delivery network (CDN)

What is a CDN, and why is it beneficial?

A content delivery network, commonly referred to as CDN, is a network of servers strategically located across different parts of the world. These servers store cached versions of static content from websites, such as images, stylesheets, and JavaScript files. 

When a user accesses a website, the CDN loads this content from the nearest server, reducing the distance that information needs to travel. The result? Faster load times, reduced strain on the primary server, and an enhanced user experience.

How CDNs work to improve site speed

CDNs use a principle of proximity. Without a CDN, every visitor to a site fetches content from the main server, which could be continents away. This distance leads to latency. 

CDNs reduce this by duplicating and storing content across a vast network of servers. When a user makes a request, the nearest server responds, reducing the time taken to load the content.

A spotlight on Jetpack Boost’s image CDN

Jetpack Boost harnesses the power of a CDN specifically for images, a common culprit for slow site speeds.

Jetpack Boost harnesses the power of a CDN specifically for images, a common culprit for slow site speeds. The Image CDN optimizes and serves images from a global network, ensuring that visuals load quickly and seamlessly regardless of where a visitor is accessing the site. 

Additionally, it adapts images to the user’s device and connection speed, ensuring optimal delivery every time.

Best practices to follow when improving your website speed

1. Choose a fast SSD hosting provider

Selecting the right hosting provider is the first step towards ensuring a website’s high performance. Solid-state drive (SSD) hosting, compared to traditional hard disk drive (HDD) hosting, offers superior speed and reliability. 

The core advantage of SSD hosting lies in its lack of moving parts, leading to faster data access times. The immediate benefit for a website is prompt page loading, resulting in a seamless experience for the end user.

2. Prioritize mobile website speed

With the exponential growth of mobile device usage, optimizing for mobile speed is no longer an option, but a necessity. Mobile users tend to be less patient, expecting near-instantaneous site loads. 

Slow mobile speeds can drastically increase bounce rates and diminish user engagement. Ensuring that your site is responsive, with elements tailored for smaller screens, can significantly reduce load times and cater to this vast user segment.

3. Optimize your website’s Core Web Vitals

Google’s introduction of Core Web Vitals emphasized the user experience in terms of loading, interactivity, and visual stability. Meeting these benchmarks is not just about ticking boxes for search engine optimization. It directly corresponds to how users perceive and interact with your site. A site that excels in these metrics could see increased dwell times, lower bounce rates, and higher engagement.

4. Reduce third‑party scripts (or host them locally)

Every script that a website runs can add to its load time, especially if these scripts are fetched from third-party sources. It’s prudent to evaluate the necessity of each third-party script. If they are crucial, consider hosting them locally, which provides more control over their loading and execution, ultimately streamlining the process.

5. If you’re on WordPress, install a speed optimization plugin

Speed optimization plugins fine tune various aspects of WordPress performance. This is where Jetpack Boost shines.

The Jetpack Boost advantage

WordPress site owners have a robust tool at their disposal in the form of Jetpack Boost. This WordPress speed optimization plugin is meticulously designed to tackle the typical speed challenges WordPress sites face. Here’s a brief overview of its offerings:

One-click features. Jetpack Boost doesn’t bury its features behind a maze of menus. With a simple and intuitive interface, users can activate key optimizations with a single toggle, making the process not only effective, but also time-efficient.

Core Web Vitals optimization. Recognizing the importance of Google’s Core Web Vitals, Jetpack Boost focuses its efforts on these pivotal performance metrics. From Largest Contentful Paint (LCP) to First Input Delay (FID) and Cumulative Layout Shift (CLS), this tool addresses the elements that matter in today’s SEO landscape.

Defer non-essential scripts. By delaying the loading of certain non-essential JavaScript until user interaction, Jetpack Boost ensures that the primary content loads rapidly, enhancing the user experience and improving perceived site speed.

Critical CSS generation. Jetpack Boost identifies and prioritizes the most crucial CSS for your site’s above-the-fold content, ensuring that it loads first. This improves site speed and offers users a smoother visual experience, eliminating the distracting shifts that can occur when non-critical CSS loads ahead of essential styles.

Image optimization. While images enhance the visual appeal of a site, they can also be significant contributors to slowdowns. Jetpack Boost addresses this challenge head-on, offering tools that optimize images without compromising quality.

Frequently asked questions about website speed

Why is website speed important?  

Website speed is crucial because it directly influences visitor satisfaction, bounce rates, and conversion rates. Fast-loading sites offer users a more seamless experience, leading to longer site visits and increased interaction. Conversely, delays can lead to decreased trust and reduced user engagement.

How does website speed impact user experience and conversions?

Website speed plays a decisive role in shaping first impressions. Visitors expect rapid, responsive interactions with web pages. Delays can trigger user frustration, causing them to abandon the site — resulting in missed opportunities for engagement, sales, or conversions.

How does website speed affect SEO?  

Search engines, notably Google, consider page speed when ranking websites. Faster sites generally receive better rankings, increasing their visibility to potential visitors. A slow website can thus result in reduced organic traffic.

What are the main factors that slow down a website?  

Multiple elements can bog down a site. Bulky images, excessive third-party plugins or scripts, unoptimized code, non-responsive design, inadequate hosting solutions, and not employing caching mechanisms are some prevalent culprits.

How do I prioritize which speed optimizations to tackle first?  

Begin with a comprehensive website speed test to identify the most pressing issues. Often, the most significant gains come from optimizing images, leveraging browser caching, and reducing third-party scripts. Addressing these areas can yield immediate improvements.

How often should I check my website’s speed?  

It’s advisable to monitor website speed after any significant content or design update. However, as a best practice, performing a monthly check can help you preemptively identify and rectify any emerging issues.

What are Google’s Core Web Vitals, and why are they crucial?  

Google’s Core Web Vitals are a set of metrics that focus on user experience — loading performance, interactivity, and visual stability. As these metrics influence Google’s ranking process, it’s essential for website owners to optimize for them to ensure maximum visibility in search results.

How do I know if my website is mobile optimized?  

Mobile optimization can be assessed using tools like Google’s Mobile-Friendly Test. An optimized site will be easy to navigate on mobile devices, with appropriately sized text and easily clickable elements.

What’s the difference between browser caching and server-side caching?  

Browser caching stores website resources on a user’s device, reducing the need to fetch them during subsequent visits. Server-side caching, on the other hand, involves storing a static version of your website on the server, which can be served to users, reducing the need to generate a page dynamically for each visit.

How do images impact website load times?  

Images often constitute the bulk of a webpage’s size. If not appropriately optimized, they can substantially increase load times. Compressed and properly formatted images ensure quick page loads while retaining visual quality.

How does hosting impact website speed?  

The quality of your hosting provider plays a pivotal role. A robust hosting solution ensures fast server response times, efficient resource allocation, and a higher overall uptime, translating to a speedier website.

Can advertisements slow down my website?  

Yes, advertisements, especially those fetched from third-party servers, can slow down your site. It’s essential to manage and optimize ad scripts, so they don’t degrade overall site performance.

What is the easiest way to speed up a WordPress site?  

For WordPress users, employing a speed optimization plugin like Jetpack Boost can lead to immediate performance gains. This tool, with one-click features, streamlines the optimization process, addressing many common issues that slow down WordPress sites.

Jetpack Boost: WordPress speed optimization made easy

Amid the digital clamor and ever-evolving landscape of website design and optimization, having a reliable tool in one’s repertoire can make the difference between site success and stagnation. 

There’s a myriad of WordPress plugins designed to enhance site performance, but few bring together the trifecta of efficiency, effectiveness, and ease-of-use quite like Jetpack Boost.

Understanding the power of Jetpack Boost

Jetpack Boost is a solution designed with the end user in mind. While many optimization tools require an understanding of intricate coding nuances or hours spent configuring intricate settings, Jetpack Boost simplifies the process into a simpler approach, making speed optimization accessible to all, irrespective of technical know-how.

Learn more about Jetpack Boost and get started today for free: https://jetpack.com/boost/

This entry was posted in Performance. Bookmark the permalink.


Jen Swisher

Jen is a Happiness Engineer for Jetpack. She has been working with WordPress and Jetpack for over a decade. Prior to starting at Automattic, Jen has helped small businesses, local non-profits, and Fortune 50 companies create engaging web experiences for their customers. She is passionate about teaching others how to create on the web without fear.

The easiest speed optimization plugin for WordPress

Jetpack Boost gives your site the same performance advantages as the world’s leading websites, no developer required.Boost your site for free

Editor says …Sterling Publishing & Media Service Agency is not responsible for the content of external site or from any reports, posts or links and thanks for following as always appreciate every like, reblog or retweet and comment thank you

@acenewsservices
@acenewsservices
Categories
WORDPRESS

BREAKING ALERT WORDPRESS SECURITY TEAM REPORT: Alert: Impersonation Scams

@acenewsservices

AceBreakingNews – The WordPress Security Team is aware of multiple ongoing phishing scams impersonating both the “WordPress team” and the “WordPress Security Team“ in an attempt to convince administrators to install a plugin on their website which contains malware

@acenewsservices

Ace Press News From Cutting Room Floor: Published: Dec.05: 2023: Published: December 4, 2023 By Peter Wilson Thank you Aaron Jorbin, Otto, Dion Hulse, Josepha Haden Chomphosy, and Jonathan Desrosiers for their collaboration on and review of this post: TELEGRAM Ace Daily News Link https://t.me/+PuI36tlDsM7GpOJe

Screenshot of email sent by a WordPress.org email account. The details include "mailed-by wordpress.org" and "signed-by wordpress.org".
@acenewsservices

The WordPress Security Team will never email you requesting that you install a plugin or theme on your site, and will never ask for an administrator username and password.

If you receive an unsolicited email claiming to be from WordPress with instructions similar to those described above, please disregard the emails and indicate that the email is a scam to your email provider.

These emails link to a phishing site that appears to be the WordPress plugin repository on a domain that is not owned by WordPress or an associated entity. Both Patchstack and Wordfence have written articles that go in to further detail.

Official emails from the WordPress project will always:

  • Come from a @wordpress.org or @wordpress.net domain.
  • Should also say “Signed by: wordpress.org” in the email details section.

The WordPress Security Team will only communicate with WordPress users in the following locations:

The WordPress Plugin team will never communicate directly with a plugin’s users but may email plugin support staff, owners and contributors. These emails will be sent from plugins@wordpress.org and be signed as indicated above.

The official WordPress plugin repository is located at wordpress.org/plugins with internationalized versions on subdomains, such as fr.wordpress.org/pluginsen-au.wordpress.org/plugins, etc. A subdomain may contain a hyphen, however a dot will always appear before wordpress.org.

A WordPress site’s administrators can also access the plugin repository via the plugins menu in the WordPress dashboard.

As WordPress is the most used CMS, these types of phishing scams will happen occasionally. Please be vigilant for unexpected emails asking you to install a theme, plugin or linking to a login form.

The Scamwatch website has some tips for identifying emails and text messages that are likely to be scams.

As always, if you believe that you have discovered a security vulnerability in WordPress, please follow the project’s Security policies by privately and responsibly disclosing the issue directly to the WordPress Security team through the project’s official HackerOne page.

@acenewsservices

Editor says …Sterling Publishing & Media Service Agency is not responsible for the content of external site or from any reports, posts or links and thanks for following as always appreciate every like, reblog or retweet and comment thank you

@acenewsservices
@acenewsservices
Categories
WORDPRESS

FEATURED WordPress REPORT: Upcoming Update: Jetpack’s Lazy Loading Feature Deprecation

@acenewsservices

AceNewsDesk – Jetpack and Jetpack Boost have long been champions of optimizing site performance, with features like lazy loading images being instrumental in reducing load times. However, in light of recent technological advancements, we’re here to inform you about the deprecation of this feature to align with the latest web standards

Ace Press News From Cutting Room Floor: Published: Nov.03: 2023: Updated on November 3, 2023: Jetpack News by ali ugurlu – TELEGRAM Ace Daily News Link https://t.me/+PuI36tlDsM7GpOJe

@acenewsviews

The Evolution of Lazy Loading in WordPress

WordPress has been incorporating native lazy loading since version 5.5, making external JavaScript solutions redundant for the majority of users. The upcoming WordPress 6.4 and Gutenberg 16.6.0  releases introduce changes that conflict with our current lazy loading feature. To ensure top performance and avoid redundancies, we will be deactivating and eventually removing this feature from Jetpack and Boost plugins. This gradual phase-out helps maintain transparency and reduces confusion for our users.

What This Means for You

With native browser support covering most user needs, manually enabling lazy loading is no longer necessary. The feature will be disabled automatically with the update to WordPress 6.4+ or Gutenberg 16.6.0+, ensuring your website’s loading efficiency remains optimized.

Future Plans

The Jetpack Boost team is committed to delivering superior image optimization solutions and may further enhance WordPress’s native lazy loading in future updates. Keep an eye on our developments as we continue to push the envelope in site performance optimization.

To stay up-to-date with the latest improvements and ensure a seamless transition, we encourage you to update your Jetpack and Jetpack Boostplugins. By keeping your plugins current, you’ll be equipped with the latest tools to keep your site running swiftly and smoothly.

We appreciate your understanding and are excited to continue providing top-tier performance enhancements for your WordPress site. For the latest updates and optimization tips, keep following our blog.


Editor says …Sterling Publishing & Media Service Agency is not responsible for the content of external site or from any reports, posts or links and thanks for following as always appreciate every like, reblog or retweet and comment thank you

@acenewsservices
@acenewsservices
Categories
WORDPRESS

WordPress BUSINESS SITE REPORT: The Different Types of CRM Software and Which to Choose Using Jetpack Plugin

@acenewsservices

AceBusinessNews – As we immerse ourselves in business growth and customer relationship management (CRM), we’re confronted by a kaleidoscope of tools and technologies, each promising to propel us to new heights. But among these, CRM software stands out.

@acenewsviews

Ace Press News From Cutting Room Floor: Published: Oct.20: 2023: WordPress News Updated on October 19, 2023 – Rob Pugh: TELEGRAM Ace Daily News Link https://t.me/+PuI36tlDsM7GpOJe

@acenewsservices

Why? Because it’s at the heart of many successful businesses. It keeps companies connected to their customers and allows organizations to understand consumers in ways we couldn’t have imagined just a few decades ago.

Let’s embark on a deep dive into CRM systems and, in particular, Jetpack CRM, a robust open-source solution with a wealth of benefits, designed for WordPress sites.

Key features to look for in a CRM

Every successful business venture begins with the right tools, and CRM software is one of the indispensable ones. But not all solutions are created equal. Below are some key features you should look for when choosing a CRM:

1. Contact management

Jetpack CRM homepage
@johnny2pencils

This is the core of any CRM system. A well-designed contact management solution is like a central nervous system, collecting and organizing all of your customer information in one place. 

With a solid contact management feature, you can store comprehensive customer details, including their interaction history with your business, preferences, and personal details. All of this information helps you provide personalized interactions in the future.

2. Interaction tracking

Tracking interactions means recording every touchpoint with your customers, from emails, calls, and social media chats, to face-to-face meetings. This visibility into your customer interactions helps your team maintain continuity in conversations and interactions, thus fostering stronger relationships.

3. Lead management

A CRM with robust lead management capabilities helps your business nurture potential customers through your sales funnel by tracking their interactions and engagement, allowing your sales team to step in at just the right time to seal the deal.

4. Email integration

A CRM with integrated email capabilities helps manage your email communication from the same place as the rest of your customer management. This means your team can send, receive, and track emails directly from the CRM, keeping a clear record of every communication and maximizing the efficiency of your sales and support teams. 

5. Document storage and management

Storing all your important documents in a centralized location makes it easier for your team to locate, share, and collaborate on these resources. Moreover, linking these documents to specific customers or deals can be useful for future reference.

6. Workflow automation

Workflow automation streamlines routine tasks, such as sending out follow-up emails, scheduling appointments, or updating records. This feature frees up your team to focus on what truly matters — building relationships and closing deals.

7. Reporting and analytics

A CRM with powerful reporting and analytics features turns your customer data into actionable insights. With detailed reports and dashboards, you can track key metrics, spot trends, and make informed decisions.

8. Mobile access

Mobile access enables your team to work with CRM data from anywhere, at any time. It ensures that, even when on the go, your staff remains connected and has access to critical customer information.

9. Third‑party integrations

Your CRM should seamlessly integrate with other business tools you use. These might include marketing automation tools, customer support systems, or accounting software. These integrations enhance the functionality of your CRM and eliminate the need for data duplication.

The different types of CRM systems

When it comes to CRM systems, one size does not fit all. Different CRM types are designed with specific functionalities and business needs in mind.

1. Operational CRM

What is an operational CRM?

An operational CRM system focuses on streamlining and automating business processes related to customer interactions in sales, marketing, and service departments. This type of CRM allows you to manage your leads, customers, and opportunities effectively.

Benefits of an operational CRM

Operational CRMs improve efficiency and productivity by automating routine tasks, enabling your team to focus more on your customers. They also enhance customer service by providing complete information, thus enabling personalized interactions.

When to use an operational CRM

If your business prioritizes streamlining customer-facing processes and needs a system to manage day-to-day customer interactions effectively, an operational CRM would be the best fit.

2. Analytical CRM

What is an analytical CRM?

Analytical CRMs utilize data analysis to understand and improve customer relationships. It involves collecting customer data from various touchpoints, reviewing it, and leveraging insights to enhance satisfaction and loyalty.

Benefits of an analytical CRM

Analytical CRMs help businesses understand their customers better, enabling personalized marketing campaigns, improving retention, and increasing sales. They also aid in strategic decision-making by providing insightful reports and dashboards.

When to use an analytical CRM

If your business wants to gain more, in-depth insights into customer behavior and utilize data to enhance their experiences, an analytical CRM system is the right choice.

3. Collaborative CRM

What is a collaborative CRM?

A collaborative CRM focuses on enhancing communication and collaboration between teams within an organization and with external partners. It shares data across departments and partners to provide a holistic view of the customer.

Benefits of a collaborative CRM

Collaborative CRMs foster teamwork and coordination, ensuring everyone is on the same page regarding customer interactions. They enhance customer service by providing comprehensive information, resulting in improved satisfaction.

When to use a collaborative CRM

If your business aims to enhance interdepartmental collaboration and communication to deliver a seamless customer experience, a collaborative CRM system is a great choice.

4. Strategic CRM

What is a strategic CRM?

A strategic CRM centers around the development and execution of customer-centric strategies. It uses customer information to build strong relationships and aligns the business strategy with the needs and preferences of each client.

Benefits of a strategic CRM

Strategic CRMs help businesses build long-term relationships with their customers by ensuring their needs and preferences are at the core of the business strategy. It improves loyalty and retention, leading to increased profitability.

When to use a strategic CRM

If your business is focused on developing and executing customer-centric strategies for long-term success, a strategic CRM system is the way to go.

Key factors to consider when choosing a CRM solution

Choosing the right CRM solution can be a daunting task. Here are some key factors you should consider when making a choice:

1. Scalability and customization

The CRM you choose should be able to scale with your business and allow customization to fit your unique needs. Your business will grow and evolve, and so too should your CRM.

2. Integration capabilities

Your CRM should integrate seamlessly with other systems and tools your business uses. This will ensure a smooth flow of information across different platforms and reduce the risk of data silos.

3. User experience and interface

The CRM’s user experience and interface should be intuitive and simple. If your team finds it difficult to navigate and use the system, they’re less likely to adopt it fully.

4. Pricing and total cost of ownership

Consider the CRM’s pricing and the total cost of ownership, including implementation, training, and maintenance costs. Be sure the CRM provides value for money and aligns with your budget.

How to choose the right CRM for your business

Choosing the right CRM is crucial for the success of your business. Here are some steps you can follow to ensure you make the right choice:

1. Define your business needs and objectives

Start by identifying your business needs and objectives. What problems are you trying to solve? What are your goals? The answers to these questions will guide you towards the right CRM.

2. Identify your budget and ROI objectives

Define your budget and expected return on investment (ROI). Make sure the CRM solution you choose fits into your plans.

3. Evaluate the ease of use and implementation

Ease of use and implementation are critical to the success of a CRM system. The CRM should be user-friendly to encourage maximum adoption and usage by your team. Also, consider how long it will take to implement the CRM and how much disruption it may cause to your business operations.

4. Consider customization options

Your CRM should allow for customization to fit your business’s unique needs and workflows. With customization, you can tailor the CRM to match your processes rather than changing your processes to fit the CRM.

5. Assess vendor support and reputation

Look at the vendor’s reputation in the market and their customer support. You want to choose a CRM provider who will be there to support you throughout your journey.

6. Look into scalability

Ensure the CRM can scale as your business grows. You don’t want to invest time and resources into a system, only to outgrow it in a few years.

Common mistakes to avoid when choosing a CRM

While the right CRM can transform your business, a poorly chosen one can lead to frustration and wasted resources. Here are some common mistakes to avoid when choosing a CRM:

1. Not setting clear objectives

Without clear objectives, you’re likely to choose a CRM based on just a list of features and not on what your business truly needs. Always start with clear objectives before choosing a CRM.

2. Not involving all stakeholders

The input of all users of the CRM, from salespeople to managers, is essential when choosing a CRM. Their insights can help you choose one that meets the needs of everyone in your organization.

3. Underestimating training needs

A CRM is a powerful tool, but without proper training, your team may not fully utilize it. Ensure you have a comprehensive training plan in place for your team.

4. Not considering scalability

As mentioned earlier, your CRM should be able to grow with your business. Ignoring scalability can lead to costly upgrades or system changes down the line.

5. Ignoring integration capabilities

Your CRM needs to work in harmony with your existing tools and systems. Ignoring integration capabilities can lead to data silos and inefficiencies.

6. Overlooking customization capabilities

Every business is unique. Failing to consider customization capabilities can result in a CRM that doesn’t align with your workflows and processes.

7. Skimping on customer support

Good customer support is vital for the successful implementation and usage of your CRM. Skimping on this aspect can leave you stranded when you encounter issues or need guidance.

8. Not taking advantage of CRM demos or trials

Demos and trials give you a hands-on experience of the CRM before making a decision. Not taking advantage of these can result in unforeseen issues after purchase.

9. Neglecting the importance of a user‑friendly interface

A user-friendly interface is crucial for the successful adoption of your CRM. If your team finds the CRM difficult to use, they’re less likely to use it to its full potential.

How to successfully implement a CRM

Implementing a CRM is a critical task that requires careful planning and execution. Here’s how to do it right:

1. Get buy‑in from your team

Change can be daunting, and the introduction of a new CRM is no exception. Ensure you get buy-in from your team by explaining the benefits of the CRM and how it will make their jobs easier.

2. Set up and customize your CRM

Take time to set up your CRM properly, including customization to fit your workflows and processes. The initial setup of your CRM can determine how well it serves your business.

3. Train your team on how to use the CRM

A CRM is only as good as the people using it. Train your team on how to use the CRM effectively, and encourage them to explore and learn the system.

4. Continually update and adapt your CRM strategy

Your CRM strategy should not be static. As your business evolves, so too should your CRM strategy. Regularly review and update your strategy based on changing business needs and insights from your CRM data.

5. Monitor and analyze CRM data for insights

Your CRM is a treasure trove of data. Regularly monitor and analyze this data to gain insights into your customers, business performance, and more.

A deep dive into Jetpack CRM: A versatile & open‑source CRM

Jetpack CRM is a comprehensive, open-source CRM designed specifically for WordPress. But what makes Jetpack CRM stand out? Let’s take a deep dive into this versatile CRM.

The many features and benefits offered by Jetpack CRM

Jetpack CRM comes packed with powerful features that make managing customer relationships a breeze. These include a contact management system that lets you store and manage customer information efficiently, an interaction tracking feature that keeps a record of every customer touchpoint, and a robust lead management system that helps you nurture leads and convert them into customers.

But that’s not all. Jetpack CRM also offers email integration, allowing you to manage all your email communication within the CRM. Document storage and management capabilities make it easy to store, share, and collaborate on documents. Workflow automation, reporting and analytics, mobile access, and third-party integrations further enhance the functionality of this CRM.

Jetpack CRM caters to the different CRM types

Whether your business needs an operational, analytical, collaborative, or strategic CRM, Jetpack CRM has you covered. Its versatility allows it to cater to the different CRM types, making it a suitable choice for a wide range of businesses.

Jetpack CRM integrates seamlessly with WordPress 

Jetpack CRM is built specifically for WordPress, which means it integrates seamlessly with your WordPress site. This allows you to manage your customer relationships directly from your WordPress dashboard, resulting in a smooth and efficient workflow.

Frequently asked questions

As we wrap up, let’s answer some frequently asked questions about CRM software and Jetpack CRM.

What is a CRM?

CRM, or Customer Relationship Management, is a strategy or system for managing a company’s interactions with its customers. A CRM system centralizes customer data and automates certain processes to enhance customer service and drive sales.

What are the benefits of a CRM for a business?

A CRM offers numerous benefits to businesses, including improved customer service, increased sales, enhanced productivity, valuable insights into customer behavior, improved collaboration within your team, and better decision-making due to the availability of accurate and up-to-date data.

What are the different pricing models for CRM software?

CRM software can be priced in a variety of ways. This includes subscription pricing, where you pay a monthly or annual fee to use the software, perpetual licensing, where you make a one-time payment to use the software indefinitely, and usage-based pricing, where the cost is based on the number of users or the volume of data. Some CRM software, like Jetpack CRM, is open-source and free to use, though premium add-ons may be available for a fee.

What are the advantages of using open‑source CRM software?

Open-source CRM software offers several advantages. This includes flexibility and customization, as you can modify the software to fit your unique needs. Open-source software is also cost-effective, as it is usually free to use. Furthermore, open-source CRM software, like Jetpack CRM, benefits from a community of developers who regularly contribute improvements and updates to the software.

Which type of CRM software is best for a small business?

The best CRM software for a small business depends on the specific needs of the business. That being said, an operational CRM, which automates day-to-day operations, can be a good choice for small companies looking to increase efficiency. A CRM like Jetpack CRM, which is versatile and caters to the different CRM types, can also be a suitable choice.

Which type of CRM software is best for an ecommerce business?

For ecommerce businesses, a CRM that offers strong customer data management, marketing automation, and reporting and analytics features can be beneficial. Jetpack CRM, with its robust feature set and integration with WordPress, is a fantastic choice for ecommerce businesses running on the WordPress platform.

Jetpack CRM: The CRM of choice for companies using WordPress

In conclusion, choosing the right CRM software is a critical decision that can significantly impact your business. By understanding the different types of CRM systems and the key features to look for, you can make an informed choice that aligns with your business needs.

If your business uses WordPress, Jetpack CRM is a powerful and versatile CRM solution that offers a comprehensive feature set, caters to the different CRM types, and integrates seamlessly with your WordPress site. With Jetpack CRM, managing customer relationships becomes a breeze, allowing you to focus on what truly matters: building meaningful relationships with your customers and growing your business.

So, if you’re ready to transform your customer relationship management, we invite you to give Jetpack CRM a try. Because in the end, it’s not just about choosing a CRM — it’s about choosing a partner that will support your business in its journey to success.

Learn more about Jetpack CRM and get started today: https://jetpackcrm.com/

This entry was posted in Learn. Bookmark the permalink.


Rob Pugh

Rob is the Marketing Lead for Jetpack. He has worked in marketing and product development for more than 15 years, primarily at Automattic, Mailchimp, and UPS. Since studying marketing at Penn State and Johns Hopkins University, he’s focused on delivering products that delight people and solve real problems.

Explore the benefits of Jetpack

Learn how Jetpack can help you protect, speed up, and grow your WordPress site.

Get up to 53% off your first year.Compare plans

@acenewsviews

Editor says …Sterling Publishing & Media Service Agency is not responsible for the content of external site or from any reports, posts or links and thanks for following as always appreciate every like, reblog or retweet and comment thank you

@acenewsviews
@acenewsviews
Categories
WORDPRESS

WORDPRESS JETPACK PLUGIN REPORT: The 10 Best Social Media Management Tools for Businesses

@acenewsservices

AceSocialDesk – 93% of internet users have at least one social media account, which makes social media an excellent opportunity to connect with your audience, no matter what type of business you run

@acenewsservices

Ace Press News From Cutting Room Floor: Published: Sept.15: 2023: WordPress Updated on September 14, 2023 – Simon Keating: TELEGRAM Ace Daily News Link https://t.me/+PuI36tlDsM7GpOJe

@acenewsservices

But when you need to manage social media accounts while also writing content, marketing across other platforms, and running every other aspect of your company, it can be a bit like trying to juggle a dozen balls in the air.

Thankfully, there’s a wide range of social media management tools for business that can help you run your social media, so you can focus on what’s most important.

In this helpful guide, we’ll help you decide on the best social media management tool for your business. We’ll explore ten of the best options, look at the key features you should keep in mind, and answer your burning questions about social media management software. 

Jetpack Social homepage
@acenewsservices

1. Jetpack Social

Jetpack Social is one of the best social media management tools for WordPress website owners, allowing you to easily share your content on various channels. This social media management plugin is trusted by tens of thousands of WordPress site owners, who collectively share over one million posts a day.

Jetpack Social has easy-to-use tools that allow you to schedule posts to publish at the date and time your audience is most engaged on a particular platform. Plus, it enhances your content strategy by making it easy to reshare posts for the perfect stream of evergreen media on your feed.

example of images shared with Jetpack Social
@acenewsservices

Social media posts with images create up to 2.3x higher engagement than those without. Jetpack Social’s image generator enables you to always include the perfect graphics with your posts.

It will automatically look at the images in the post and select the ones in the best dimensions for each social media platform. If your post includes a video, Jetpack Social will also allow you to share this directly on your social media post.

Simply sharing links to a post on your site likely won’t get much attention. But when you upload a curated image and take the time to add a bit of written context, suddenly that post is much more alluring to followers. 

Jetpack’s tools mimic this curated approach to social media while streamlining processes so social media managers (or small business owners) can work much more efficiently. 

Jetpack Social also works perfectly alongside the social sharing tools in the Jetpack plugin, which automatically add buttons for visitors to share their favorite content on their own profiles with just a few clicks.

Created by the team behind WordPress.com, Jetpack Social is a safe, robust, solution for WordPress sites. It integrates seamlessly with the latest version of WordPress and is supported by true WordPress experts.

settings for Jetpack Social
@acenewsservices

Key features of Jetpack Social:

  • The ability to post and share your WordPress site’s content to Facebook, Tumblr, LinkedIn, Instagram, and Mastodon
  • Tools to customize the content of your posts
  • Options to reshare existing content
  • A scheduler for auto-posting 24/7
  • Unlimited shares (paid plans)
  • An image generator (advanced plan)
  • Multi-image sharing (advanced plan)
  • Video sharing (advanced plan)

Pros of Jetpack Social:

  • Jetpack Social makes it easy to share your WordPress website’s content on social media, enabling you to expand the audience for your content beyond your site visitors.
  • You can manage your social media sharing from within your WordPress dashboard.
  • The plugin’s scheduling feature enables you to post your content at the time that’s best for your audience, without having to be online.
  • Jetpack Social allows you to share the best images or videos from your post along with custom text, which creates the illusion of manually-created social media posts. 

Cons of Jetpack Social:

  • Jetpack Social is designed to make sharing your website’s content with followers simple, but it won’t share posts with content that’s not already on your site.  

Ease of use

Jetpack Social is user-friendly. It guides you through the process of connecting your social accounts, so you can begin using the plugin and sharing your posts within minutes of installation. You can also take advantage of documentation, along with email and live chat support from Jetpack’s Happiness Engineers.

Pricing

Jetpack Social’s free plan allows you to share up to 30 posts per month. The Basic plan allows unlimited sharing for just $3.99 a month, and the Advanced plan unlocks all features, including image sharing, for only $12.99 a month.

@acenewsservices
Editor says …Sterling Publishing & Media Service Agency is not responsible for the content of external sites or from any reports, posts or links thanks for following as always appreciate every like, reblog retweet and comment thank you 
@acenewsservices
Categories
WORDPRESS

WATCH: How to contribute to WordPress by just being helpful

@acenewsservices

If you’re the type of person who likes to help others, then one of the least complicated ways you can contribute to WordPress is helping out in the …

How to contribute to WordPress by just being helpful
@peacewriter51 @johnny2pencils